


2
Introduction
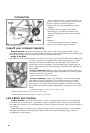
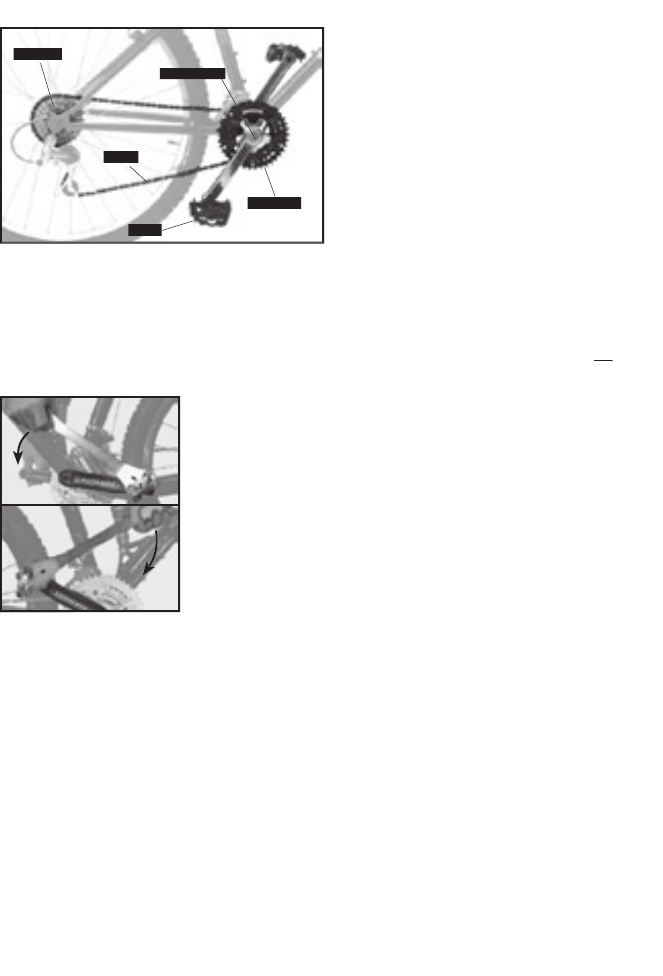
Figure 2- Drivetrain parts
Figure 2- Drivetrain parts
Chain
Crankset
Crank bolt
Crank bolt
Pedal
Cassette
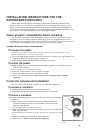
Figure 3 Tightening pedals
Figure 3 Tightening pedals
The crankset is part of the drivetrain, the
group of parts on the bicycle that transmit
power to the rear wheel (Figure 2):
• Pedals (and toe-clip assemblies on some
models)
• Crankset- left and right crank arms,
chainring(s), and bottom bracket (the
axle and bearings on which the crankset
rotates).
• Chain
• Cassette
This section explains how to inspect,
adjust, and lubricate your crankset.
Inspect your crankset regularly
Inspect your crankset regularly
Once a month
Once a month
check that the chain is clean, free of rust, and properly oiled. A dirty
chain can prematurely wear the chainrings. All links of the chain should pivot smoothly and
chain can prematurely wear the chainrings. All links of the chain should pivot smoothly and
without squeaking, and no links of the chain should be deformed.
without squeaking, and no links of the chain should be deformed.
Every 3 months
Every 3 months
check your chain for wear with a chain wear gauge or a ruler. Each
full link of a new chain measures one inch. If 12 links of your chain measures 12
full link of a new chain measures one inch. If 12 links of your chain measures 12
1/8
check your chain for wear with a chain wear gauge or a ruler. Each
1/8
check your chain for wear with a chain wear gauge or a ruler. Each
inches
or more, it should be replaced. With good maintenance, a chain
usually lasts 1000 to 1500 miles. A worn chain will cause the
chainrings of your crankset to wear prematurely. Replacing the
chain takes special tools and training and should only be done by
your dealer.
Every 3 months
inspect your pedals. Tighten the pedals into
the crank arms; turn the right pedal clockwise, but the left pedal
counter-clockwise (Figure 3):
• Pedals: 350-380 lb•in (40.2-42.9 Nm).
Every 3 months
inspect the crankset. Clean the chainrings
and inspect them for damage. If any teeth are bent or broken,
have the chainring replaced by your dealer. Note that on some
chainrings, a few teeth have a special shape to enhance shifting.
Also check the bottom bracket adjustment, and tighten the crank
bolts:
• Crank bolt (Figure 2): 360-415 lb•in (41-47 Nm)
• Chainring bolts (steel): 70-95 lb•in (7.9-10.7 Nm)
• Chainring bolts (steel): 70-95 lb•in (7.9-10.7 Nm)
• Chainring bolts (aluminum alloy): 72-80 lb•in (8-9 Nm)
• Chainring bolts (aluminum alloy): 72-80 lb•in (8-9 Nm)
Lubrication and cleaning
Lubrication and cleaning
Once a month
Once a month
clean and oil the chain. Place a rag behind the chain to avoid getting
oil on the rest of the bicycle. Use Wrench Force® synthetic chain lube or similar lubrica-
oil on the rest of the bicycle. Use Wrench Force® synthetic chain lube or similar lubrica-
tion. See your dealer for a recommended oil. After oiling your chain, wipe off the excess oil
tion. See your dealer for a recommended oil. After oiling your chain, wipe off the excess oil
with a rag.
with a rag.
When installing a threaded part, apply a small amount of bicycle grease to the threads,
When installing a threaded part, apply a small amount of bicycle grease to the threads,
except for aluminum chainring bolts. With aluminum chainring bolts apply a drop of
except for aluminum chainring bolts. With aluminum chainring bolts apply a drop of
Loctite 222 to the threads.
Loctite 222 to the threads.