


25
Trigger
Warning!
Your ANSCHÜTZ target rifle offers you a
versatility of individual adjusting properties.
Please make sure that your rifle always is
unloaded when carrying out adjustments. The
trigger was attached to the sports device and
adjusted in this condition to guarantee utmost
safety. The trigger adjusted by the factory
guarantees utmost safety. Please observe the
general safety use when using your rifle.
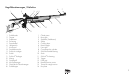
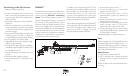
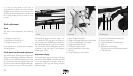
Trigger adjustments
The trigger model 5065 is delivered with the
following adjustments: two stage trigger with
trigger weight adjusted to approx. 100 g.
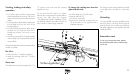
Note!
Screws B and C have been adjusted in the
factory and are sealed. These screws must
not be adjusted or modified.
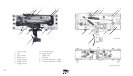
1. Trigger weight
Adjust the trigger weight with set screw F2,
adjustable from 30 g to 170 g:
• if you turn it to the right (clockwise):
trigger weight is increased (+)
• if you turn it to the left (counter-clockwise):
trigger weight is decreased (-)
2. First stage weight (only for two stage
triggers)
Adjust first stage weight with set screw F1:
• if you turn it to the right (clockwise):
first stage weight is increased (+)
• if you turn it to the left (counter-clockwise):
first stage weight is decreased (-)
Trigger weight and first stage weight depend
on each other with regard to the mechanic
mechanism. If one of them is changed there
will always be a corresponding change of
the other as well.
3. Sear engagement
The sear engagement is the distance between
the second stage and the release of the
trigger. The sear engagement has been
adjusted to an optimum by the factory.
Important note!
To protect your precise trigger and to
guarantee perfect operation you should
always close the cocking lever carefully. If
the trigger weight is too low or if the first stage
is too short, the trigger might release
inadvertently by a sudden impact or too
powerful closing of the cocking lever if the
rifle is loaded and not in the ”safe“ position.
4. First stage (only for two stage
triggers)
The single stage is the distance between the
trigger blade from zero position to the second
stage.
Adjust first stage with set screw L:
• if you turn it to the right (clockwise)
first stage is shortened (-)
• if you turn it to the left (counter-clockwise):
first stage is extended (+)
5. Trigger-Stop
The trigger stop is the distance from the se-
cond stage to the stop of the trigger blade.
Adjust trigger stop with set screw T:
• if you turn it to the right (clockwise):
overtravel is shortened (-)
• if you turn it to the left (counter-clockwise):
overtravel is extended (+)
Attention!
The trigger stop set screw T can be turned
over the second stage or first stage function.
Malfunction (the trigger does not release)!
6. Adjustment of the trigger blade
Loosen clamping screws as desired. The
trigger blade can be moved in the
longitudinal guide, can be tilted
laterally and can be adjusted in height. The
trigger blade can also be pulled out
completely and turned by 180°. The longer
part of the trigger blade now is directed
downwards. The trigger blade holder is
asymmetric and can be mounted in opposite
direction (180°). The lateral trigger blade
adjustment can be varied this way.
7. Change of two stage trigger into sin-
gle stage trigger
Adjustment via set screw L. Turn set screw L to
the right (clockwise) until there is no first stage
anymore.