


4
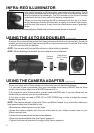
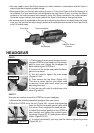
Camera adapterYour Viper
Set screws
Video or 35mm
Camera
• You may need to focus the 35mm camera or video camera in combination with the Viper in
order to get the sharpest possible image.
• We suggest that you find an open space to work in. Focus the Viper so that the scene is at
its sharpest. For best results you should disable the auto focus (if any) on either the 35mm
camera or the video camera and manually focus the 35mm camera or the video camera.
Once the image is sharp, then simply adjust the Viper’s front lens to change the focus.
• An important part to remember is that you are not taking a picture of an object that is far away
from you, but you are actually taking a picture of the phosphorous screen of the Viper that is
only 2-3 inches away.
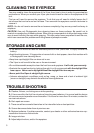
HEADGEAR
PART I
1) The first step that you want to take in mount-
ing your VIPER on your head is to fit the head-
gear to your size. Adjust the headgear fist
befor attaching the VIPER to it.
2) Loosen all the straps and plase the head-
gear on your head.
3) You will want to tighten the side straps
(Figure H1) fist.
4) Then secure the top strep (Figure H2).
This one is rather tight so you might need
to remove it from your head, when you are
adjusting the strap.
5) And last you will want to adjust your chin
strap (Figure H3).
PART II
Now you are ready to mount the VIPER on to your headgear.
1) Remove the already adjausted headgear from your head.
2) Slide the VIPER on to the rail (Figure H4). Loosen the tightening
knob (on the rail) to enable you to easily slide
the unit on. Don’t retighten the knob just yet.
3) Adjust the vertical position of the VIPER to
your comfort and tighten the vertical tigten-
ing screw (Figure H5, #1) and tighten vertical
fixator (Figure H5,#2).
4) To adjust horizontally you may use the vertical tightening screw
(Figure H5, #1).
Figure H1
Figure H2
Figure H3
Figure H4
Figure H5
2
1