


2
CAMERA ADAPTER
(OPTIONAL)
To use your MO5-2 with a 35mm camera or
camcorder you will need the following:
1) If you plan to use a camcorder, then your
camcorder must have a MACRO feature. Most
modern camcorders today have a MACRO fea-
ture built-in.
2) If you plan to use a 35mm camera, you will need
a MACRO lens. If you don’t have one, we advise
that you contact your local camera store.
3) You may or may not need a STEP-UP or
STEP-DOWN ring in order to adapt the camera
adapter to your lens.
NOTE:
The camera adapter comes with 37mm
NOTE: The camera adapter comes with 37mm NOTE:
and 52mm threads. If you need other sizes your
local camera store should be able to help.
• Remove the rubber eyecup from the MO5-2
• Screw the camera adapter onto the front of
the lens on your Video camera’s lens or your
35mm camera’s lens.
• Loosen the three set screws on the camera
adapter.
• Place the camera adapter over the MO5-2’s
eyepiece.
• Tighten the three set screws to fit snugly to the
MO5-2’s eyepiece
• You may need to focus the 35mm camera or
video camera in combination with the MO5-2 in
order to get the sharpest possible image.
• We suggest that you find an open space to work
in. Focus the MO5-2 so that the scene is at its
sharpest. For best results you should disable
the auto focus (if any) on either the 35mm
camera or the video camera and manually
focus the 35mm camera or the video camera.
Once the image is sharp, then simply adjust
the MO5-2’s front lens to change the focus.
*An important part to remember is that you are
not taking a picture of an object that is far away
from you, but you are actually taking a picture
of the phosphorous screen of the MO5-2 that is
only 2-3 inches away.
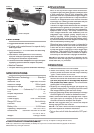
INFRA-RED ILLUMINATOR
Infra-red (IR) Illuminators are common for
night vision technology. The IR light greatly
enhances the performance of your scope,
while remaining almost totally invisible to the
naked eye. In a dark environment, power up
the scope and observe a scene with the IR
off. Then observe the same scene with the
IR on. Note the difference in illumination. It is
important to remember that the IR illuminator
is simply an infra red light source, and like any
light source it may loose its effectiveness over
a great distance.
To fix the IR Illuminator to the scope screw the
fixation screw on the IR into the thread on the
body.
The IR illuminator control buttons are located
on its side.
To switch the Digital IR illuminator on/off press
“+” and “-” buttons simultaneously. When the
IR illuminator is switched on you can see the
green LED lit.
By pushing the buttons “+” and “-” you may
adjust the IR brightness.
The IR beam is focusable to change the field of
coverage. To change the beam width slightly
turn the IR lens.
You may notice that beam of IR illuminator
might not shine directly in the middle of your
viewing image. You can change the direction of
the IR beam slightly in horizontal and vertical
directions with rotation of small screws on the
side of IR.
You can also change the position of the IR
control panel fitting your needs. Undoing the
small set screw on back of IR. Then use the
included wrench to loosen back ring, Move the
IR to its desired position/angle, retighten ring
with wrench then retighten set screw.
STORAGE AND CARE
• If the device is not to be us d for extended
period of time (more than 10 days) remove the
battery.
• Avoid touching lenses. If fingerprints or traces
of dirt or dust appear, clean their surface with
a Photographic lens cleaning tissue.
• Keep lens cap/daylight filter on when not in use.
• The MO5-2 is not harmful to the user or the
environment.
• Do not disassemble except to clean the front lens
and eyepiece:
it will void your warranty.
• Evaluate the monocular function by looking
through it in a lit environment with the daylight
filter lens cap on. Never use in daylight without
the daylight filter lens cap on.
• Never point the MO5-2 at a bright light source.
• Adverse atmospheric conditions such as fog,
smog or haze and a lack of ambient light
(moon or starlight) may diminish the effective
viewing distance.
IR Brightness
IR Brightness
Adjustment
Battery
Housing
IR Focusing
IR Focusing
Fixation
Screw
IR Beam Direction
Vertical Adjustment
Vertical Adjustment
IR Beam Direction
Horizontal Adjustment
Battery
Cap