


4
the IR illuminator is simply an infra red light source, and like any light source it may loose its
effectiveness over a great distance.
To fix the IR illuminator to the riflescope use the picatinny raile of the scope.
The IR illuminator control buttons are located on its side. To switch the Digital IR illuminator
on/off press “+” and “-” buttons simultaneously. When the IR illuminator is switched on you can
see the green LED lit. By pushing the buttons “+” and “-” you may adjust the IR brightness.
The IR beam is focusable to change the field of coverage. To change the beam width slightly
turn the IR lens.
You could change the IR control panel fitting your needs. The wrench included into the set
should be used for weakening the fixing nut located on the IR. Rotate the IR placing at in the
most convenient position. Tighten the nut with the wrench to fix the new position.
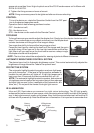
REMOTE CONTROL
Attach the Remote Control cable to connector on the bottom of
the body of device. Place the Remote Control on the weapon,
suiting your shooting style best and grip. Fix the Remote Control
in this position with a montage strap.
To turn the scope on push the button of remote control. Keep
pressed button when observing scene. The scope is turned off
immediately after releasing remote control button.
LOW BATTERY INDICATOR
When red LED on left side of the field of view starts blinking it is time to change your battery.
RETICLE
Your scope has an Electronic reticle with two color and 5 degrees of brightnes of illumination
for each color. The knob of brightnes ajustment reticle and color select is located on the top of
the boby of the scope. On the knob there are marking with color of illumination of reticle.
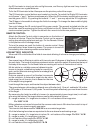
Mil dot reticle is a reliable means of determining dis-
tances to targets, establishing leads for moving tar-
gets, and for alternate aiming points for windage and
elevation holds.
Dots are spaced in one mil (milliradian) increments
on the crosshair. A distance to target can be calcu-
lated using the mil formula, that is based on the size
of the object being targeted.
Look through the scope, and bracket the object between dots.
The space between dot centers subtends one milliradian(mil). One mil. subtends 3.6 inches
at 100 yards or 36 inches at 1,000 yards. To use this system effectively you must know the size
of the target.
By measuring the height or width of a known (or approximately known target size) in mil-radi-
ans using the reticles, the target distance can be calculated as follows.
R = range in meters, H = target size in meters, M = mil-radians of the image size:
R = 1000 * H / M
Military shooters are trained to know that the common male torso is 39 inches from crotch to top
of
head. This is very close to exactly one meter.
This formula then becomes R = 1000 / M for a one meter target size.
All of the following formulae are equivalent to the one above for estimating range.
R = range in meters, H = target size in inches,
M = mil-radians of the image:
R = 25.4 * H / M
R = range in yards, H = target size in inches,
M = mil-radians of the image:
R = 27.78 * H / M
R = range in yards, H = target size in feet,
M = mil-radians of the image:
R=333.3 * H / M
1 mil
1 mil