PRV-9000 Operating Instructions
2.3.1 Connecting a VCR or an Analog Camcorder
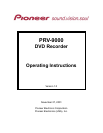
1. Connect the VCR/camcorder’s Video
Output to a front Video Input.
Video Input 3 with a S-Video or
RCA-pin video cable
(not provided)*
Video Input 1 with a S-Video cable
Video Input 2 (rear panel) with a
BNC video cable
(not provided)
2. Connect the VCR/camcorder’s audio
outputs to the front DV IN/OUT port
with standard stereo audio cable (one
cable provided).
Video Out 1 with a S-Video cable
(not provided)
Video Out 2 with a standard BNC
video cable (not provided)
* As an alternative, you may use Component Video Output to connect (cable provided).
Note: If the input terminals are the other device are RCA, use a BNC/pin conversion
adapter to make connections.
2.3.2 Connecting a Digital Camcorder
Connect the front DV In/Out jack to
a DV digital camcorder or deck to
transfer DV tapes or DVD-R/RW
discs to DVD-R/RW.
(DV cable not provided)
IMPORTANT: The DV In/Out jack is for DV equipment only. This jack is incompatible
with computers, digital satellite tuners and D-VHS video decks.
Use a single DV (also known as i.Link) cable for audio and video signals to
connect compatible equipment to the PRV-9000. There are three elements to
remember when communicating through the DV In/Out jack:
Compatible with the DV-format (DVC-SD) sources
Controlling the PRV-9000 via the DV In/Out jack is unavailable
(including connecting multiple units, also known as daisy-chaining)
Switching the DV audio output may cause noise in the connected
device
18