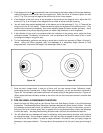
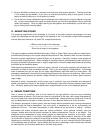
Figure 4A Figure 4B
7. Bring the star’s image slowly in and out of focus until you see several circles (“diffraction rings”)
surrounding the star’s central disk. If Step 5 was done accurately, you will see concentric circles as in
Figure 4B. An improperly collimated instrument will reveal oblong or elongated circles as in Figure 4A.
Slowly adjust the three collimation screws on the mirror cell until the circles are concentric on either side
of focus.
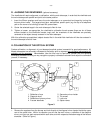
F. TIPS ON USING A DOBSONIAN TELESCOPE
1. Never lubricate the Teflon pads on the Ground Plate and Side Bearing Cradle, or the Side Bearings
themselves. The Meade Starfinder Dobsonian has been designed with some inherent friction. You want
the telescope to move easily when you position it, but you also want it to stay in place when you don’t.
Using any kind of oil, silicone spray, wax, or grease will ruin the performance by causing the telescope
to move too easily. Just keep these bearing surfaces clean; that’s all the maintenance required.
2. You will notice that your telescope will move in altitude by raising and lowering the tube, and in azimuth
by rotating the base. As you observe objects in the night sky they will appear to drift out of the field of
view due to the Earth’s rotation. To keep an object centered in the field of view, just lightly nudge the
telescope in the proper direction. This may take a little practice at first, but you’ll soon get the hang of
it.
2. If the diagonal mirror is not centered within the circle formed by the bottom edge of the focuser drawtube,
rotate the diagonal mirror holder about its support bolt. When the mirror is centered, tighten the lock
nuts (7, Fig. 3) on the long bolt against the central hub of the 4-vane system.
3. If the reflection of the main mirror is not centered on the surface of the diagonal mirror, adjust the 3 tilt
screws (6, Fig. 3) on the back of the diagonal mirror holder to achieve correct centering.
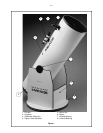
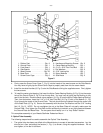
4. You will notice three socket headed bolts on the bottom end of the telescope (5, Fig. 1) (These will be
wing nuts on the 16-inch model). These are used to adjust the alignment of the primary mirror. They
should never be removed completely. Also, when adjusting these collimation screws, go slowly. Just a
small movement of a primary adjusting screw can make a big difference in mirror alignment.
5. If the reflection of your eye is not centered within the reflection of the primary mirror, adjust the three
collimation screws. Proceed by “trial and error” until you develop a feel for which screw to turn in order
to change the image in any given way.
6. For final adjustments, perform a test using an actual star to confirm the accuracy of Steps 1 through 5,
above. Using the 25mm eyepiece, point the telescope at a moderately bright (second or third
magnitude) star, and center the image in the telescope’s field of view.