EPSON PowerLite 8000i/9000i Projector
6 -
EPSON PowerLite 8000i/9000i Projector 10/99
This table summarizes the functions on the remote control.
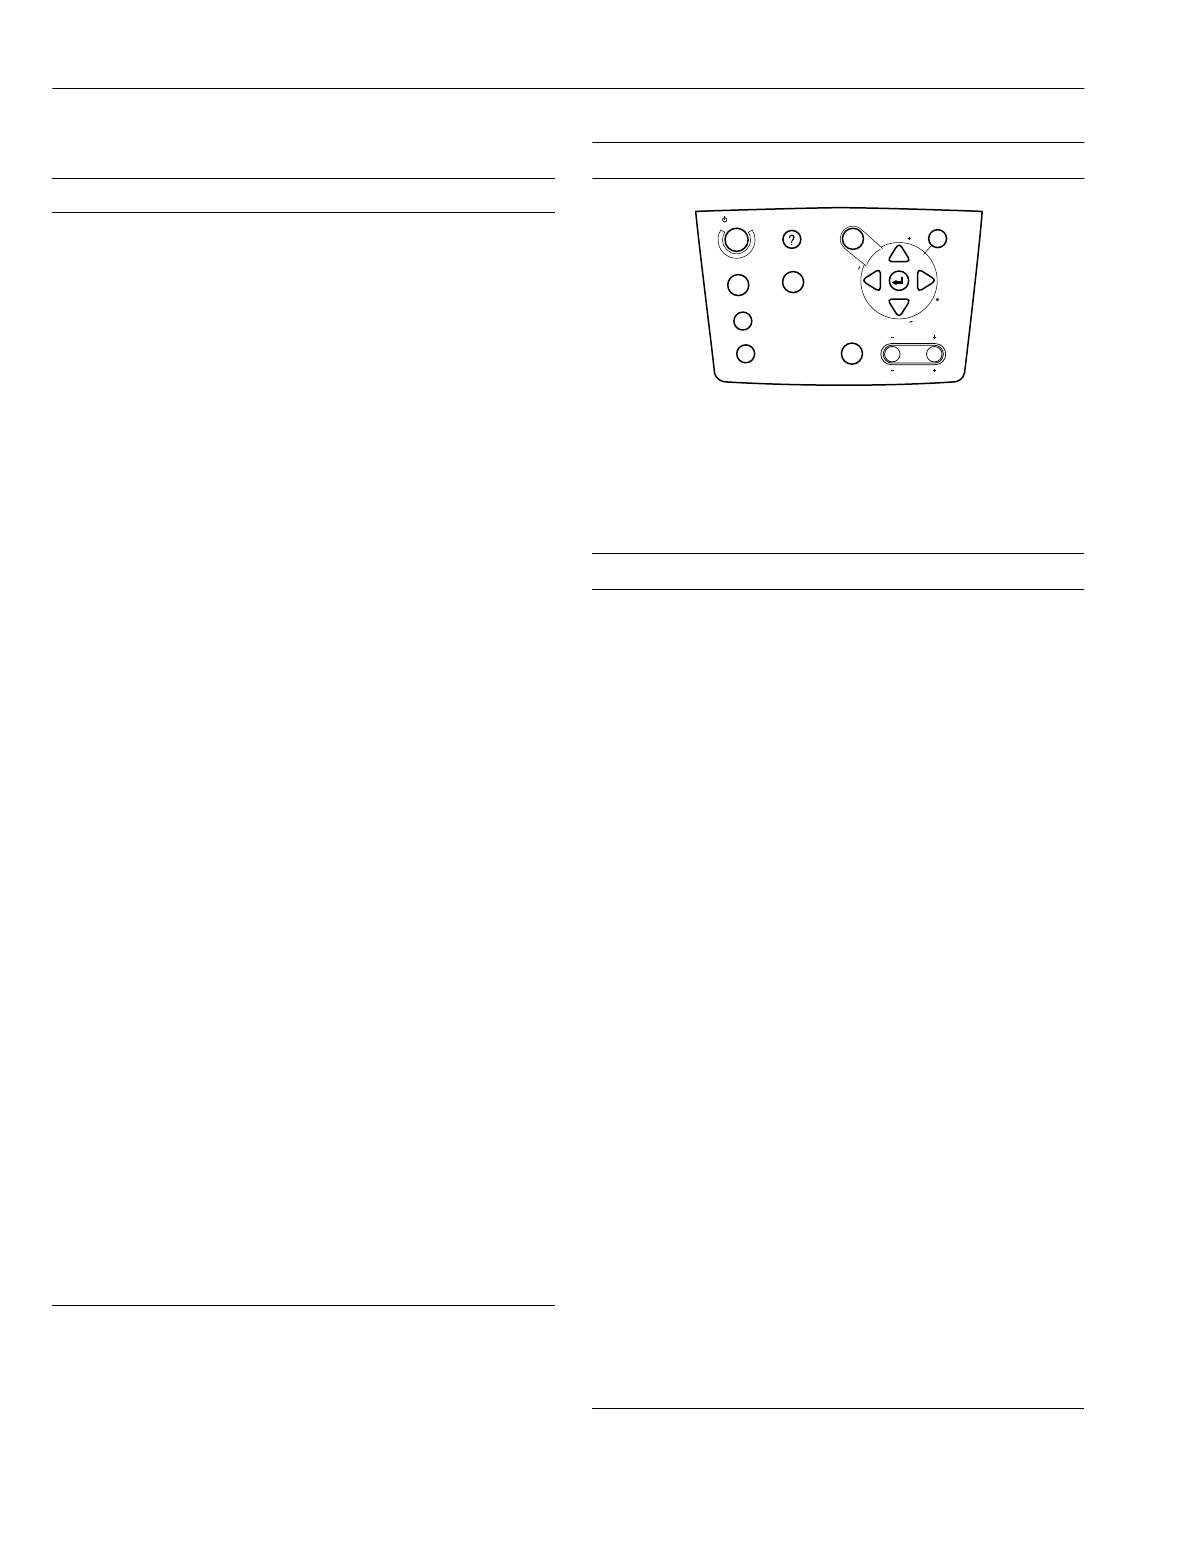
Using the Control Panel
You can use the control panel to control the projector instead
of the remote control. However, you can program and access
the custom features only with the remote control.
The following table summarizes the functions on the control
panel:
Button Function
Power Starts or stops the projector.
Freeze Keeps the current computer or video ima
e on the screen.
A/V mute Turns off the audio and video, displayin
the black, blue or
user lo
o back
round.
E-Zoom Enlar
es or reduces the ima
e size from 1x to 4x (in 24
steps). Pressin
the ri
ht side of the button enlar
es the
ima
e, pressin
the left side of the button reduces the
ima
e. To display a portion of an enlar
ed ima
e which is
outside the display area, press the Enter button and scroll
the ima
e to the desired location.
R/C ON/OFF Turns the remote control on or off.
Effects buttons Use to display prepro
rammed special effects. Additional
effects can be pro
rammed usin
the ELP Link IV
software, or control panel menu options.
Enter
(pointer button)
Use the Enter button to navi
ate the menus or use the
remote as a mouse pointer when the projector is
connected to the computer with the main cable and the
mouse cable. When the ima
e source is Computer, the
Enter button acts as a mouse left-click.
Illumination Illuminates all buttons on the remote control.
Esc Stops the current function. Pressin
Esc while viewin
a
menu or the online help displays the previous screen or
menu. When the ima
e source is Computer, the Esc button
acts as a mouse ri
ht-click.
Menu Displays or hides the menu.
Comp1 Switches to the Computer 1 ima
e.
S-Video Switches to the S-Video ima
e.
Auto Optimizes the computer ima
e.
P in P Displays a video or S-video ima
e in a subscreen on the
main display. Use the Enter button to reposition the Picture
in Picture (P in P) screen, or the E-Zoom button to enlar
e
or reduce the ima
e. Chan
es made to the P in P screen
location and size are automatically carried over to the next
P in P session.
Help Displays the online help menu.
Comp2/BNC Switches to the Computer2/BNC ima
e.
Video Switches to the Video ima
e.
Resize Switches the display dot mode and resize mode for VGA,
UXGA, SVGA, and SXGA input. You cannot resize the
ima
e if the input resolution matches the output resolution
of the projector.
Preset Saves and recalls up to five different session settin
s
(resolution, trackin
, sync si
nal, and position). To save
the current session settin
s, press the Preset button and it
will be assi
ned the next available number, 1 throu
h 5. To
recall a settin
, press the Preset button a second time and
move to the desired session number. To overwrite a saved
settin
, move to the settin
you want to replace and press
Enter. When the confirmation messa
e displays, choose
Yes and press Enter.
– Volume +
Adjusts the volume.
Button Function
Power Starts or stops projection.
Help Displays the online help menu.
Computer Switches between Computer 1 and Computer 2.
A/V mute Turns off the audio and video, displayin
the black,
blue, or user lo
o back
round.
Resize Switches the display dot mode and resize mode for
VGA, UXGA, SVGA, and SXGA input. You cannot
resize the ima
e if the input resolution matches the
output resolution of the projector.
Video Switches to the video ima
e. Pressin
the button once
switches to composite video, pressin
it twice switches
to S-Video.
Menu Displays or hides the menu.
Esc Stops the current function. Pressin
Esc while viewin
a menu or the online help displays the previous screen
or menu. When the ima
e source is Computer, the Esc
button acts as a mouse ri
ht-click.
Up, down arrows
(Sync+/Sync-)
Synchronizes the computer’s
raphic si
nal. Use these
buttons to adjust an overall ima
e that is fuzzy or
streaked, or to select menu items durin
menu
operations. Allows movement or selection of a menu, if
a menu is displayed.
Left, ri
ht arrows
(trackin
-/
trackin
+)
Matches the projector’s internal clock to various
computer
raphic si
nals (trackin
adjustment). Use
these buttons to adjust an ima
e with vertical fuzzy
lines, or to chan
e numeric settin
s durin
menu
operations. Allows movement of a menu, if a menu is
displayed.
Enter Selects a menu option or the next menu/help screen.
Pressin
Enter when no menu or help screen is
displayed optimizes the computer ima
e.
Shift Pressin
the shift and Keystone buttons at the same
time increases or decreases the sound volume.
– Keystone + Adjusts a trapezoid distorted ima
e to normal,
correction up to a ±20° tilt.
– Volume +
Adjusts the volume when used in conjunction with the
Shift button.
Power
Video
Computer
A/V mute
Resize
Esc
Help
Menu
Shift
Keystone
Volume
S
y
n
c
.
S
y
n
c
.
T
r
a
c
k
i
n
g
T
r
a
c
k
i
n
g


