


7
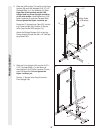
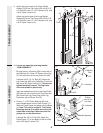
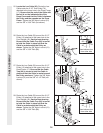
4. Press a 2” Square Inner Cap (27) into the end
of the Top Frame (55). Press a 1 3/4” Square
Inner Cap (44) into each end of the crossbar
on the Top Frame. Press two 1” Round Inner
Caps (49) into the top of the crossbar
.
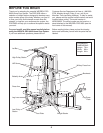
Attach the Top Frame (55) to the VKR Upright
(74) and the Leg Press Upright (56) with two
5/16” x 2 3/4” Bolts (11) and two 5/16” Nylon
Locknuts (3).
Attach the Top Frame (55) to the Front
Upright (42) with two 5/16” x 2 3/4” Bolts (11),
two 5/16” Flat Washers (8), and two 5/16”
Nylon Locknuts (3).
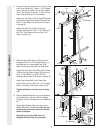
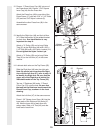
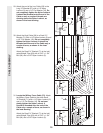
5. Slide the Rear Seat Frame (100) onto the
indicated 5/16” x 2 1/2” Carriage Bolts (1) in
the Stabilizer (5). Hand-tighten two 5/16”
Nylon Locknuts (3) onto the Carriage Bolts.
Attach the other end of the Rear Seat Frame
(100) to the Leg Press Upright (56) with two
5/16” x 2 3/4” Bolts (11), two 5/16” Flat
Washers (8), and two 5/16” Nylon Locknuts (3).
Attach the Handle (82) to the Rear Seat
Frame (100) with two 5/16” x 2 1/2” Carriage
Bolts (1) and two 5/16” Nylon Locknuts (3).
Tighten all Nylon Locknuts used in steps
1–5.
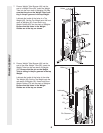
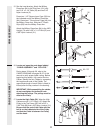
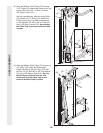
6. Set two Weight Bumpers (19) on the bracket
on the Base (4) as shown. Set two W
eight
Bumpers (19) on the bracket on the Stabilizer
(5).
Stack eight W
eights (25) onto each set of
Weight Bumpers (19). Be sure that the pin
grooves are all on the same side of each
stack of W
eights.
Be careful not to tip either stack of
Weights (25) until step 8 is complete.
4
27
55
3
3
8
49
44
44
11
11
56
42
Crossbar
5
1
1
11
82
100
5
56
8
3
3
3
25
25
19
19
5—Bracket
4
—
Bracket
FRAME ASSEMBLY
74
Pin
Grooves
6
Pin
Grooves