


11
23
80
Rod
28
71
76
11
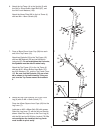
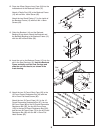
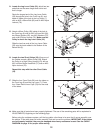
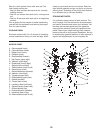
21. Attach a Pulley Housing (94) to the indicated “U”-
channel on the 10-Pound Center Resistance Bar
(44) with an M10 x 102mm Button Head Bolt (24),
two Pivot Bushings (74), and an M10 Nylon
Locknut (76).
Wrap the Long Cable (80) around a 90mm Pulley
(28). Attach the Pulley inside of the Pulley
Housing (94) with an M10 x 42mm Button Head
Bolt (71) and an M10 Nylon Locknut (76).
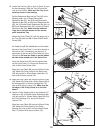
22. Wrap the Long Cable (80) around a 90mm Pulley
(28). Attach the Pulley and a Pulley Guard (29) to
the indicated M10 x 140mm Carriage Bolt (73)
with an M10 Nylon Locknut (76). Make sure the
flat edge of the Pulley Guard is on the side
shown.
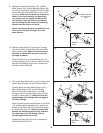
20. Wrap the Long Cable (80) under a 90mm Pulley
(28) as shown. Attach the Pulley and a Pulley
G
uard (29) to the Upright (3) with an M10 x
113mm Button Head Bolt (40) and an M10 Nylon
L
ocknut (76). M
ake sure the flat edge of the
Pulley Guard is on the bottom.
20
21
22
80
2
9
4
0
28
3
76
28
74
94
74
76
76
80
71
28
80
Flat
Edge
29
76
73
24
44
Flat
Edge
22
104
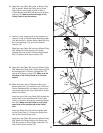
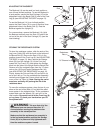
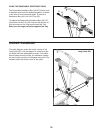
23. Make sure there are no Resistance Bars (not
shown) under the “U”-channels on the 10-Pound
Center Resistance Bar (not shown). Have a sec-
ond person pull on the Long Cable (80) to create
slack in the Cable.
Insert the end of the Long Cable (80) through the
welded tube on the indicated end of the Cross
T
ube (1
1) and then through the remaining Swivel
Arm (22). Make sure the Cable is on the indi
-
cated side of the welded rod in the Swivel
Arm.
Insert the Swivel Arm (22) into the welded tube
on the Cross Tube (11). Secure the Swivel Arm
with an M4 x 5mm Screw (104).
Wrap the Long Cable (80) around a 90mm Pulley
(28). Attach the Pulley inside of the Swivel Arm
(22) with an M10 x 42mm Button Head Bolt (71)
and an M10 Nylon Locknut (76).