


GB
2
INFORMATION AND WARNINGS
PLEASE READ THIS OWNER’S MANUAL THROUGH CAREFULLY BEFORE ASSEMBLING,
USING AND SERVICING THE WORKOUT CYCLE! FOLLOW THE INSTRUCTIONS DESCRIBED
IN THIS MANUAL CAREFULLY.
THE EQUIPMENT HAS BEEN DESIGNED FOR HOME USE. THE TUNTURI WARRANTY APPLIES ONLY
FOR FAULTS AND MALFUNCTIONS IN HOME USE.
PLEASE NOTICE THAT THE WARRANTY DOES NOT COVER ANY DAMAGES DUE TO NEGLIGENCE OF
ADJUSTMENT OR MAINTENANCE INSTRUCTIONS DESCRIBED IN THIS MANUAL!
NOTE ABOUT YOUR HEALTH
* Before you start any training, consult a physician to check your state of health.
* If you experience nausea, dizziness or other abnormal symptoms while exercising, stop your workout at once
and consult a physician.
* To avoid muscular pain and strain, begin each workout by warming up and end it by cooling down (slow
pedalling at low resistance). Don’t forget to stretch at the end of the workout.
NOTE ABOUT THE EXERCISING ENVIRONMENT
* Place the cycle on a firm, level surface.
* Make sure that the exercising environment has adequate ventilation. To avoid catching cold, do not exercise in
a draughty place.
NOTE ABOUT USING THE EQUIPMENT
* Parents or others responsible for children should note that children’s natural playfulness and curiosity may lead
to situations and behaviour for which the cycle is not designed. If children are allowed to use the cycle, they
should be supervised and taught to use the cycle properly, keeping in mind the child’s physical and mental
development and their personality. The exercise cycle is not a toy.
* Before you start using the cycle, make sure that it functions correctly in every way. Do not use a faulty device.
* In heavy or long-term use, the machine may shed dust or oil. It is therefore advised to place the machine on a
protective base.
* Only one person may use the cycle at a time.
* Hold the handlebar for support when getting on or off the cycle.
* Wear appropriate clothing and shoes when exercising.
* Do not use the cycle when the protective covers are not in place.
* Do not attempt any servicing or adjustment other than those described in this manual. The given
service instructions must be followed carefully.
* The equipment is not recommended for persons weighing over 110 kg.
THE FIGURES REFERRED TO IN THE TEXT ARE IN THE BACK FOLD.
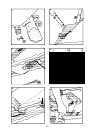
Assemble the cycle as follows (left, right, front and back are
as seen from the exercising position):
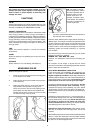
MOUNTING THE REAR SUPPORT
Slip a flat object, such as a piece of wood, under the cycle
frame to lift the rear end off the floor. Place the support under
the rear part of the frame and fasten it with two hex screws
and washers (Fig. 1). Remove the piece of wood.
MOUNTING THE
HANDLEBAR SUPPORT TUBE
Lean the cycle over on one side so that it rests against a
chair, for example. Remove the protective foam from the
support tube and fit the handlebar support tube into place so
that the resistance adjustment knob at the top of the tube
points to the back (Fig. 2). If the handlebar support tube will
not go into the hole in the grey top cover, undo the screw at
the lower end of the cover so that the cover can be moved,
and fit the tube in. Remember to retighten the screw after
fitting the support tube. Make sure that the resistance
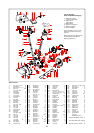
ASSEMBLY
Unpack the cycle and check that all the following parts
are in the package:
2. Rear support
3. Handlebar support tube + meter
5. Ear sensor for pulse measurement
6. Fastening screws (2 hex screws) and washers (2) for
rear support screws, batteries (2)
7. Fastening screw, washer and rectangular metal
8. Assembly tools
If you notice that a part is missing, contact the dealer and
number (see the back of the manual).
The package includes a silicate bag for absorbing moisture