


4
Congratulations on the purchase of your Tasco® Digital Color Night Vision. Comprised of high quality electronics and optics, this
Tasco Night Vision unit is a hand-held digital night vision viewing system that utilizes a low-light charge coupled device (CCD) sensor
providing images comparable to analog "Gen 2" resolution. Day and Night time images are magnified and displayed on a Color LCD
micro display screen, which provides a color image when ambient light conditions are high enough, and a desaturated color or
neutral, monochrome image (not the typical "green screen" night vision) under lower ambient light conditions.
HOW DIGITAL NIGHT VISION WORKS
Tasco Digital Night Vision products collect existing light through the objective lens. The light is then processed through a highly
sensitive CCD sensor and transferred to the micro liquid crystal display (color LCD). Images viewed on the LCD are magnified 3
times. An infrared illuminator provides a light source to enable viewing in total darkness.
The Tasco Digital Color Night Vision unit is ideal for camping, caving, scouting, maritime navigation, and observing wildlife under
the veil of darkness, patrolling warehouses and similar surveillance operations where light is scarce.
OPERATING INSRUCTIONS
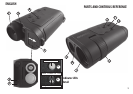
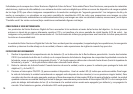
1. Slide the battery compartment door (2) open in the direction of the white arrow. Insert two CR123 batteries (3v lithium, not
included) into the battery compartment. Be sure to observe the correct battery polarity, as shown on the left. The "+" end of
the top battery should be facing out (towards the battery door), and the "-" end of the lower battery should be facing out.
2. Remove the front lens cover. When finished using the unit, replace the cover to protect the objective lens (1) and IR light (7).
3. Press the ON/OFF switch (3) to power the device on. A green LED light (4) indicates that the power is on. To extend battery
life, the unit will normally turn off automatically after 2 minutes (if no buttons are pressed). To cancel this auto-off function,
briefly press and release the IR switch (8) on the top of the unit. The power will then remain on until you turn it off manually
with the ON/OFF switch. The orange light on the lower half of the power indicator light (4) will glow if the unit is in auto-off
mode (default), and will turn off if you cancel the auto-off function. If the batteries become weak, the green power indicator
LED will blink.
4. View through the eyepiece (5) and select an object to focus on.
5. To focus the image, first rotate the eyepiece rubber ring (5) until the edges of the LCD display appear sharp to your vision. Next,
rotate the objective lens focus wheel (6) until the object is in focus and the view is clearest. At this point, the display focus
(eyepiece ring) is set for your individual eyesight and will not require further adjustment when viewing objects at different
distances. When changing the viewing distance, simply rotate the main focus wheel (6) until the image is in focus.