


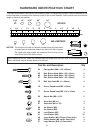

ASSEMBLY INSTRUCTIONS
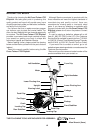
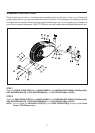
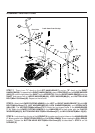
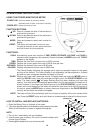
Place the front end of the RIGHT PEDAL ARM(5) on the ROLLER(60) of the FRONT STABILIZER(2).
Connect the back end of the RIGHT PEDAL ARM(5) to the RIGHT CRANK(42). Thread the RIGHT PEDAL
SHAFT(46) into the RIGHT CRANK(42) by hand. SECURELY TIGHTEN using a 15mm open-ended wrench
or an adjustable wrench (not included). Repeat on the left side. The shoulder of the PEDAL SHAFT(45, 46)
should be in contact with the CRANK(41, 42) when securely tightened.
Check the tightness of the PEDAL SHAFT(45, 46) and CRANK(41, 42) regularly. Retighten as necessary.
There is an "L" decal on the LEFT PEDAL ARM(4), and an "R" decal on the RIGHT PEDAL ARM(5).
The RIGHT PEDAL SHAFT(46) has right hand threads and is tightened by turning clockwise.
The LEFT PEDAL SHAFT(45) has left hand threads and is tightened by turning counterclockwise.
STEP 5
NOTE:
9
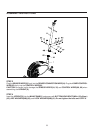
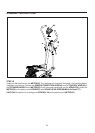
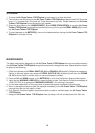
The LEFT and RIGHT PEDAL CAPS(50, 51) have a raised lip on two sides. Attach the LEFT and
RIGHT PEDAL CAPS(50, 51) to the LEFT and RIGHT PEDAL ARMS(4, 5) so the raised lip is on
the front and the inner sides.
L
R
L
R
1.
2.
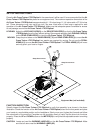
STEP 6: There is an "L" decal on the LEFT PEDAL CAP(50), and an "R" decal on the RIGHT PEDAL CAP
(51). Attach the RIGHT PEDAL CAP(51) to the RIGHT PEDAL ARM(5) with ROUND HEAD SCREWS
(M5x15mm)(76). Repeat on the left side.
NOTE:
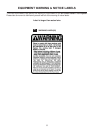
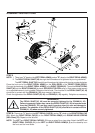
WARNING!
The PEDAL SHAFT(45, 46) must be securely tightened to the CRANK(41, 42).
Failure to securely tighten may cause the PEDAL SHAFT(45, 46) to become loose
from the CRANK(41, 42) and may result in serious injury to user and damage to
product. The shoulder of the PEDAL SHAFT(45, 46) should be in contact with the
CRANK(41, 42) when securely tightened.