


Treadmill Assembly
Attention!
The following instructions are included only as information so that you, the con-
sumer, understand basically how the treadmill is assembled.
STEP 1: Remove treadmill from carton. You may pick the rear of the treadmill up and
roll it off the packaging. Remove foam padding, wrap, etc. Observe for possible
freight damage.
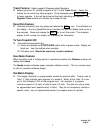
Note: You will need a phillips screw driver and 1/2” wrench to complete assembly.
STEP 2: This owners manual packet contains (2) Allen wrenches and (4) black plugs.
When practical, assembly hardware is mounted in appropriate locations that require
removal and replacement. The computer head is loose. Set aside for step 6.
STEP 3: An unpainted steel channel connects the console uprights to the base. With
phillips screwdriver and Allen wrench (provided) unbolt the console uprights from base.
Discard plastic washers (4) and steel channels. The 5/16” x 1” Allen bolts and “gold”
special nut/washers will be used in step 5. The black phillips head screws will be used
in step 8.
STEP 4: Raise the console upright assembly and place upright console assembly into
front grill area. Be careful of the two cables. A bottom and rear 3/8” pin will help locate
into proper position to allow hardware installation. Locate the (4) 5/16” x 1” black Allen
bolts and “gold” special 5/16” washer/nuts removed in step 4. Place one bolt on the end of
the Allen wrench (provided) and insert thru any one of (4) round frame holes. Bolt
should go thru console hole to allow “gold” 5/16” hex nut/washer to be started. Hand
“run” the nut against the console so that it will not turn during tightening with Allen
wrench. Do not tighten with Allen wrench until all (4) nut/bolt assemblies are inserted
and started. Tighten all bolts. Nuts should “hold” without a wrench. If they do not hold
use an open end wrench from the bottom. Insert the (4) black plugs into the access
holes.
Note: For heavy use units it is advisable to use a wrench on the nuts and add addi-
tional torque to nut / bolt.
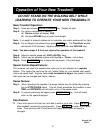
STEP 5: Handles will install thru access holes in console upright. Remove both
5/16” Allen bolts in each handle with included wrench that is located in parts bag. Slide
handle (flair to outside) thru access holes in console upright. Use caution to avoid
data cables in left hand side console upright. You may observe data cable clear-
ance from top of open console upright. Start both bolts into hand rail thru console
upright. Repeat procedure for opposite hand rail. Tighten all bolts.
3
Smooth 9.1 / 9.6
2/06/01