


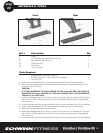
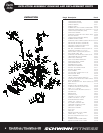
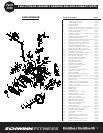


Ref. # Description Qty
1 Frame 1
44 Pop Pin Assembly for Head Tube 1
25 Handle Bar 1
44, 27, 45 Seat Slider Assembly (Pre-Assembled) 1
26 Seat Post 1
67 Bottle Cage
2
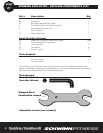
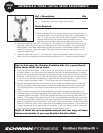
Tools Required
Adjustable wrench (not supplied)
1
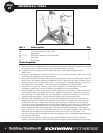
A. Remove the Pop Pin Assembly (44) from the small parts bag and add some grease to the threads
of the large 21mm nut that will screw into the head tube boss on the bike.
B. Thread the Pop Pin Assembly into the head tube boss using a large adjustable wrench,
tighten firmly.
C. Using your hand grab the T-handle of the Pop Pin, turn it counter-clockwise to make sure it is free
of the securing threads and can be pulled freely.
D. Insert the Handle Bar (25) into the head tube of the bike while pulling the Pop Pin back. Insert the
Handle Bar to the desired height and release the Pop Pin. Make sure the Pop Pin settles into one
of the securing holes in the Handle Bar tube. Turn the Pop Pin clockwise threading it into the Pop
Pin Assembly and hand tighten. This will secure the Handlebar at the desired height.
E. Using your hand, grab the T-handle of the Pop Pin attached to the seat tube, turn it counter-
clockwise to make sure it is free of the securing threads and can be pulled freely.
F. Insert the Seat Post (26) into the seat tube while pulling the Pop Pin back. Insert the Seat Post
to the desired height and release the Pop Pin. Make sure the Pop Pin settles into one of the
securing holes in the Seat Post tube. Turn the Pop Pin clockwise threading it into the Pop Pin
Assembly and hand tighten. This will secure the Seat Post at the desired height.
G. The Seat Slider Assembly (44,27,45) has been pre-assembled at the factory. Insert the front
(saddle nose side) of the Seat Slider Assembly into the back of the seat post slider tube (hori-
zontal tube at the top). There is a small spring pin at the rear of the slider tube on the Seat
Post that must be depressed to allow the Seat Slider Assembly to fully attach to the Seat Post.
This can be can be accomplished by laying the Seat Slider Assembly on the spring pin, push
down on the entire Seat Slider Assembly so that the spring pin is depressed. While pulling
down on the Pop Pin push the Seat Slider Assembly onto the seat post slider tube. When the
Seat Slider has moved far enough forward the spring pin will pop out of the back. This
secured the Seat Slider to the seat post tube and prevents it from inadvertently separating from
the seat post slider tube.
H. Using a 3mm Hex Wrench, remove the screws pre-assembled to the fork legs of the bike.
Position the bottle cage (67) on the side of the bike and tighten the screws securely to the fork leg.
MATERIALS & TOOLS
step
#3
4
Evolution / Evolution-SR