


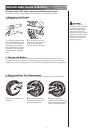

1 To adjust the tension, thread
the brake lever adjuster in or out
1/4 to 1/2 turn until the desired
brake adjustment is attained.
Most adjustments are complete
at this step. If brake still needs
further adjustment, proceed to
step 2.
2 If the brake has too much
slack, use a 10mm open wrench
to loosen the brake anchor
cable for additional adjustment.
WARNING:
The brake is capable of
causing the electric motorbike
to skid the tire throwing an
unsuspecting rider. Practice
in an open area free from
obstacles until you are familiar
with the brake function. Avoid
skidding to a stop as this can
cause you to lose control or
damage the rear tire.
5
REPAIR AND MAINTENANCE
Check the Razor website for any updates on the latest repair and maintenance procedures.
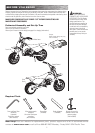
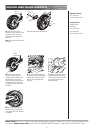
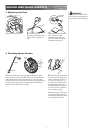
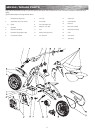
q Chain and Rear Tire Replacement
Tools required: 10mm open wrench, two (2) 8mm open wrenches, and two (2) 15mm open wrenches.
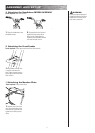
2 With a 10mm open wrench,
loosen the brake cable anchor
and disconnect the cable.
3 With two 8mm open
wrenches, loosen brake housing
anchor and disconnect. Keep the
spacer and washers together.
1 Loosen screws and remove
chain guard.
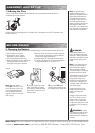
q Testing the Brakes
To use the brake, squeeze the lever to increase the pressure on the brake. The brake lever is fitted
with a cable adjuster to compensate for cable stretch and/or to fine-tune the lever movement to brake
engagement. If brake is not engaging properly, follow instructions for adjusting the brakes outlined below.
Turn power switch “OFF” before conducting any maintenance procedures.
q Adjusting the Brakes
Tools required: 10mm open wrench