


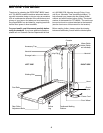
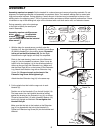
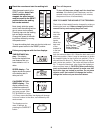
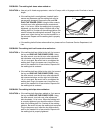

3. With the help of a second person, lift the right Handrail (2)
off the right Upright (14). Hold the Console Base (6) and
the Right Handrail in the position shown. Feed all of the ex-
cess Wire Harness (26) into the Right Handrail, through the
indicated bracket, and down into the right Upright; bend the
Wire Harness, if necessary.
Cut the indicated plastic tie off the right Handrail (2).
Make sure that the Wire Harness (26) is in the bracket and
insert the bracket into the right Upright (14). Make sure
that the Wire Harness is not pinched.
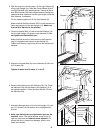
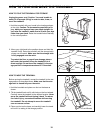
4. Thread a Handrail Bolt (15) with a Handrail Washer (16)
into the right Upright (14) and the right Handrail (2). Do
not tighten the Handrail Bolt yet.
Make sure that the hole in the bracket on the Extension
Leg (41) is aligned with the hole in the Handrail (2).
Tighten an Extension Leg Screw (34) into the bracket and
Handrail.
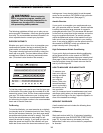
5. Attach the Console Base (6) to the Handrails (2) with four
3/4Ó Screws (59).
Tighten all parts used in steps 2, 4, and 5.
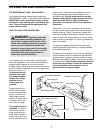
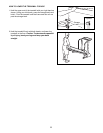
6. Remove the backing from the Adhesive Clip (74). Press
the Adhesive Clip onto the base of the Uprights (14) in
the indicated location. Press the Allen Wrench (73) into
the Adhesive Clip.
7. Attach the Storage Latch (12) to the left Upright (14) with
two 1/2Ó Screws (13). Be careful not to overtighten the
Screws.
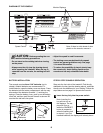
8. Make sure that all parts are tight before you use the
treadmill. (Note: The ratchet screws shown at the far
right are factory set and should not be adjusted.) To
protect the floor or carpet from damage, place a mat
under the treadmill.
6
26
Plastic Tie
Bracket
2
14
3
6
Bracket
34
41
15
16
14
2
4
59
6
59
2
2
5
73
74
14
Ratchet
Screws
12
13
14
6
7
8