


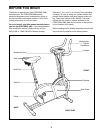

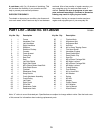

7
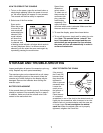
HOW TO OPERATE THE CONSOLE
1. To turn on the power, press the on/reset button or
simply begin pedaling. When the power is turned
on, the entire display will appear for two seconds.
The console will then be ready for operation.
2. Select one of the five modes:
Scan modeÑ
When the power
is turned on, the
scan mode will
automatically be
selected. One
mode indicator
will show that
the scan mode
is selected, and
a flashing mode indicator will show which mode is
currently displayed. Note: If a different mode is
selected, you can select the scan mode again by
repeatedly pressing the mode button.
Speed, time,
distance or
calorie modeÑ
To select one of
these modes for
continuous dis-
play, press the
mode button
repeatedly. The
mode indicators
will show which mode is selected. Make sure that
the scan mode is not selected.
3. To reset the display, press the on/reset button.
4. To turn off the power, simply wait for about four min-
utes. Note: The console has an Òauto-offÓ fea-
ture. If the pedals are not moved and the con-
sole buttons are not pressed for four minutes,
the power will turn off automatically in order to
conserve the batteries.
Inspect and tighten all parts of the exercise cycle reg-
ularly. Replace any worn parts immediately.
The exercise cycle can be cleaned with a soft, damp
cloth. Avoid spilling liquid on the console. Keep the
console out of direct sunlight or the display may be
damaged. Remove the batteries when storing the
exercise cycle.
BATTERY REPLACEMENT
If the console does not function properly, the batteries
should be replaced. See assembly step 4 on page 5.
In addition, make sure that the console wire is con-
nected to the reed switch wire.
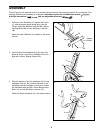
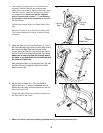
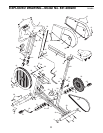
HOW TO TIGHTEN THE CRANK
If the arms of
the Crank (20)
become loose,
they should be
tightened in
order to prevent
excessive wear.
Loosen the
crank nut on
the left arm of
the Crank.
Place the end
of a standard
screwdriver in one of the slots in the slotted crank nut.
Lightly tap the screwdriver with a hammer to turn the
slotted crank nut counterclockwise until the arms are
no longer loose. Do not overtighten the slotted
crank nut. When the slotted crank nut is properly
tightened, retighten the Crank Nut.
STORAGE AND TROUBLE-SHOOTING
Crank
Nut
Slotted
Crank
Nut
20