


6
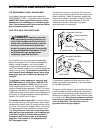
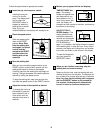
6. Refer to step 4. Tighten the Handrail Screw (53).
Attach the other Handrail to the left Upright (not shown)
as described in the steps above.
Attach the Storage Latch (14) to the left Upright (11) with
two Latch Screws (35). Be careful not to overtighten
the Latch Screws.
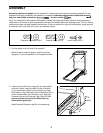
7. Make sure that all parts are tightened before you use the treadmill. Keep the included allen wrench in a
secure place. The allen wrench is used to adjust the walking belt (see page 13). To protect the floor or carpet,
place a mat under the treadmill.
35
14
11
6
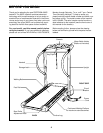
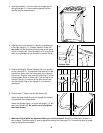
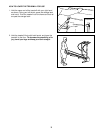
4. Align the hole in the Handrail (1) with the indicated hole
in the right Upright (11). Thread a Handrail Screw (33)
two turns into the Upright and the Handrail at the angle
shown in drawing 4b. It may be helpful to lift up and push
down on the Handrail as you thread the Handrail Screw.
1
33
33
11
4a
4b
3. Insert the Handrail (1) into the tube at the upper end of
the right Upright (11). Have a second person hold the
Handrail as you complete step 4.
11
1
3
Bottom View
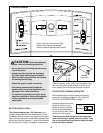
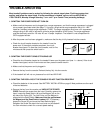
5. Refer to drawing 5a. Slide a Handrail Cap (41) onto the
end of a Handrail (1). The Handrail Cap should fit on the
Handrail as shown, with the narrow part of the Handrail
Cap on top. Pivot the lower end of the Handrail (1) to the
side as shown. Refer to drawing 5b. Fold the flap on the
Handrail Cap (41) to one side or the other as you posi-
tion the Handrail Cap on the Upright (11) as shown in
drawing 5c.
5a
5b
5c
11
1
41
11
Narrow Part
Flap