


6
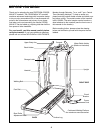
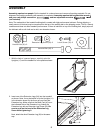
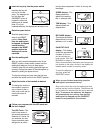
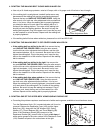
3. Identify the Right Handrail (7) (it may be helpful to look at
the drawing on page 4).
Hold the Right Handrail (7) at an angle as shown and in-
sert the upper end into the Right Upright (11). Keep the
lower end of the Handrail away from the treadmill to
avoid scratching the finish. Next, rotate the lower end
of the Handrail to the position shown by the dotted line.
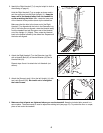
Make sure that the hole in the lower end of the Right
Handrail (7) is aligned with the hole in the Extension Leg
(34). If the holes are not aligned, rotate the Handrail away
from the treadmill and pull the upper end of the Handrail
out of the Upright (11) slightly. Then, rotate the Handrail
back to the position shown by the dotted line. Repeat until
the holes are aligned.
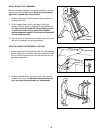
5. Attach the Storage Latch (14) to the left Upright (11) with
two Latch Screws (35). Be careful not to overtighten
the Latch Screws.
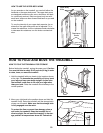
4. Attach the Right Handrail (7) to the Extension Leg (34)
with a Handrail Bolt (90), a Handrail Washer (92) and a
Handrail Nut (91).
Repeat steps 3 and 4 to attach the Left Handrail (not
shown).
11
34
34
92
90
91
7
4
35
14
11
5
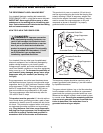
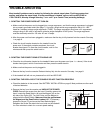
6. Make sure that all parts are tightened before you use the treadmill. Keep the included allen wrench in a
secure place. The allen wrench is used to adjust the walking belt (see page 13). To protect the floor or carpet,
place a mat under the treadmill.
7
3