


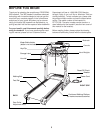
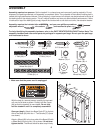
7
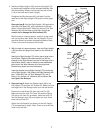
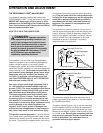
2. Identify the Right Upright (108) and the Left Upright (73)
by observing the positions of the indicated brackets. See
the inset drawing. Make sure that there are two U-Nuts
(118) in the lower end of each Upright.
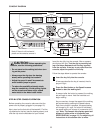
Straighten the Wire Harness (42), and feed it into the
lower end of the Right Upright (108) and out of the upper
end.
Open part bag B. Hold the Right Upright (108) against the
right side of the Base (69), with the bracket on the side
shown. Hand tighten two 3” Bolts (61) with two 5/16” Star
Washers (48) into the Base and the Right Upright;
be
careful not to damage the Wire Harness (42).
With the help of a second person, carefully tip the tread-
mill onto its other side. Attach the Left Upright (73) and
the other Wheel (not shown) as described above. Note:
There is not a wire harness on the left side.
42
69
Brackets
73
2
108
61
48
73, 108
118
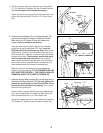
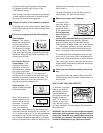
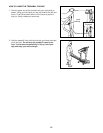
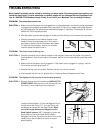
3. With the help of a second person, raise the Right Upright
(108) and the Left Upright (not shown) to the vertical po-
sition.
Identify the Right Handrail (72), which has a large hole in
the left side. Feed the Wire Harness (42) up into the
bracket on the Right Handrail and out of the large hole in
the left side. Note: It may be helpful to use needlenose
pliers to pull the Wire Harness out of the large hole.
Remove any plastic ties from the bracket.
Insert the bracket on the Right Handrail (72) into the top
of the Right Upright (108). Attach the Right Handrail with
two 1” Bolts (63), two 1/4” Star Washers (76), two 2”
Bolts (114), and two 1/4” Washers (38) as shown.
Do
not tighten the Bolts yet.
Bracket
72
114
38
108
42
3
63
63
76
76
Large
Hole
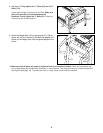
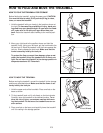
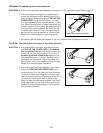
4. Open part bag C. Attach the Storage Latch (36) to the
Left Upright (73) with two 3/4” Screws (2). Make sure that
the large hole in the Storage Latch is on the side shown.
Remove the Lock Knob (30) from the Lock Pin (35).
Make sure that the Lock Pin Collar (33) and the Spring
(32) are on the Lock Pin as shown. Insert the Lock Pin
into the Storage Latch (36), and tighten the Lock Knob
back onto the Lock Pin.
Attach the Left Handrail (not shown) to the Left Upright
(73) as described in step 3. Note: There is not a wire har-
ness on the left side.
35
33
32
36
30
Large Hole
73
2
4