


page 15
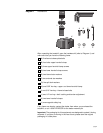
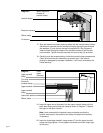
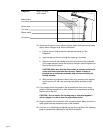
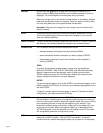
21. To mount the lower portion of the handrails, refer to Diagram 8 while taking
the following steps:
Note: Perform the following steps on one side of the treadmill before
proceeding to the other side.
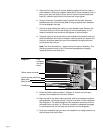
a. Slide the lower handrail flange along its guide rail until it is aligned with
the handrail mounting bolt hole. The flange should line up with the
seam in the side rail label.
b. Position the lower handrail clamp onto the flange, align the screw
holes, and push the clamp into place.
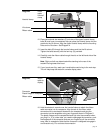
c. Place the lower portion of the handrail into the clamp. You may need to
push the lower handrail clamp down along its track to securely seat the
end of the tube into the clamp.
d. Put an internal star washer (E) on the lower handrail clamp screw (D),
align the screw holes, and finger-tighten the screw.
e. To secure the handrail inside the clamp, use the hex key (H) provided.
Do not overtighten the screw or damage may occur to the clamp.
Note: After extensive use, vibrations from the treadmill may cause the
clamp to loosen. You may need to periodically inspect the screws and,
if necessary, tighten the handrail clamp screws using the hex key (H)
provided.
f. Proceed to the other side of the treadmill and follow steps a through e
to complete the installation of the lower handrails.
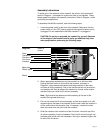
22. Return to the upper handrail clamp, look underneath the clamp to be sure
that the handrail ends meet in the middle of the clamp, re-adjust the
handrails if necessary, and
tighten the screws securely using the
hex key (H) provided.
Diagram 8
Attach lower
handrails
Handrail
Side rail
Lower handrail flange
Lower handrail clamp