


STEP 1: Verify Package Contents
Verify package contents by emptying contents of
bag(s) and confirming all parts are included and
undamaged. Do this at home before you leave on
your trip.
STEP 2: Assembly Tent
A) Select a smooth level site and lay out your tent.
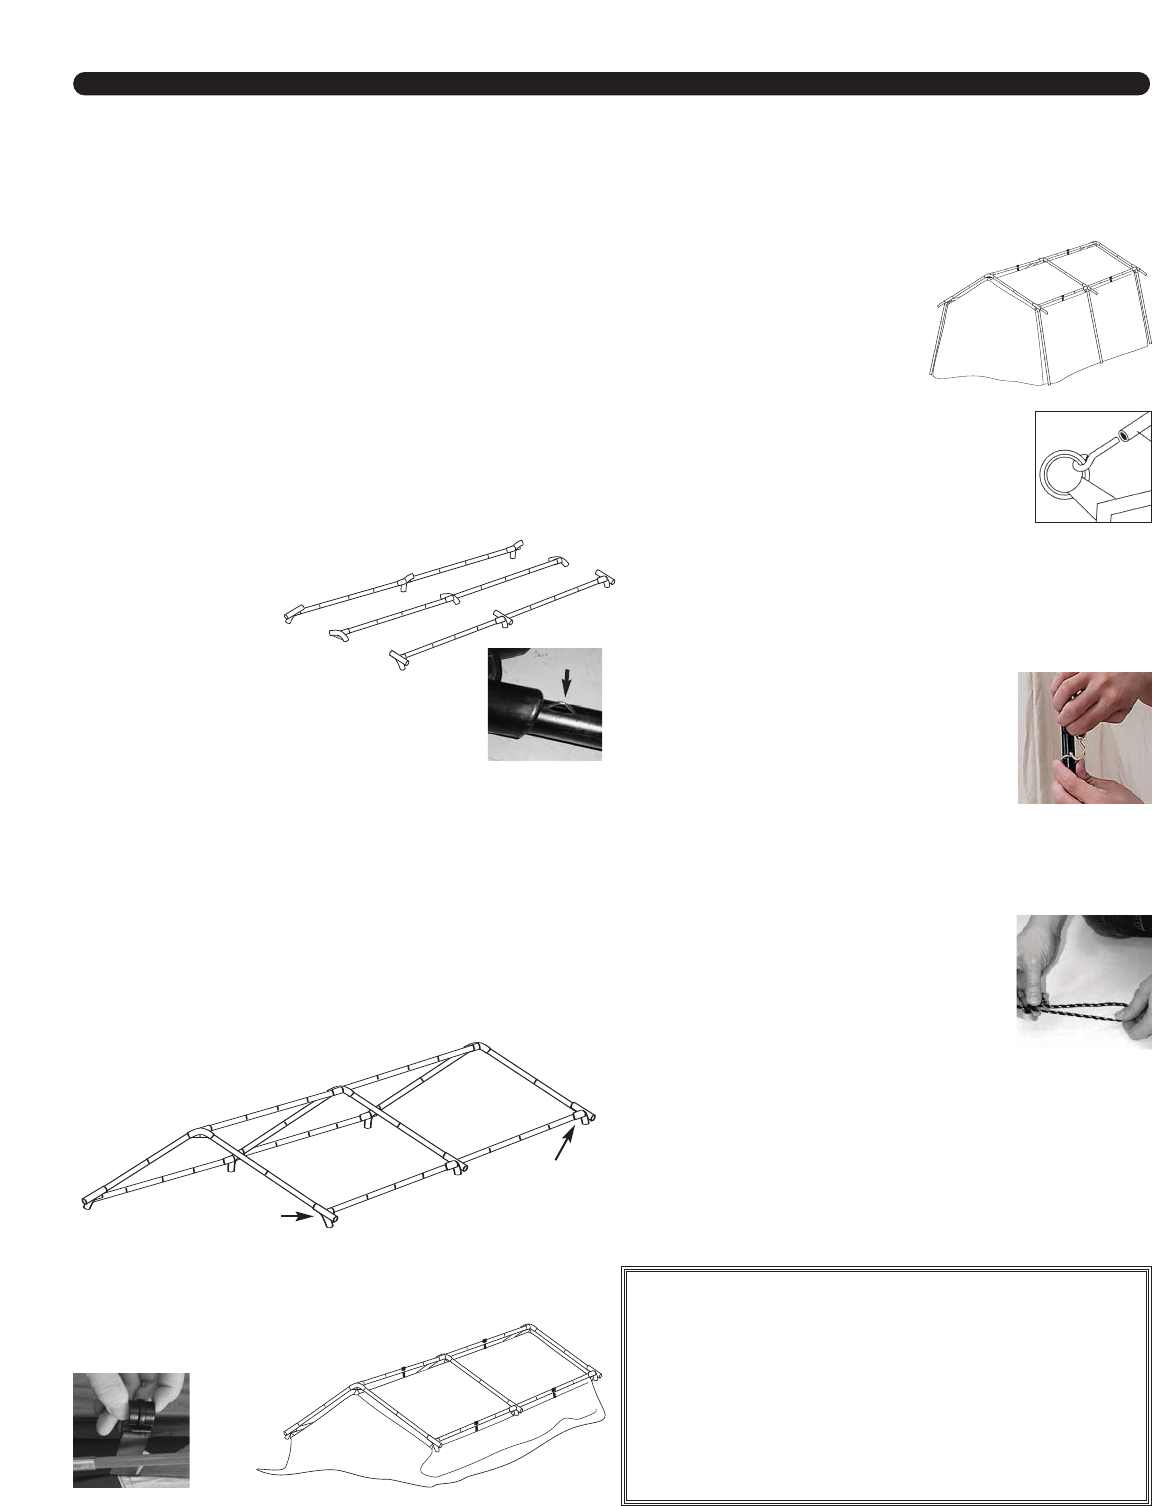
B) Extend all of your poles and sort into groups by
style i.e. roof ridge poles, roof side poles, leg poles,
eave poles, etc. This will simplify the assembly
process.
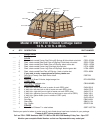
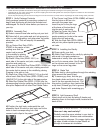
C) Lay Center Roof Pole (CRPL-
375BK) in the center of tent,
making sure that the
center hub is secure
in the middle by placing
R-spring in the slot on hub.
D) Attach 3 Way Hub (3WAY-120-1) on
each side of the center roof pole, making
sure the reds match up.
E) Lay one of the Side Roof Poles (SRPL-375BK) on
each side of the center roof pole, making sure that
the center hub is secure in the middle by placing
R-spring in the slot on hub.
F) Attach the 4 Way Hub (4WAY-071-2) on the left
side of each Side Roof Poles (SRPL-375BK), and
(4WAY-070-2) to the right side of the same poles.
G) Slide Roof Gable Pole (RGPL-137BK) into the
corresponding hubs by matching the blue hub to the
blue pole. Repeat with all other Roof Gable Poles.
H) Position the tent body underneath the roof
assemb
ly
.
Hook S-hooks on tent body roof to the
holes in each corresponding hub
.
Also
connect quick clips to the poles.
I) The Corner Leg Poles (LPSA-168BK) will insert
into the hubs on all four cor-
ners with the green tape.
Insert the pin on the pin-rings
at the base of the tent body
into the end of each pole.
J) Take the Center Leg Poles
(LPCA-168BK) and put into
purple opening on hubs in the center.
Insert pins into pole ends.
K) Take the Eave Pole (EPOL-26BK)
and put into yellow taped opening on all
six hubs.
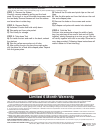
STEP 3: Installing the Rainfly
A) Drape rainfly over tent.
B) Attach Eave Poles to the rainfly by placing the
pole ends in the pole pockets on
underside of rainfly. Use nylon fasten-
ers on fly to secure poles. Use S-hooks
on the corners and connect to the D-
rings on the corner leg poles.
STEP 4: Stake Tent
A) Stake tent by driving stakes through the webbing
loops around the base of tent.
B) To secure guy lines, find the guy
line plastic slider and look for the por-
tion of the line opposite the knot. Pull
this portion, forming a loop (works like
a slip knot.) Extend guy line to ground
and stake. Repeat with remaining guy
lines.
STEP 5: Add Accessory Shelf
Attach shelf unit to tent by taking S-hooks and
attaching them to the loops inside, located at the
bac
k of tent.
ASSEMBLY INSTRUCTIONS
THIS RECREATIONAL PRODUCT REQUIRES TWO ADULTS TO ASSEMBLE.
* Unless otherwise specified all instructions will be given assuming the assembler is facing the front opening of the tent.
* Carefully fold out your poles, using caution to prevent snapping the shock-cording. Make sure each pole segment is “seated” into the next section
before flexing the pole during set-up.
* Do not drop tent pole bag.Do not bounce tent bag on its end to remove tent, as these actions may damage the shock-cording and/or pole ends.
4WAY-070-2
4WAY-071-2
CAMPERS WANT TO KNOW
How can I stay cool and dry?
Partially unzip the upper window in your tent to
remove unwanted moisture and condensation
from perspir
ing sleepers
.
On muggy nights, also
zip open a lower window to draw cooler air
through to increase air circulation.
R-spring