25
LIFE FITNESS APPROVED CLEANERS (UNITED STATES AVAILABILITY ONLY)
Two preferred cleaners have been approved by Life Fitness reliability experts: PureGreen 24 and Gym Wipes. Both clean-
ers will safely and effectively remove dirt, grime and sweat from equipment. PureGreen 24 and the Antibacterial Force
formula of Gym Wipes are both disinfectants that are effective against MRSA and H1N1. PureGreen 24 is available in a
convenient spray. Apply the spray to a microfi ber cloth and wipe down the equipment. Use PureGreen 24 on the equip-
ment for at least 2 minutes for general disinfection purposes and at least 10 minutes for fungus and viral control. Gym
Wipes are large, durable pre-moistened wipes to use on the equipment before and after workouts. Use Gym Wipes on
the equipment for at least 2 minutes for general disinfection purposes. Contact Life Fitness Customer Support Services to
order these cleaners. Call 1-800-351-3737 or Email: customersupport@lifefi tness.com.
LIFE FITNESS COMPATIBLE CLEANERS
Mild soap and water or a mild non-abrasive household cleaner can also be used to clean the display and all exterior
surfaces. Use a soft cotton cloth only. Apply the cleaner to the cotton cloth before cleaning. DO NOT use ammonia or acid
based cleaners. DO NOT use abrasive cleaners. DO NOT use paper towels. DO NOT apply cleaners directly to the equip-
ment surfaces.
7.3 HOW TO ADJUST AND TENSION THE STRIDING BELT
Do not move the treadmill or place hands under the treadmill while it is plugged into an electrical outlet!
Tool Required: 6MM Hex Key Wrench
THE BELT TENSIONING BOLTS
The Life Fitness treadmill has access holes in the rear roller guards, which allow access to the tensioning bolts. These
tensioning bolts make it possible to adjust tracking and centering of the striding belt (A) without removing the guards.
Note: It is extremely important that the treadmill be correctly leveled prior to any tracking adjustments. An unstable unit
may cause striding belt misalignment. See How To Stabilize the Life Fitness Treadmill prior to attempting any rear roller
adjustments.
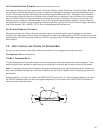
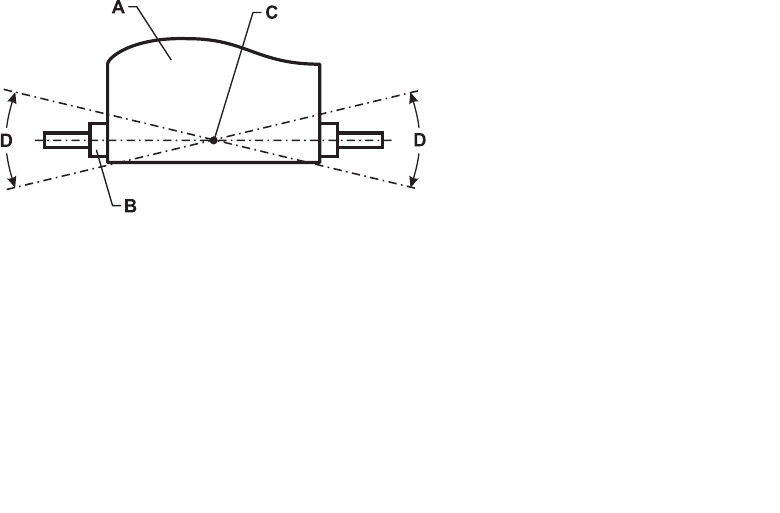
Before proceeding, it is helpful to visualize the REAR ROLLER (B) pivot point (C). Each adjustment made to one side of
the ROLLER must be met with an equal and opposite adjustment (D) to the other side of the ROLLER to maintain an
ideal belt tension at the pivot point.


