


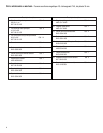

6
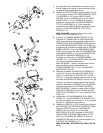
1. Before proceeding, familiarize yourself with the parts of the
Cross-Trainer and make sure that you have received all
the items described in the Parts List.
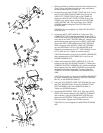
2. Locate the left and right FRONT COVER (#9, #10). Using
two PHILLIPS PAN HEAD SCREWS (#3), mount the
USER LEFT FRONT COVER (#9) to the FRAME (A).
Attach the USER RIGHT FRONT COVER (#10) to the
FRAME in the same manner using two PHILLIPS PAN
HEAD SCREWS (#3). Secure the tops of the FRONT
COVERS together using two PHILLIPS PAN HEAD
SCREWS (#3).
CAUTION: Do not overtighten the PHILLIPS PAN HEAD
SCREWS (#3).
3. Locate the RIGHT USER ARM (#12). Snap the 2-PIN
CONNECTOR (2PA) located at the bottom of the RIGHT
USER ARM into the 2-PIN CONNECTOR (2PB) positioned
at the top of the RIGHT ROCKER ARM (B). Feed the con-
nectors and excess cable up into the RIGHT USER ARM.
Secure the RIGHT USER ARM to the RIGHT ROCKER
ARM using three HEX SOCKET HEAD CAP SCREWS
(#1) and INTERNAL TOOTH LOCK WASHERS (#18).
Repeat the procedure for the LEFT USER ARM (#11) and
LEFT rocker arm (C). Tighten all screws securely.
CAUTION: Be careful not to pinch the WIRE HARNESSES
when assembling the USER ARMS (#11 & #12) to the
ROCKER ARMS (B & C).
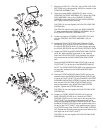
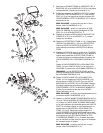
4. Detach and unwrap the WIRE HARNESS (E) (16P, 4P)
located at the top of the MONOCOLUMN (F). Holding the
CONSOLE SUPPORT ASSEMBLY (#7) with the handgrips
facing upward, feed the WIRE HARNESS up through the
neck and out the top access hole. Carefully lower the
CONSOLE SUPPORT ASSEMBLY into the MONOCOL-
UMN.
CAUTION: Be careful not to pinch the WIRE HARNESSES
(E) when assembling the CONSOLE SUPPORT ASSEM-
BLY (#7) to the MONOCOLUMN (F).
5. Using two HEX SOCKET HEAD CAP SCREWS (#1) and
two FLAT WASHERS (#8), secure the CONSOLE SUP-
PORT ASSEMBLY (#7) to the MONOCOLUMN (F).
Tighten the SCREWS securely.
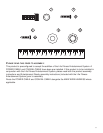
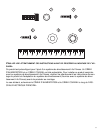
6. Locate the ACCESSORY TRAY (#17). Align the ACCES-
SORY TRAY with the bottom of the DISPLAY CONSOLE
(#4) as shown. Using four MOUNTING SCREWS (#2),
secure the ACCESSORY TRAY to the DISPLAY CON-
SOLE as shown. Tighten the SCREWS securely.
CAUTION: Do not overtighten the MOUNTING SCREWS
(#2).