


11.2 HOW TO ADJUST AND TENSION THE STRIDING BELT
Do not move the treadmill or place hands under the treadmill while it is plugged into an electrical outlet!
Tool Required: 6MM Hex Key Wrench
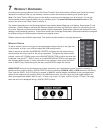
THE BELT TENSIONING BOLTS
The Life Fitness treadmill has access holes in the rear roller guards, which allow access to the tensioning bolts. These
tensioning bolts make it possible to adjust tracking and centering of the striding belt (A) without removing the guards.
Note: It is extremely important that the treadmill be correctly leveled prior to any tracking adjustments. An unstable unit
may cause striding belt misalignment. See How To Stabilize the Life Fitness Treadmill prior to attempting any rear roller
adjustments.
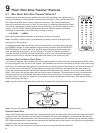
Before proceeding, it is helpful to visualize the REAR ROLLER (B) pivot point (C). Each adjustment made to one side of
the ROLLER must be met with an equal and opposite adjustment (D) to the other side of the ROLLER to maintain an
ideal belt tension at the pivot point.
TRACKING (CENTERING) AN EXISTING OR NEW STRIDING BELT
1. Locate the two access holes to the BELT TENSIONING BOLTS (D) on each of the rear roller guards.
2. Stand on the sides of the treadmill and straddle the belt. Enter the MANUAL Workout and set the belt speed to run
at 4.0 mph (6.4 kph).
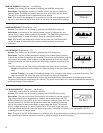
3. If the striding belt has moved to the right, turn the right tension bolt 1/4 turn
clockwise with the provided 6MM Hex Key Wrench, and then turn the left
tension bolt 1/4 turn counter-clockwise to start striding belt tracking back to
center of roller.
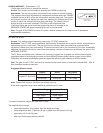
4. If the striding belt has moved to the left, turn the left tension bolt 1/4 turn
clockwise and then turn the right tension bolt 1/4 turn counter-clockwise to
start striding belt tracking back to center of roller. Repeat adjustments until
the striding belt appears centered. Allow the machine to continue running
for several minutes to observe if tracking remains stabilized.
Note: Do not exceed one full turn of the adjusting screws in either direction. If
after one full turn the belt does not track properly, contact Customer Support
Services.
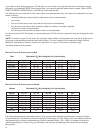
TENSIONING AN EXISTING STRIDING BELT
Under normal usage, the treadmill striding belt may stretch slightly. If the belt starts to slip during use, take the steps
listed below to correct the tension.
1. Using the STOP key, stop the treadmill.
2. Turn the belt tensioning bolts clockwise a quarter-turn per side to tension the belt. Do not exceed one full turn (four
quarter-turns per side).
3. Set the treadmill at 2.0-mph (3.2 kph) and get on to make sure the belt no longer slips. Also, check the striding belt’s
tracking. If the striding belt drifts to the left or right see Tracking (Centering) an Existing or New Striding Belt.
Note: Do not overtighten the tensioning bolts while making belt adjustments. Overtightening of bolts may over stretch
and damage the striding belt or roller bearings. Do not exceed one full turn of either bolt in either direction.
D
D
29