


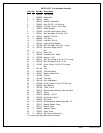


4
P/N 211911A 09/02
ENGLISH INSTRUCTIONS
IMPORTANT! WRITE DOWN MODEL NUMBER FROM BOX ON
PAGE 1 OF THIS OWNERS MANUAL
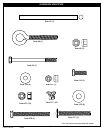
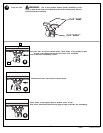
1. Remove contents from tank (1).
2. Install rod (5) through holes in bottom pole section (4) and
eyebolt (6).
3. Install wheel axle (2) through wheel carriage (7) and install
wheels (3) onto wheel axle (2) with spacers (26) as shown.Insert
pole assembly into tank assembly as shown. Secure bottom
pole (4) to tank and wheel bracket as shown, a deep socket is
recommended. NOTE: Two people recommended for this step.
IMPORTANT! DO NOT OVER TIGHTEN.
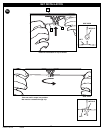
4. Secure tank struts (11) to pole. Rotate non-secured ends of tank
struts (11) outward to mounting holes in tank as shown.
WARNING: TIGHTEN BOLT (11) IN LOCK NUT (14) UNTIL
FLUSH (EVEN) WITH LOCK NUT’S OUTER EDGE.
5. Secure non-secured ends of tank struts (11) to tank as shown.
Repeat for opposite side.
6. Attach extension arm (18) to pole using U-bolt (22), washers
(19), nuts (8), as shown. Install pole cap (24) as shown.
WARNING: DO NOT LEAVE ASSEMBLED UNIT
UNATTENDED, IT MAY TIP OVER.
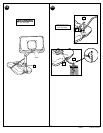
7. Attach board struts (29) to extension arm using U-bolts (30),
strap (42), and nuts (15) and bolt covers (43) as shown.
Tighten completely.
8. Attach backboard to struts (29) with bolts (21) and nuts (15) as
shown.
Insert T-bolt (32) through back bracket (31) and attach this
assembly to backboard by inserting bolts (20) through back
bracket (31), backboard, backboard extension arm (18), washers
(19), and nuts (15) as shown.
IMPORTANT! Prevent backboard lighting wires from being
damaged by keeping them in the small channel on
backboard.
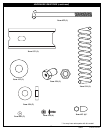
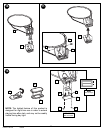
9. A.Fit rim (16) securely into bracket (31) as shown.
B.Install reinforcement bracket (33) onto “T” bolt (32) as shown.
Tuck wires from rim behind reinforcement bracket (33).
C.Install spring (34) onto “T” bolt (32) as shown.
D.Install special nut (36) and washer (35) onto “T” bolt (32).
Tighten
nut (36) until flush with end of “T” bolt (32).
10. Connect red and black wires from rim (16) to red and black wires
from rim cover (37). Repeat with blue and white wires.
11. Fit rim cover (37) into rim bracket (31) and secure to rim with screws (38)
as shown.
12. Remove paper backing from battery cover gasket (39) and
adhere gasket (39) to inside of battery cover (40) as shown.
Install 2 “AA” batteries (not included) into rim cover (37). Be sure
to install batteries in direction shown on inside of battery
compartment. Attach battery
cover (40) with screws (38) and washers (41)as shown. Turn
unit on to verify correct battery installation. NOTE: The lighted
feature of this product is designed for night time use in order to
extend playing time after dark, and may not be readily visible
during day light.
WARNING: USE OF THIS PRODUCT WITHOUT PROPER
INSTALLATION OF SMART CLIPS, OR WHEN ALL SMART CLIPS
ARE NOT PRESENT COULD RESULT IN BODILY HARM. BE SURE
TO FOLLOW DIRECTIONS CAREFULLY.
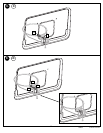
13. Install net clips as shown. (See illustration)
14. Install net as shown. (See illustration)
15. Carefully upright assembly. Apply moving system label (13) to
front of pole as shown.
WARNING: DO NOT LEAVE ASSEMBLED UNIT
UNATTENDED WHEN EMPTY, MAY TIP OVER.
16. Place assembled unit to desired location. Fill tank with water (30
gallons (114 liters)) or sand (360 lb. (163 kg)) and snap tank
cap (28) in place.
Insert T-strap (27) through slot on back of base as shown.
Secure unit to ground by twisting tie down stake (25) into ground
and hooking T-strap (27) onto tie down stake (25).
IMPORTANT! Add two gallons (7.6 liters) of non-toxic
antifreeze in sub-freezing climates.
WARRANTY CARD:
Please remember to complete your product
registration form either on-line at:
www.huffysports.com/warrantycard or mail-in
the enclosed postcard.