


FOLLOW THESE 8 TIPS TO GET THE
MOST OUT OF YOUR NEW WATCH!
8. It is advisable to have your watch
pressure tested annually and to
re-furbish your watch every 2-3
years to extend the life of the watch.
1. Never pull out the crown or operate
the pushers/buttons under water.
3. If your watch is exposed to
saltwater it is very important to
wash it thoroughly under tap water
and wipe dry with a soft cloth.
Keep it clean!
7. Never try to remove the caseback,
leave this to a certified watch repair
technician or Freestyle service
center. This will help in preventing
water leakage from improper
battery replacement.
4. Severe impacts or drops may
affect your watches water
resistance and performance.
6. Avoid exposing your watch to
chemicals, soaps or solvents as
they deteriorate the water resist
seals in your watch.
2. Make sure your crown is returned
to the original position before you
expose your watch to water.
5. Avoid exposing your Freestyle
watch to extreme temperatures
such as in a hot shower, Jacuzzi,
sauna or hot tub. The combination
of extreme heat and water may
cause your watch to lose some of
its water resistance.
graphic data recorded. Press S2
button to cycle the selection
backward.
4. When displaying maximum
absolute pressure, minimum
absolute pressure and the individual
statistic and graphic data recorded,
the corresponding log time and date
will be swapping in every 2 seconds.
5. Press S3/S4 button to return to
BAROMETER mode.
TO USE THE CHRONOGRAPH
1. Press S3 button to select
CHRONOGRAPH mode.
2. The chronograph will then be
displayed in its current sate – reset,
running or stopped.
3. To resume a counting, press S1
button to resume from where it left
off.
4. To start a new counting, reset the
chronograph to zero first.
Press S2 button to stop counting,
then press and hold S2 button for
around 3 seconds to reset the
counter to zero.
FOR THE MEASUREMENT OF
ELAPSED TIME
In CHRONOGRAPH mode,
1. Press S1 button to start counting.
2. To stop counting, press S2 button.
Press S1 button to resume from
where if left off.
3. To reset to zero, press S2 button to
stop counting, then press and hold
S2 button for around 3 seconds to
reset the counter to zero.
FOR THE MEASUREMENT OF
SPLIT TIME AND LAP TIME
In CHRONOGRAPH mode,
1. Press S1 button to start counting.
2. While the chronograph is running,
press S1 button once to register a
lap. Both the split time and lap time
will be displayed.
After 3 seconds, the currently
accumulated split time and lap time
will be displayed.
3. Repeat the last step until all the
laps have been registered.
4. To stop counting, press S2 button.
Press S1 button to resume from
where if left off.
5. To reset to zero, press S2 button to
stop counting, then press and hold
S2 button for around 3 seconds to
reset the counter to zero.
NOTE: The watch can record up to a
maximum of 99 laps. During a
measurement of split time and lap
time, the message “FULL” will be
displayed when the memory is full.
TO USE THE RECALL FUNCTION
1. After the measurement of split
time, press S4 button to select
RECALL mode when the
chronograph is stopped.
2. After 2 seconds or by pressing
S1/S2 button, the sum of time of all
lap counting (TOTAL) will be
displayed.
3. Press S1/S2 button to select
displaying the sum of time of all lap
counting (TOTAL), best lap (BEST),
average time (AVERAGE) or
individual lap record (LAP-XX).
4. Press S4 button to return to
CHRONOGRAPH mode or press S3
button to return to TIME mode.
NOTE: The lap record(s) will be cleared
when chronograph is reset.
NOTE: The average time (AVERAGE)
is the total time of all lap counting
over the number of lap count.
TO SET THE TIMER
1. Press S3 button to select TIMER
mode.
2. Press and hold S4 button for around
3 seconds, the second digits will
blink.
3. Press S1/S2 button to set the
second digits. Holding down the
button will speed up the process.
4. Press S3 button, the minute digits
will blink.
5. Press S1/S2 button to set the
minute digits.
6. Press S3 button, the hour digits will
blink.
7. Press S1/S2 button to set the hour
digits.
8. Press S3 button, the mode selection
will blink.
9. Press S1/S2 to select among
countdown stop mode (Cd-STOP),
countdown up mode (Cd-UP) and
countdown repeat mode (REP-00).
10.After finish making all the settings,
press S4 button to confirm.
TO USE THE TIMER
In countdown stop mode (Cd-STOP),
1. Press S1 button to start counting.
The timer icon
will appear.
2. To stop counting, press S2 button.
Press S1 button to resume from
where it left off.
3. To reload the timer, press S2 button
to stop counting, and then press S2
button again to reload the timer to
the preset value.
4. After reaching zero in a countdown,
a beep sound will be emitted and
the timer icon
will blink for 10
seconds. The timer will then be
reloaded to the preset value.
In countdown up mode (Cd-UP),
1. Press S1 button to start counting.
The timer icon
will appear.
2. To stop counting, press S2 button.
Press S1 button to resume from
where it left off.
3. After reaching zero in a countdown,
a beep sound will be emitted and
the time icon
will blink for 10
seconds. The timer will
start counting up simultaneously.
4. Press S2 button once to stop
counting. Press S2 button again to
reload the timer to the preset value.
In countdown repeat mode (REP-00),
for time value < 1 minute:
1. Press S1 button to start counting.
2. To stop counting, press S2 button.
Press S1 button to resume from
where it left off.
3. After reaching zero in a countdown,
a beep sound will be emitted for 1
second. The timer will repeat
counting at the preset value
simultaneously.
4. Press S2 button once to stop
counting. Press S2 button again to
reload the timer to the preset value.
for time value > 1 minute:
1. Press S1 button to start counting.
2. To stop counting, press S2 button.
Press S1 button to resume from
where it left off.
3. After reaching zero in a countdown,
a beep sound will be emitted and
the timer icon
will blink for 10
seconds. The timer will repeat
counting at the preset value
simultaneously.
4. Press S2 button once to stop
counting. Press S2 button again to
reload the timer to the preset value.
NOTE: In countdown repeat mode, the
maximum number of repetition is 100
(REP-00 to REP-99).
NOTE: When timer beep sound is
emitted, press any button to disable
the beep sound.
TO SELECT AND SET ON/OFF
THE ALARM
1. Press S3 button to select ALARM
mode.
2. Press S2 button to select from
ALARM 1 (AL-1) to ALARM 5 (AL-
5). Each alarm can be set as
different modes - time alarm,
altitude alarm or pressure alarm.
3. Press S1 button to toggle between
on and off of the alarm. If the alarm
is on, the alarm icon
will appear.
TO SELECT THE ALARM MODE
OF INDIVIDUAL ALARM
1. In individual alarm (AL-1 to AL-5),
press and hold S4 button for around
3 seconds. The message “Time-AL”
will be displayed.
2. Press S1/S2 button to select time
alarm setting mode (Time-AL),
altitude alarm setting mode (ALTI-
AL) or pressure alarm (BARO-AL).
3. Press S3 button to enter into each
setting mode.
4. Press S4 button to return to ALARM
mode.
TO SET THE TIME ALARM
In time alarm setting mode,
1. Press S1/S2 button to set the hour
digits. Holding down the button will
speed up the process.
2. Press S3 button once, the minute
digits will blink. Press S1/S2 button
to set the minute digits.
3. Press S3 button to set the time
zone. Press S1/S2 button to toggle
between T1 and T2 time zones.
4. After finishing making all the
settings, press S4 button to return
to ALARM mode.
TO SET THE ALTITUDE ALARM
In altitude alarm setting mode,
1. Press S1/S2 button to set the
altitude value (in units M (meter) or
Ft (feet)). Holding down the button
will speed up the process.
2. After finishing making all the
settings, press S4 button to return
to ALARM mode.
NOTE: When altitude arrives or over
the set value, a beep sound will be
emitted for 20 seconds. Then the alarm
will be deactivated automatically.
NOTE: The altitude value can be set
from -1600 ft. (-500m) to 29500 ft.
(9000m).
TO SET THE PRESSURE ALARM
In pressure alarm setting mode,
1. Press S1/S2 button to set the
pressure value (in units mbar
(millibar) or Ft (feet)). Holding down
the button will speed up the
process.
2. After finishing making all the
settings, press S4 button to return
to ALARM mode.
WHEN AN ALARM GOES OFF
When any alarm alerts, press any
button to stop the alarm.
NOTE: Individual alarm will
automatically be activated after being
set.
TO SHOW THE TEMPERATURE
1. Press S3 button to select
TEMPERATURE mode.
2. Press S1/S2 button to toggle
between ºC and ºF.
TO SET THE OFFSET
In TEMPERATURE mode,
1. Press and hold S4 button for around
3 seconds, the temperature value
will blink.
2. Press S1/S2 to offset the
temperature value (in units ºC or
ºF).
3. After finishing making all the
settings, press S4 button to return
to TEMPERATURE mode.
NOTE: The temperature offset range
is +/- 5 ºC or +/- 10ºF.
NOTE: The temperature measuring
range is -10 ºC - 60 ºC or 14 ºF - 140
ºF.
NOTE: If the measured temperature
value is out of measuring range, the
temperature value will be shown as
“---”.
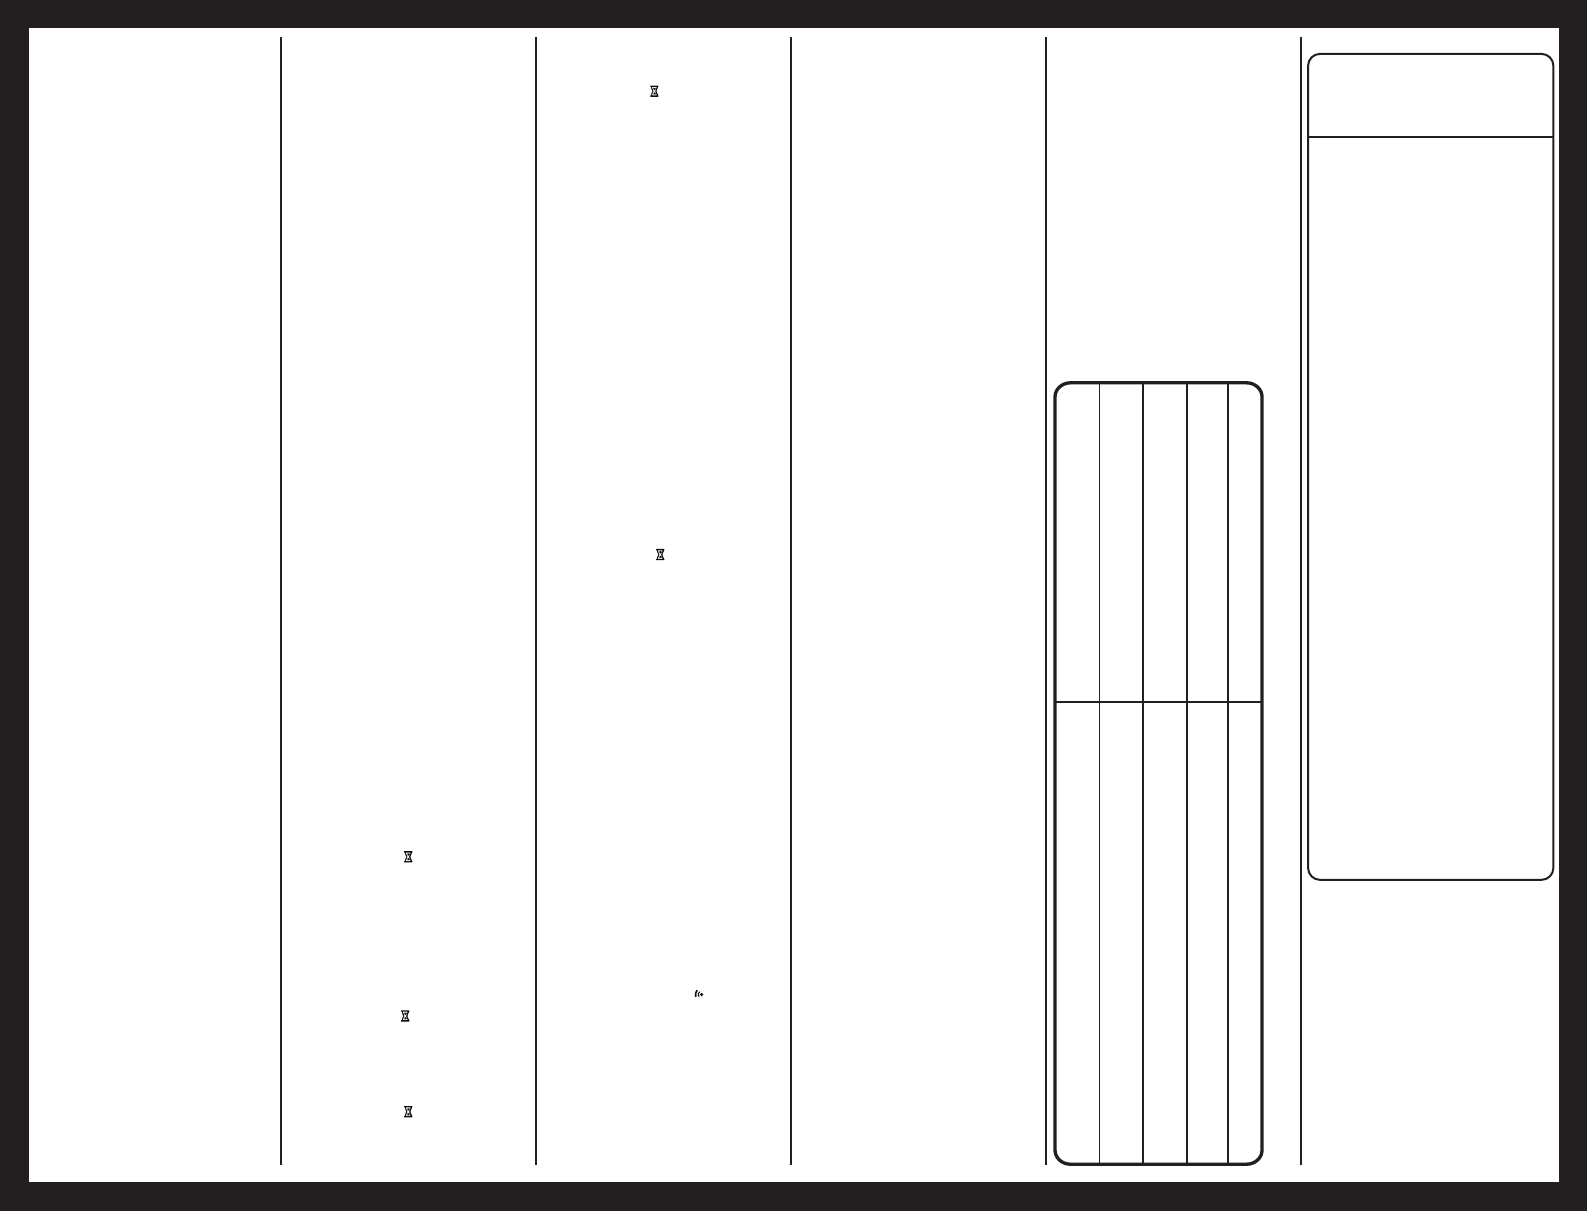
WATER RESISTANCE
3 ATM / 50 METERS / 100 FEET /
30 METERS H2O
5 ATM / 50 METERS / 165 FEET /
50 METERS H2O
10 ATM / 100 METERS / 330 FEET /
100 METERS H2O
20 ATM / 200 METERS / 660 FEET /
200 METERS H2O
SUITABLE ATMOSPHERE
Suitable for washing hands and light splashing
Suitable for light swimming. E.g.: Bathing in a pool or low
tide waters, but not suitable for diving
Suitable for most water sorts. E.g.: Swimming,
surfing and snorkeling, but not suitable for deep water diving
Suitable for most water sports including deep water diving
WATER RESISTANCE GUIDE