


NOMAD
Model FS81202
Model FS81203
Model FS81204
FEATURES:
•
30 meters H2O
• Day/date/calendar
• Compass with degrees and direction
• Barometer with pressure trend
• Altimeter with cumulative ascent
and descent
• 99 lap memory chronograph
• Countdown timer
• 5 Alarms
• EL backlight
CONTROL BUTTONS
S1 – Start/split Button
S2 – Stop/reset Button
S3 – Mode Button
S4 – Light/adjust Button
S2S3
S1S4
DISPLAY MODES
The watch has eight display modes:
TIME, COMPASS (COMP), ALTIMETER
(ALTI), BAROMETER (BARO),
CHRONOGRAPH (CHRO), TIMER,
ALARM and TEMPERATURE (TEMP).
To change from one display mode to
another, press S3 button once. The
mode description will appear for
around 2 seconds before the selected
mode is activated.
TO USE THE BACKLIGHT
Press S4 button to turn on the
backlight for 3-5 seconds.
OTHERS
In any setting/viewing mode, if there
is no key manipulation for around 1-
2 minutes, the watch will automatically
save the entered data and exit the
setting/viewing mode.
TO SET THE TIME AND
CALENDAR
1. Press S3 button to select TIME
mode.
2. Press S4 button for around 3
seconds.The message “Set-Time”
will be displayed.
3. Press S3 button once, the hour
digits will blink.
4. Press S1/S2 button to set the hour
digits. Holding down the button will
speed up the process.
5. Press S3 button once, the minute
digits will blink.
6. Press S1/S2 button to set the
minute digits.
7. Follow the same pattern to set the
second, year, month, date and hour
format.
8. To set the second digits, press S1/S2
button to reset the second digits to
00.
9. To set the hour format, press S1/S2
button to toggle between 12-hour
and 24-hour format. The P.M.
indicator may be displayed to
indicate the time period 12:00 A.M.
– 11:59 P.M. in 12-hour format.
10.After finish making all the settings,
press S4 button to confirm.
TO SET NIGHT, CHIME AND BEEP
1. In TIME mode, press S4 button for
around 3 seconds. The message
“Set-Time” will be displayed.
2. Press S1/S2 button to select option
mode. The message “OPTION” will
be displayed.
3. Press S3 button continuously to
select among NIGHT, CHIME or
BEEP mode.
4. Press S1/S2 button to activate or
deactivate each mode.
5. After finish making all the settings,
press S4 button to confirm.
NOTE: When NIGHT mode is activated,
the NIGHT mode icon
will appear.
The backlight will turn on for 3-5
seconds when any button is pressed.
NIGHT mode will turn off automatically
after 8 hours.
TO SHOW DUALTIME (T1 OR T2)
1. In TIME mode, press and hold S2
button to view T1 or T2 time zone.
2. Press and hold S2 button for around
4 seconds to swich to display T1 or
T2 time zone.
3. Follow the same pattern to toggle
between displaying T1 and T2 time
zones.
TO SHOW CALENDAR OR
TEMPERATURE
1. In TIME mode, press and hold S1
button to view calendar or
temperature.
2. Press and hold S1 button for 4
seconds to switch to display
calendar or temperature.
3. Follow the same pattern to toggle
between temperature and calendar
displays.
TO USE THE COMPASS
1. Press S3 button to select COMPASS
mode. The direction, degree and
time will be displayed.
NOTE: In COMPASS mode, if there is
no key manipulation for around 30
seconds, the compass sensor will be
deactivated for power saving. Press
S1/S2/S4 button to re-activate the
compass sensor. If the compass
sensor is deactivated for around 10
minutes, the watch will automatically
return to TIME mode.
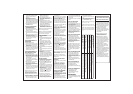
NOTE: This moving dot represents the
direction of North (N).
TO TAKE A NEW “MARK ANGLE”
In COMPASS mode, press S1 button to
take a “mark angle”. A new mark will
blink to indicate the marked direction
and a new “mark angle” (in degree)
will be displayed.
1. Press S1 button to take another
“mark angle”.
2. Press S2 button to return to
COMPASS mode.
TO SHOW THE LAST “MARK
ANGLE” OR TIME
1. In COMPASS mode, press S2 button
to display to display the previous
“mark angle”. A mark will blink to
indicate the previously marked
direction and the previous “mark
angle” (in degree) will be displayed.
2. Press S2 button again to return to
COMPASS mode.
TO CALIBRATE THE COMPASS
1. In COMPASS mode, press and hold
S4 for around 3 seconds. The
message “CALIB” will be displayed.
2. Press S3 button to start the
calibration.
3. When the message “2-TURN” is
displayed, a series of moving dots
will be displayed at the rim of the
display and increase in clockwise
direction. Rotate the watch
horizontally in counter-clockwise
direction in order to freeze the last
moving blinking dot to stay at 12-
hour position.
4. When the watch is rotated
completely for 360 degrees, the
message “1-TURN” will be
displayed. Rotate the watch again
in counter-clockwise direction.
5. To interrupt and stop the calibration,
press S4 button. The message
“DISTORT” will be displayed and
the watch will return to COMPASS
mode after 3 seconds.
6. When the calibration is done, the
message “DONE” will be displayed
and the watch will return to
COMPASS mode after 2 seconds.
TO SET THE DECLINATION
ANGLE
1. In COMPASS mode, press and hold
S4 button for around 3 seconds. The
message “CALIB” will be displayed.
2. Press S1/S2 button to select
declination angle setting mode. The
message “DECLIN” will be
displayed.
3. Press S3 button, E will blink.
4. Press S1/S2 button to toggle
between E (East) & W (West).
5. Press S3 button. The declination
angle will blink.
6. Press S1/S2 to set the degree from
0˚ to 90˚.
7. After finish making all the settings,
press S4 button to return to
COMPASS mode.
TO USE THE ALTIMETER
1. Press S3 button to select
ALTIMETER mode.
2. The latest altitude will be displayed
in numeric and graphic formats.
TO SET UP THE ALTIMETER
1. In ALTIMETER mode, press and hold
S4 button for around 1 second. The
message “SET-ALTI” will be
displayed.
2. Press S1/S2 button to select among
altitude setting mode (SET-ALTI),
sea level pressure setting mode
(SEA-Lv) or units setting mode
(UNITS).
3. Press S3 button once to enter into
each setting mode. Press S3 button
again to return to the mode
selection screen.
4. In altitude setting mode, press
S1/S2 button to set the altitude
digits.
5. In sea level pressure setting mode,
press S1/S2 button to set the sea
level pressure digits.
6. In units setting mode, press S1/S2
button to toggle between M (meter)
and Ft (feet).
7. After finish making all the settings,
press S4 button to return to
ALTIMETER mode.
TO SHOW THE LOG DATE AND
TIME
1. In ALTIMETER mode, press S2
button to display log date and time.
2. Press S3 button or leave the watch
idle for 5 seconds to return to
ALTIMETER mode.
TO CLEAR THE DATA
1. In ALTIMETER mode, press and hold
S2 button for around 3 seconds to
clear all statistic data and graphic
data.
NOTE: After clearing the data, the first
new data will be updated after 2
seconds and another data will be taken
in every 30 minutes.
TO VIEW ALTITUDE AND OTHER
INFORMATION
1. In ALTIMETER mode, press S1
button to select displaying the data
of accumulative ascent (ASCENT),
accumulative descent (DESCENT),
difference in altitude (DIFFER), rate
(RATE) or time (TIME).
2. After showing the individual data at
the bottom for around 2 seconds,
the data in bar chart (graphic)
format will be displayed at the top.
NOTE: To reset the difference in
altitude to zero, press and hold S1
button for around 3 seconds when the
difference in altitude data is displayed.
TO VIEW DATA IN DETAIL
1. In ALTIMETER mode, press S4
button once. The message “VIEW
DATA” will be displayed.
2. After 3 seconds or by pressing
S1/S2 button, the message
“Highest” will be displayed.
3. Press S1 button to select displaying
the data of highest altitude
(Highest), lowest altitude (Lowest),
accumulative ascent (ASCENT),
accumulative descent (DESCENT),
difference in altitude (DIFFER) or
the individual statistic and graphic
data recorded. Press S2 button to
cycle the selection backward.
4. When displaying highest altitude,
lowest altitude and the individual
statistic and graphic data recorded,
the corresponding log time and date
will be swapping in every 2 seconds.
5. Press S3/S4 button or leave the
watch idle for 1 minute to return to
ALTIMETER mode.
TO USE THE BAROMETER
1. Press S3 button to select
BAROMETER mode.
2. The latest sea level pressure will
be displayed in numeric and graphic
formats.
TO SET UP THE BAROMETER
1. In BAROMETER mode, press and
hold S4 button. The message “Sea
-Lv” will be displayed.
2. Press S1/S2 button to select among
sea level pressure setting mode
(Sea-Lv) or units setting mode
(UNITS).
3. Press S3 button once to enter into
each setting mode. Press S3 button
again to return to the mode
selection screen.
4. In sea level pressure setting mode,
press S1/S2 button to set the sea
level pressure digits.
5. In units setting mode, press S1/S2
button to toggle between blinking
mbar (millibar) and inHg (inch of
Mercury).
6. After finish making all the settings,
press S4 button to return to
BAROMETER mode.
TO SHOW THE LOG DATE AND
TIME
1. In BAROMETER mode, press S2
button to display log date and time.
2. Press S3 button or leave the watch
idle for around 5 seconds to return
to BAROMETER mode.
TO CLEAR THE DATA
1. In BAROMETER mode, press and
hold S2 button for around 3 seconds
to clear all statistic data and graphic
data.
NOTE: After clearing the data, the first
new data will be updated after 2
seconds and another data will be taken
in every hour.
TO VIEW BAROMETER AND
OTHER INFORMATION
1. In BAROMETER mode, press S1
button to select displaying the data
of sea level pressure (SEA-Lv), sea
level pressure change per hour
(dP/dt) or time (TIME).
2. Press S1 button continuously to
view data of Sea level pressure,
dP/dt (sea level pressure change
per hour) and Time.
3. After showing the individual data at
the bottom for around 2 seconds,
the data in trend (graphic) format
will be displayed at the top.
TO VIEW DATA IN DETAIL
1. In BAROMETER mode, press S4
button once. The message “VIEW
DATA” will be displayed.
2. After around 2 seconds or by
pressing S1/S2 button, the message
“MAX” will be displayed.
3. Press S1 button to select displaying
the data of maximum absolute
pressure (MAX), minimum absolute
pressure (MIN) or the statistic and