


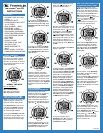

TIMER COUNTDOWN CHRONO
LAP- Press Reset button RB, “ ”
“ ” and ” ” flags will be displayed.
This function will countdown from a
preset time. When the countdown
time is reached, the timer will beep
and automatically start a chrono-
graph. This chronograph has a chrono
lap timer, identical to that in the
chronograph/stopwatch “
LP” mode.
TIMER
COUNTDOWN CHRONO
SPLIT- Press Lap/Reset button
RB; “ ,” “ ” and “ ” flags will be
displayed. This function will count-
down from a preset time. When the
countdown time is reached, the
timer will beep and automatically
start a chronograph. This chrono-
graph has a chrono split timer,
identical to that in the
chronograph/stopwatch “ ” mode.
To set the countdown time, press
and hold the
Light/Set button LT
for three seconds. The minutes digit
will flash. To advance the flashing
minutes digit, press
Start/Stop button
RT.
Press Mode button LB to advance
to the tens of minutes digits, and
hours digits. Press Start/Stop
button RT to advance the flashing
digit. When desired timer time is
set, press Light/Set button LT to
exit the setting mode. To start or
stop timer, press
Start/Stop button
RT. To reset a stopped timer, press
Reset button RB.
HOW TO SET DUAL TIME
Press Mode button LB four times to
enter the dual time mode from the
normal time mode. The dual time
mode is indicated by the “ ” flag.
Normal time will remain in the lower
row and dual time will appear on the
upper row.
Press and hold the
Light/Set button
LT for approximately three seconds;
the minutes digits will flash. Press
Start/Stop button RT to advance.
Continue through the setting sequence
as done in normal time setting by
cycling between
Mode button LB and
Start/Stop button RT.
Press Light/Set button LT to exit
the setting mode.
Note: Press and hold Start/Stop
button RT to temporarily display the
day and date of the normal time
mode.
Note: The alarm and chime
flags are visible in this mode,
however, they are set to the normal
time mode.
HOW TO OPERATE THE NIGHT
VISION
™
ELECTROLUMINESCENT
BACKLIGHT
Press Light/Set button LT to activate
the Night Vision
™
electroluminescent
backlight. This light will remain illumi-
nated for approximately four seconds.
CARE AND MAINTENANCE
1. Back case cover should only be
removed by an authorized watch
repair specialist.
2. Always rinse your watch in fresh
water after immersion in salt or chlo-
rinated water.
3. Do not expose watch or band to
chemicals such as gasoline, aerosol
sprays, paint or solvents.
4. Periodically clean with a soft cloth
and fresh water.
WARRANTY INFORMATION
FreeStyle U.S.A. warrants, to the original
purchaser, that its watches are free from
defects in materials and workmanship for
a period of ten (10) years under normal
use. The warranty excludes batteries,
crystal, watch case plating, and strap/
bracelet/band. The warranty excludes
normal wear and tear and abuse.
Special note: FreeStyle® watches are
designed and engineered to be highly
water-resistant, and to withstand the most
active of lifestyles. The most important
component in keeping your watch water-
resistant is the case back O-ring, which
prevents water from entering the watch
through the case back.
Water leakage most often occurs after
improper battery replacement. We strong-
ly recommend having a certified jeweler,
watch repair technician or FreeStyle's ser-
vice center replace your battery. Water
leakage due to improper battery replace-
ment is not covered under warranty.
Should your FreeStyle® watch require
warranty service, send it, along with a copy
of your sales receipt, your printed name,
address, and daytime phone number and
a brief description of the problem. Please
include a check, money order, or credit
card information for $8.00 to cover pro-
cessing and handling to:
FreeStyle U.S.A.
Attn: Individual Returns
5855 Olivas Park Drive
Ventura, CA 93003
805-477-1200 ext.240
Please allow 20 days for return of your
watch.
Neither this warranty, nor any other war-
ranty expressed, is assumed for any inci-
dental or consequential damages, includ-
ing but not limited to the mathematical
accuracy of the product. Some states do
not allow limitations on how long an
implied warranty lasts, or the exclusions of
or limitations on consequential damages,
so the above limitations may not apply to
you. This warranty gives you specific legal
rights, and you may have other rights
which vary from state to state.
This warranty applies to watches pur-
chased in the United States. For watches
purchased outside the United States,
please contact your authorized FreeStyle
dealer for warranty
information.
If your watch requires servicing not cov-
ered under our warranty (battery, crystal,
strap/bracelet/band, watch case plating), or
refurbishing, complete the return form
(attached) and return with your watch. Be
sure to include a check, money order or
credit card information for desired replace-
ment parts. Please include $8.00 for pro-
cessing and
handling.
Visit our website at:
www.freestyleusa.com
788004-1 rev. 6/01
Again, press Reset button RB to
toggle between alarm 1 and alarm
2. Alarm 2 is set and activated the
same way as alarm 1.
= alarm 1 on.
= alarm 2 on.
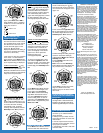
HOW TO OPERATE THE
COUNTDOWN TIMER
Press Mode button LB three times
from the normal time mode to enter
the countdown timer mode. Normal
time will remain in the lower row
and the timer will appear on the
upper row. “ ” flag will be
displayed. (Minimum time setting is
one minute; maximum time setting
is 99 hours, 59 minutes).
*Note: there are four timer functions
in this mode. To select between
these features, press
Reset button
RB until the desired function (noted
by its respective flag) is displayed.
TIMER
COUNTDOWN - “ ” flag
will be displayed. This function will
countdown from a preset time.
When the countdown time is reached,
the timer will beep and will automat-
ically reset to the preset time.
TIMER
COUNTDOWN REPEAT-
Press Reset button RB; “ ” and
“ ” flags will be displayed. This
function will countdown from a pre-
set time. When the countdown time
is reached, the timer will beep,
automatically reset, and begin
counting down repeatedly until the
Start/Stop button RT is pressed.