


10
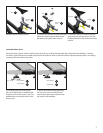
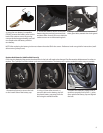
Adjust Flywheel/Chain Tension
Over time and after substantial use, the chain on the CycleOps Pro Series indoor cycle will stretch. Adjusting the tension/align-
ment is a diffi cult task and improper adjustment can lead to premature chain/cog wear. It is recommended this task be done with
assistance from an authorized indoor cycle dealer. The chain tension has been adjusted properly when there is little or no play felt
when the pedals are rocked back and forth.
NOTE: Be sure to make small incremental adjustments to the tensioning hardware on both sides of the fl ywheel. Only adjusting
one side will lead to improper fl ywheel alignment and unwanted drive train wear and/or noise.
CAUTION: Improper chain adjustment will cause premature wear and may void the warranty.
CAUTION: NEVER put hands into or near the drive train while it is motion!
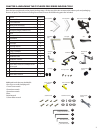
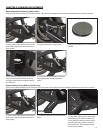
1. Using a 4mm Allen wrench, remove the
three chain guard bolts.
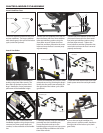
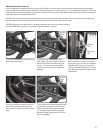
3. Use a 17mm cone wrench to hold the
axle locking nuts in place. Do not turn
the wrench, it is only used as a stabilizer.
With the other hand, use a 15mm box
wrench to loosen the fl ange nuts on the
axle. Repeat this process on each side of
the fl ywheel.
4. Using a 10mm box wrench, adjust the
tensioning hardware until the proper
chain tension is achieved evenly on both
sides.
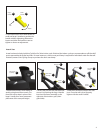
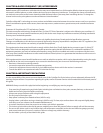
5. Pull chain down (midway between chain
ring and gear) to measure vertical travel.
Vertical travel should be approximately
1/4” when the chain has been properly
adjusted. Tighten fl ange nuts to 75 in-lbs.
Do not overtighten.
10 mm tensioning
hardware
Flange
Nut
Axle Lock
Nut
Vertical
Travel
2. Pull chain down (midway between
chain ring and gear) to measure vertical
travel. Vertical travel should be approxi-
mately 1/4”. Vertical travel with signifi -
cantly more or less than 1/4” should be
adjusted.
Vertical
Travel