


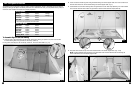

6. Attach the two remaining hooks on the top of the tent to the Center Support Post. (Fig. 6)
7. Attach hooks on the corners of the tent to the Gold End Poles; then the hooks on the front & back of the tent to the
Chrome Center Poles. (Fig. 6)
8. Stretch corners and front & back of tent until floor is taut; then hammer stakes through loops on web straps to
secure. (Fig. 6)
FIG. 6
9. Unfold Rainfly and pull it over the tent frame. (Fig. 7)
NOTE: The windows need to be placed over the Bedroom Area and the right and left side awning flaps need to be
positioned over the Screen Living Area.
FIG. 7
Stake through loop in six web straps on tent
Plastic Window
Awning Flap
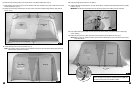
12. Insert plastic locking tabs, located on corners and front & back of Rainfly, into plastic sleeves on web straps
of tent. (Detail C)
13. Extend out guylines on front, back, and sides of tent and stake to secure Rainfly and tent (Fig. 9)
NOTE: Make sure guylines, located on left and right side of the Rainfly Awning Flap, do not interfere with access
to the doors of tent.
10. Unzip all Awning Flaps and Doors on the Rainfly.
11. Locate all 34 hook and loop fasteners, on under side of Rainfly, and wrap around all Gold and Chrome Leg Poles
to secure. (Fig. 8)
IMPORTANT: All hook and loop fasteners must be secured to provide more stability in windy conditions.
FIG. 8
Hook & Loop
Fastener
Detail C
FIG. 9
Plastic
Sleeve
Awning Flap
Guyline
Plastic
Locking
Tab
4 5
Bedroom
Area
Screened Living
Area
The X4 tent assembly is complete.
Proceed to the Tent Configuration
Section, on page 6, for the variety of ventilation options available with
your tent for its enjoyment in any weather condition.