Things You Should Know:
• Under certain conditions (cold weather, high humidity, etc.) condensa-
tion will form on the inside of your tent. Condensation is caused by
water vapor from your breath, perspiration, or any wet clothing inside
the tent. It is NOT LEAKAGE through the tent fabric. It can be minimized
by removing wet clothing from your tent and by providing good ventila-
tion through the tent.
• Never store tent, even for a short period of time, without drying it
thoroughly and brushing off caked dirt. Do not pack stakes or poles
inside your tent. Use a separate storage bag.
• STAKES SHOULD BE REMOVED BY PULLING ON THE STAKE ITSELF.
NEVER PULL ON THE TENT TO REMOVE STAKE.
• TENT POLES SHOULD NOT BE LEFT TELESCOPED TOGETHER
DURING STORAGE.
• Do not leave your tent set-up for weeks at a time. Be aware that exposure
to ultraviolet rays from the sun can seriously damage material and/or
cause it to become discolored.
WARNING: Keep all flame and heat sources away
from this tent fabric.
This tent meets the flammability requirements of CPAI-84. The
fabric may burn if left in continuous contact with any flame source.
The application of any foreign substance to the tent fabric may
render the flame-resistant properties ineffective.
The Coleman Company, Inc. • 3600 N. Hydraulic • Wichita, Kansas 67219
1-800-835-3278 • www.coleman.com
MADE IN CHINA • PRINTED IN CHINA
© 2007 The Coleman Company, Inc.
Coleman
®
and are registered trademarks of The Coleman Company, Inc.
STITCH LINE
To Set Up Tent’s Screen Room continued
To Store
1. All metal poles and stakes must to be placed in the storage
bag to prevent damage to the fabric items placed in the
carry case.
2. Make sure tent is clean and dry before placing in carry case.
3. Remove rainfly, spread out on floor of tent, then unzip
door & vents before taking tent down for storage.
4. Neatly fold tent to width of pole storage bag, place on tent,
roll tightly, and place in carry case.
5. Store in a clean, dry area.
Electrical Cord Access
1. Unzip access panel in the lower
right corner of tent and bring in
electrical cord. Use only UL approved
cords that are rated for outdoor
usage. (Fig. 11)
Fig. 11
11/07
3. Insert one end of each gray screen room pole into remaining
pins on tent. Gradually apply pressure to other end of pole to
form an arch & insert into other front pin. (Fig. 6, 6A, & 6B)
4. Attach frame clips along edges of screen room
to gray poles. (Fig. 6C)
Fig. 6
To Attach Rainfly
1. Drape rainfly over living quarters and screen room of tent
with as shown. (Fig 8).
NOTE: Hook and loop fasteners, located on seams of under
side of rainfly, should be centered over black and gray poles.
2. Locate all hook & loop fasteners on underside of rainfly and
wrap around black and gray poles to secure. (Fig. 8A)
3. Stretch elastic straps and hook clip on each to
the metal loops around the tent as shown.
(Fig. 8 & 8B)
Fig. 8
8A
6C
6B
6A
5. Stretch tent until taut, then secure metal
loops and web straps with stakes. (Fig. 7)
Fig. 7
Rainfly
8B
4. Tie guylines through
loops on web straps on
the rainfly. (Fig. 9)
5. Stretch guylines until
taut, then secure with
stakes. (Fig.10)
Fig. 10Fig. 9
Fig. 12
Cooler Access
The smaller zippered opening at the
rear of the tent is designed for added
ventilation and easy access to your
beverage cooler. (Fig. 14)
Fig. 14
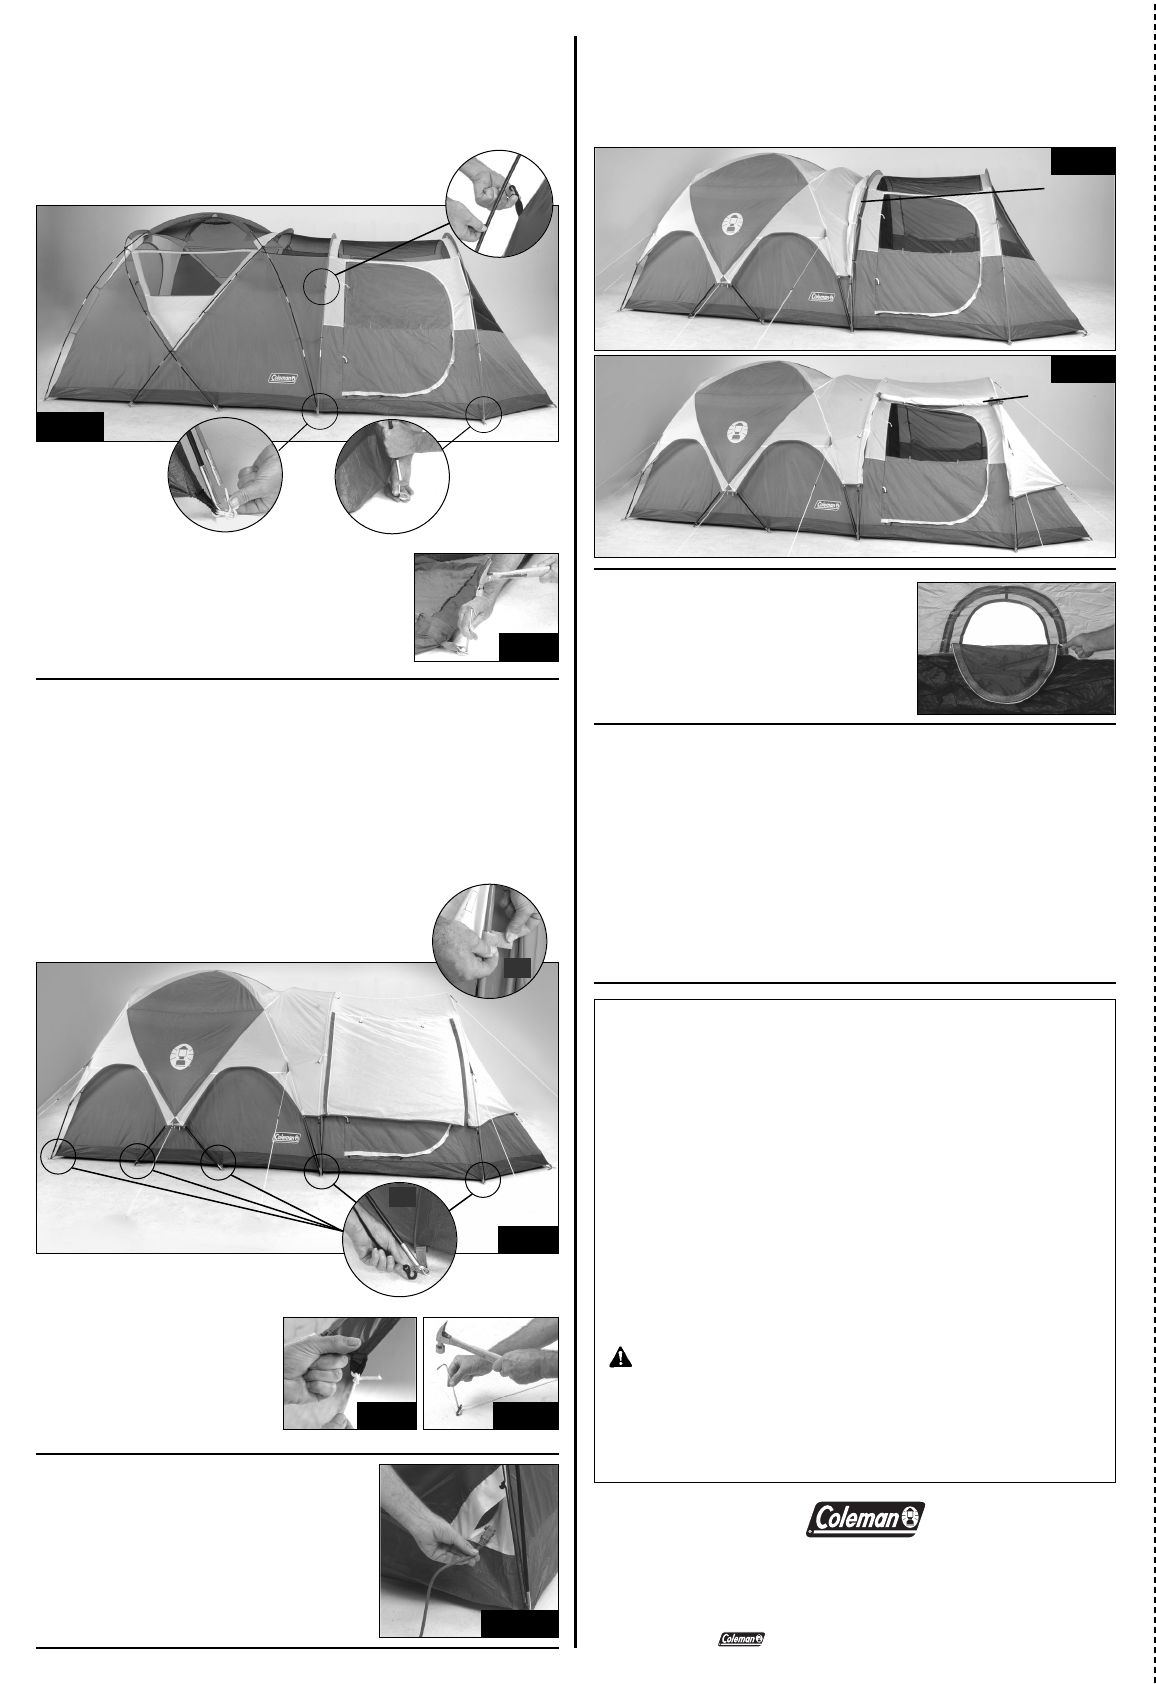
Rainfly Configurations for Screen Room
The rainly offers you the ability to choose various configurations
to fully utilize your tent’s screen room for maximum ventilation
or for privacy and protection from the elements.
Fig. 13
Rainfly door
flap rolled &
secured
Rainfly
unhooked &
rolled back
for maximum
airflow


