


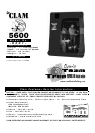


ASSEMB
L
Y
I
N
S
T
RUC
TI
O
N
S
B
EFO
R
E
A
T
T
E
M
P
T
I
N
G
T
O
U
S
E
T
H
I
S
P
R
O
D
U
CT
O
N
T
H
E
I
C
E
p
r
a
c
t
i
c
e
sett
i
n
g
u
p
an
d
t
a
k
i
n
g
down at home in the comfort of a heated area. Repeat several times until comfortable. This will make
y
ou
r
on
-
i
c
e
s
e
t
-
u
p
m
u
c
h
ea
s
i
e
r
.
N
O
T
O
O
L
S
A
R
E
N
EE
D
ED
F
OR
A
S
S
E
M
B
L
Y
O
F
Y
OUR
C
LA
M
5600.
1
.
I
N
I
TI
A
L
S
E
T
-
UP
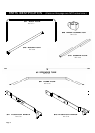
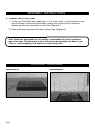
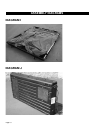
a. Open the Clam 5600 and lay on a flat level surface.
See
Diagram
A.
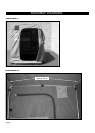
b. Lift up the two hoop pole sections until the snap button locks into place. Lock the braces.
See
Diagram
B.
(Both ends.)
c. Unfold the tent and unzip both doors. Pull the tent over the two hoop poles.
See
Diagram
C.
d. On the door ends of the tent on the top of the seam, you will see two velcro strips. Attach the
two velcro strips to the two hoop poles on the top of doors.
2
.
I
N
S
E
R
T
P
O
L
E
S
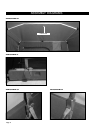
a. Insert the two spreader tubes (#6) on each end of the hoop pole.
See
Diagram
D.
b. Adjust the spreader tubes until the hoop poles are at a 90 degree angle and tent is snug,
then tighten the adjustment knob.
c. Install the dome pole (#21) in the center of the 5600.
See
Diagram
E.
(Note:
The
dome
pole
is
t
h
e
n
o
n
-
a
d
ju
s
t
a
b
l
e
po
l
e.
)
3
.
F
AS
T
E
N
T
H
E
T
E
NT
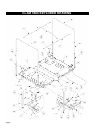
a. Fasten the tent to the base by placing the elastic straps around the notches in the base.
See
Diagram
F
.
b. Continue fastening the tent to the base by inserting the strap from the tent through the back
of the buckle.
See
Diagram
G.
Pull the strap until the elastic on the buckle starts to stretch.
Fold the tab on the buckle over and all the way down to fasten.
See
Diagram
H.
(Note:
This
o
n
l
y
n
e
e
d
s
t
o
b
e
d
o
n
e
t
h
e
f
irs
t
t
i
m
e
y
o
u
s
e
t
u
p
y
o
u
r
560
0.
)
4
.
I
NST
A
L
L
L
I
C
E
N
S
E
(Check
with
local
authorities
for the requirements of
your
ar
ea.).
a. Locate the clear sleeve sewn to the outside of the tent. Slide the required
documention of you area into the sleeve for display.
P
a
g
e
6