


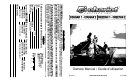
N
o
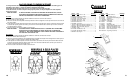
Pièce Quantité
A 40100135 Cadre supérieur - gauche.............................1
B 40100136 Cadre supérieur - droit.................................1
C 40100224 Cadre inférieur..............................................2
D 41101290 Fixation du cadre inférieur............................2
E 40100423 Cadre arrière - gauche.................................1
F 40100424 Cadre arrière - droit......................................1
G 40100722 Tube arrière..................................................2
H 40100626 Cadre du siège.............................................1
I 40101510 Fixation du bras de roue - gauche...............1
J 40101511 Fixation du bras de roue - droite..................1
K 40202006 Goupille de sécurité du bras de roue...........2
L 50100901 Forme de D..................................................1
M 41101283 Fixation arrière - gauche ..............................2
N 41101284 Fixation arrière - droite.................................2
O 40202007 Goupille de sécurité .....................................2
N
o
Pièce Quantité
P 40200104 Harnais d’épaule 16 po . . . . . . . . . . . .1
Q 50101732 Roue en plastique 20 po . . . . . . . . . . .1
R 50101733 Roue en plastique . . . . . . . . . . . . . . . .2
S 50101305 Essieu de chape . . . . . . . . . . . . . . . . .2
T 31100406/7 Toile de recouvrement . . . . . . . . . . . . .1
U 30100406/7 Coque en tissu . . . . . . . . . . . . . . . . . .1
W 50103101 Adaptateur d’essieu . . . . . . . . . . . . . .2
X 40101311 Guidon . . . . . . . . . . . . . . . . . . . . . . . .1
Y 40202011 Courroie de sécurité pour poignet . . . .1
Z 40101922 Frein de stationnement et essieu . . . . .1
AA 41101024 Bras de roue - gauche . . . . . . . . . . . . .1
AB 41101025 Bras de roue - droite . . . . . . . . . . . . . .1
AC 50103012 Tige à déclenchement rapide . . . . . . .1
AD 33100401/2 Sac de rangement (non illustré) . . . . . .1
23 4
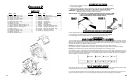
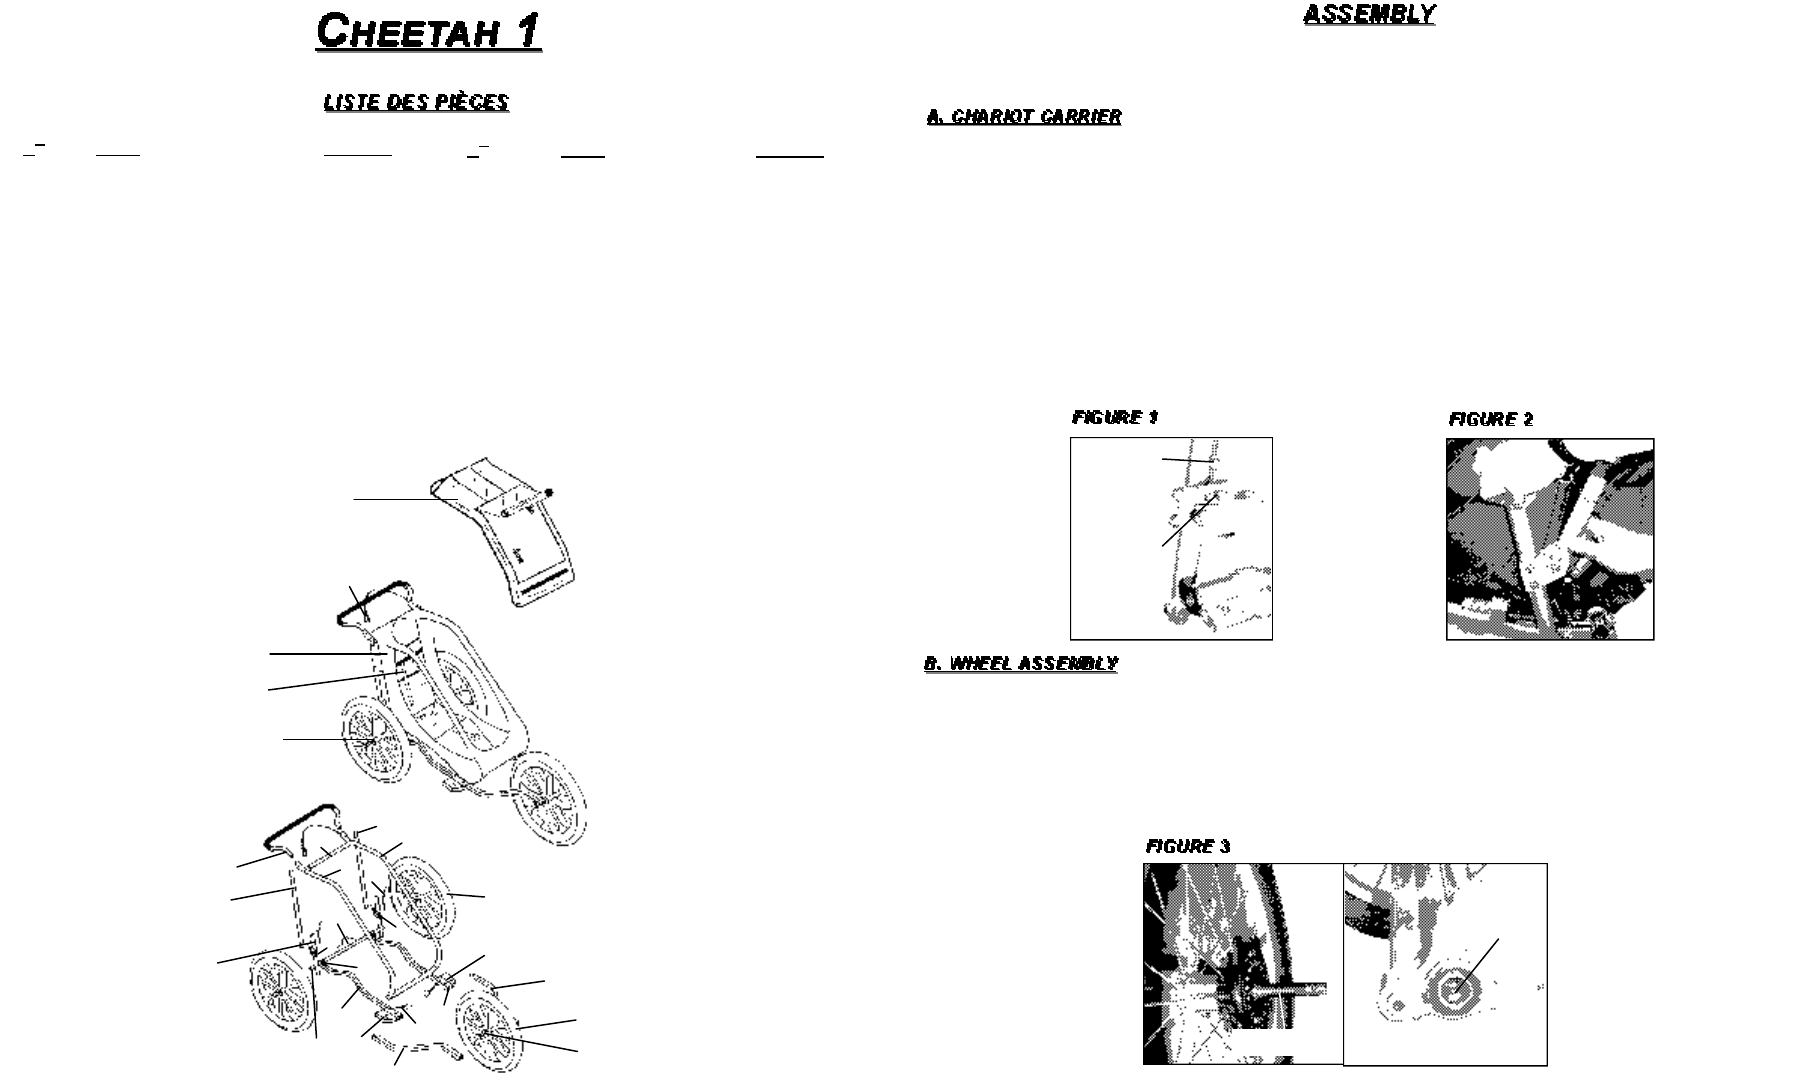
Your Chariot Carrier is shipped 99% assembled. Initial assembly takes a few minutes. After that, folding and
unfolding can be done in seconds.
Note: Any reference to orientation (left or right) is from the passenger’s point of view while in the carrier.
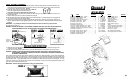
1. Stand at the back of the carrier body. Grab the upper frame and pull up until it stops.
2. Pull back on both the right and left lower bars until they “snap” all the way back over centre and the auto lock pin
engages.
CAUTION: PULL BACK ON THE LOWER BARS FROM BEHIND THE PIVOT BRACKETS TO AVOID PINCHING
YOUR FINGERS.
3. Insert both securing pins (hanging by straps attached to the frame) through both holes on the pivot brackets.
Figure 1
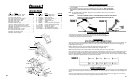
4. To collapse, remove securing pins, push the auto lock button, and then push both the right and left lower bars
forward until carrier is completely collapsed. Figure 2
NOTE: Do not attempt to collapse carrier without first pushing down the auto lock button.
WARNING! FAILURE TO INSERT SECURING PINS MAY CAUSE CARRIER TO COLLAPSE.
OCCUPANTS MAY BE INJURED.
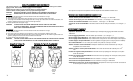
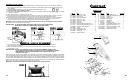
1. Depress the rubber cap on the wheel hub with your thumb and fully insert the clevis axle into the hollow
axle. Once fully inserted and secured, you should hear a “click” or “snap” sound.
IMPORTANT: To ensure the axle system is engaged properly, test by trying to pull the wheel outwards after
installing. The wheel should be locked in its installed position. If not, do not use and take your
carrier to your Chariot dealer for servicing
2. Repeat on other side with other wheel.
IMPORTANT:
Securing pins
must go through
both holes in
each bracket.
Auto Lock Pin
Hollow
Axle
Clevis Axle
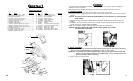
T
U
P
S
E
A
R
I
H
B
X
F
Z
G
D
C
W
J
AB
AA
K
L
Q
AC
N
M
O
Y