


— 6 —
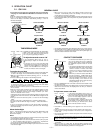
To input the date of your birth
1. In the Vital Statistics/ID Mode, display the
BIRTH screen.
2. Hold down A until the year digits start to flash
on the display. The year digits flash because
they are
selected
.
3. Press M to change the selection in the following
sequence.
4. Press C to increase the selected digits and B to decrease them. Holding
down either button changes the selected digits at high speed.
• The year can be set in the range of 1900 to 2039.
5. After inputting your data, press A to store it and return to the normal
BIRTH screen (no flashing digits).
Personal identification data
• This watch has three built-in titles for personal identification data: CREDIT
(for a credit card number), LICENCE (for a license number), and
PASSPORT (for a passport number). You can use these built-in title as
they are, or append eight more characters to a built-in title to indicate a
credit card company name, for example.
• In addition to the three built-in titles, you can also input your own titles up to
eight characters long for the two undefined items.
• You can input number up to 12 digits long for each personal identification
data item.
A
B
C
M
Month – Date
Year
Year
Month
Date
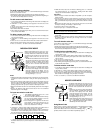
To input your blood type
1. In the Vital Statistics/ID Mode, display the
BLOOD screen.
2. Hold down A until the Rh factor setting flash in
the text area of the display.
3. Use B and C to scroll through the available
Rh factor settings in the following sequence.
4. Press M to advance to the blood type.
5. Use B and C to scroll through the available blood type settings in the
following sequence.
6. After inputting your data, press A to store it and return to the normal
BLOOD screen (no flashing characters).
• Select
--- if you do not want to specify an Rh factor and -- if you do not
want to select a blood type in the above sequence. When neither an Rh
factor nor blood type is specified, the blood data screen shows
----- on
the watch’s display.
---
R
+
R
-
A
B
C
M
Blood type ABO
Rh factor
Press C
Press B
--
A
B ABO
Press C
Press B
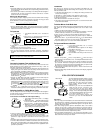
To input personal identification data
1. In the Vital Statistics/ID Mode, display the
personal identification data screen where you
want to input data.
• See “To recall Vital Statistics/ID data” for details
on how to switch between data screens.
2. Hold down A until the flashing cursor appears
in the text area of the display.
3. Input a text in the text area if you want.
• In the case of a built-in title, you can append up to eight characters to the
preset title. For the undefined data items, you can input titles up to 8
characters long.
• To use a built-in title as it is without appending text, press M eight times to
move the cursor to the number area.
Use B and C to input characters, and M to move the cursor around the
display. For details, see “INPUTTING TEXT”.
4. After you input your text, use M move the cursor to the number area and
input number data.
• You can input up to 12 digits in the number area.
• You can input only hyphens, numbers and spaces in the number area (you
cannot input text).
5. After inputting your data, press A to store it and return to the screen you
started out from in step 1 of this procedure.
To edit Vital Statistics/ID Mode data
1. In the Vital Statistics/ID Mode, scroll through the data items and display
the one you want to edit.
2. Hold down A until the data on the display starts to flash.
3. Use M to move the flashing to the part of the data item you want to
change.
4. Use B and C to change the displayed data.
• For details on inputting data, see the sections of this manual that describes
input for each screen.
5. After making the changes that you want, press A to store them and return
to the screen you started out from in step 1 of this procedure.
To delete Vital Statistics/ID Mode data items
1. In the Vital Statistics/ID Mode, scroll through the data items and display
the one you want to delete.
2. Hold down A until the data on the display starts to flash.
3. Press B and C at the same time to delete the data item.
4. Press A to return to the screen you started out from in step 1 of this
procedure.
A
B
C
M
Number area
Cursor
Text area
A
B
C
M
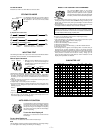
ALARM MODE
When the Daily Alarm is switched on, the alarm
sounds for 20 seconds at the preset time each
day. Press any button to stop the alarm after it
starts to sound.
When the Hourly Time Signal is switched on, the
watch beeps every hour on the hour.
To set the alarm time
1. Hold down A while in the Alarm Mode until the
hour digits start to flash on the display. The
hour digits flash because they are
selected
.
• This operation will switch the Daily Alarm on
automatically.
2. Press M to change the selection in the following
sequence.
3. Press C to increase the selected digits or B to decrease them. Holding
down either button changes the selection at high speed.
• The format (12-hour and 24-hour) of the alarm time matches the format you
select for normal timekeeping.
• When setting the alarm time using the 12-hour format, take care to set the
time correctly as morning (no indicator) or afternoon (P).
4. After you set the alarm time, press A to return to the Alarm Mode.
To switch the Daily Alarm and Hourly Time Signal on
and off
Press C while in the Alarm Mode to change the status of the Daily Alarm and
Hourly Time Signal in the following sequence.
Alarm on indicator
Hour
Minutes
[Alarm ON indicator/Hourly Time Signal ON indicator]
Both ON
Mode indicator
Hour
Minutes
Hourly time signal
on indicator
Both OFF Daily Alarm
Only
Hourly Time
Signal only
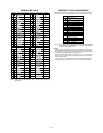
To recall Vital Statistics/ID data
In the Vital Statistics/ID Mode, press B or C to change the data on the
display in the following sequence.
• The titles of the each data item appear in the text area of the display. In the
case of the undefined items, you can specify titles that appear in the text
area whenever you later display that item.
NAME
(Name)
BLOOD
(Blood type)
CREDI
(Credit card
number)
BIRTH
(Date of birth)
(Undefined)
(Undefined)
LICEN
(License
number)
PASSP
(Passport
number)
Press C
Press B
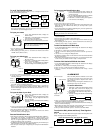
To input your name
1. In the Vital Statistics/ID Mode, display the
NAME screen.
2. Hold down A until the flashing cursor appears
in the text area of the display.
3. Input your name into the text area.
• You can input up to 16 characters for your name.
Use B and C to input characters, and M to
move the cursor around the display. For de-
tails, see “INPUTTING TEXT”.
• You can clear the characters currently input for the name by pressing B
and C at the same time.
4. After inputting your data, press A to store it and return to the normal
NAME screen (without cursor).
A
B
C
M
Text area
Cursor