


E-56
Advanced Altimeter Mode Operations
Use the information in this section to obtain more accurate altimeter readings, especially while mountain
climbing or trekking.
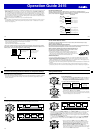
Using an Altitude Differential Value
The Altimeter Mode screen has an altitude differential value that shows
the change in altitude from a reference point you specify. The altitude
differential value is updated each time the watch takes an altitude reading.
• The range of the altitude differential value is –3,000 meters (–9,995
feet) to 3,000 meters (9,995 feet).
•
- - - -
is displayed in place of the altitude differential value whenever
the measured value is outside the allowable range.
• See “Using the Altitude Differential Value While Mountain Climbing or
Hiking” (page E-57) for some real-life examples of how to use this
feature.
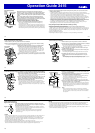
To specify the altitude differential start point
1. In the Altimeter Mode, select Screen 2 as the Altimeter Mode display
(page E-52).
2. Press
E
.
• The watch will take an altitude reading and register the result as
the altitude differential value start point. The altitude differential
value will be reset to zero at this time.
Altitude differentialAltitude differential
Altitude differentialAltitude differential
E-57
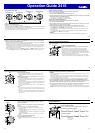
Using the Altitude Differential Value While Mountain Climbing or Hiking
After you specify the altitude differential start point while mountain climbing or hiking, you can easily
measure the change in the altitude between that point and other points along the way.
To use the altitude differential value
1. In the Altimeter Mode, check to make sure that an altitude reading is
on the display.
• If an altitude reading is not displayed, press
A
to take one. See “To
take altitude readings” (page E-55) for details.
2. Use the contour lines on your map to determine the difference in
altitude between your current location and your destination.
3. In the Altimeter Mode, press
E
to specify your current location as the
altitude differential start point.
• The watch will take an altitude reading and register the result as
the altitude differential value start point. The altitude differential
value will be reset to zero at this time.
4. While comparing the altitude difference you determined on the map
and the watch’s altitude differential value, advance towards your
destination.
• If the map shows that the difference in altitude between your
location and your destination is +80 meters for example, you know
you will be nearing your destination when the displayed altitude
differential value shows +80 meters.
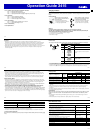
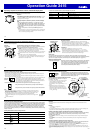
Current
location
Destination
altitude
Current
location
Destination
altitude
Altitude
Altitude
differential
Altitude
Altitude
differential
E-58
Using Reference Altitude Values
To minimize the chance of reading error, you should update the reference altitude value before setting off
on a trek or any other activity where you plan to take altitude readings. During a trek, keep checking the
readings produced by the watch against altitude information provided by markers and other information,
and update the reference altitude value as required.
• Reading error can be caused by changes in barometric pressure, atmospheric conditions, and
elevation.
• Before performing the procedure below, look up the altitude of your current location on a map, the
Internet, etc.
To specify a reference altitude value
1. In the Altimeter Mode, hold down
E
for at least two seconds.
SET
Hold
will fl ash on the display and then
ALTI
will appear in the upper
display. Keep
E
depressed until
ALTI
appears.
• The current altitude reading value will appear at this time.
2. Use
A
(+) or
C
(–) to change the current reference altitude value in
1-meter (5-foot) increments.
• Change the reference altitude value to an accurate altitude reading
that you get from a map or other source.
• You can set the reference altitude value within the range of –10,000
to 10,000 meters (–32,800 to 32,800 feet).
• Pressing
A
and
C
at the same time returns to OFF (no reference
altitude value), so the watch performs air pressure to altitude
conversions based on preset data only.
3. Press
E
to exit the setting screen.
E-59
Types of Altitude Data
Your watch can record three types of altitude data in its memory: manually saved data, auto save values,
and trek log values.
• Use the Data Recall Mode to view data stored in memory. See “Viewing Altitude Records” (page E-69)
for details.
Manually Saved Records
Any time you perform the procedure below in the Altimeter Mode, the watch will create and store a record
with the currently displayed altitude reading, along with the date and time the reading was taken. There is
enough memory to store up to 30 manually saved records, which are numbered from
REC 1
through
REC 30
.
To save a reading manually
1. In the Altimeter Mode, check to make sure that an altitude reading is
on the display.
• If an altitude reading is not displayed, press
A
to take one. See “To
take altitude readings” (page E-55) for details.
2. Hold down
A
. First,
REC Hold
will fl ash on the display. After that,
REC
and the current time will appear in the lower display. Release
A
as soon as
REC
and the current time appear.
• This will save the currently displayed altitude reading in a manually
saved record, along with the time and date of the reading.
• The watch will return to the Altimeter Mode screen automatically
after the save operation is complete.
• Holding down
A
for too long will advance to trek log update
start/stop (page E-62).
E-60
• There is enough memory to store up to 30 manually saved records. If there are already 30
manually saved records in memory, the above operation will cause the oldest record to be deleted
automatically to make room for the new one.
Auto Save Values
Auto save values are one type of data stored in the memory of your watch.
Auto Save Values
High Altitude (
MAX
)
Low Altitude (
MIN
)
Total Ascent (
ASC
)
Total Descent (
DSC
)
• These values are checked and updated automatically by the watch as altitude auto measurements are
taken.
• Auto save is performed only while the watch is in the Altimeter Mode.
• Cumulative ascent and cumulative descent values are updated whenever there is a difference of at
least ±15 meters (±49 feet) from one reading to the next.
• Auto save values also include the date and time each value was recorded.
E-61
Trek Log Values
While trek log updating is enabled, altitude values (high altitude/low altitude, cumulative ascent/descent)
for a particular trek are automatically checked and updated at regular intervals, even if you exit the
Altimeter Mode. Values include the date and time each is updated. Up to 14 records of trek log values can
be maintained in memory, and each record is assigned a number from Mt.1 through Mt.14 in the sequence
they are stored.
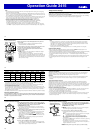
Trek Log Values in Each Record
High Altitude (
MAX
)
Low Altitude (
MIN
)
Total Ascent (
ASC
)
Total Descent (
DSC
)
• For up to 12 hours after trek log value updating is enabled, the values are updated automatically even
if you exit the Altimeter Mode. A segment (
) in the graphic around the periphery of the display fl ashes
to show the time elapsed since trek log value updating was enabled. Each graphic segment represents
12 minutes, and one revolution around the display represents 12 hours.
• You can select the altitude reading interval you want. For more information, see “To select the altitude
auto reading interval” (page E-53).
• Trek log value updating stops automatically whenever the battery charge goes low.
Note
• Even if you exit the Altimeter Mode while trekking, updating of the trek log high altitude, low altitude,
and cumulative ascent and descent values continues.
• Your watch has enough memory for 14 trek log records, which means you can maintain values for up to
14 treks.
E-62
To start trek log value updating
In the Altimeter Mode, hold down
A
for at least fi ve seconds. First,
Trek
Hold
will fl ash on the display. After that,
Hold
will disappear and a pointer
(
) indicating elapsed reading time will appear at 12 o’clock. Release
A
when
Hold
disappears.
• This indicates that updating of trek log values (high altitude/low
altitude, cumulative ascent/descent) is being performed.
To stop trek log value updating
In the Altimeter Mode, hold down
A
for at least fi ve seconds. First,
Trek
Hold End
and the elapsed time pointer (
) will fl ash. After that,
Hold
will
disappear. Release
A
when
Hold
disappears.
• This indicates that updating of trek log values (high altitude/low
altitude, cumulative ascent/descent) has been stopped.
Note
• To start a new trek log record while there are already 14 trek log
records in memory, you will need to delete existing records. For more
information, see “To delete data in a specifi c memory area” (page
E-73).
E-63
How High and Low Altitude Values are Updated
With each auto save or trek log reading, the watch compares the current reading against the
MAX
(high
altitude) and
MIN
(low altitude) values. It will replace the
MAX
value if the current reading is at least 15
meters (±49 feet) greater than
MAX
, or the
MIN
value if the current reading is at least 15 meters (±49 feet)
less than
MIN
.
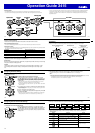
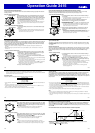
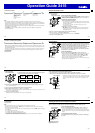
How Cumulative Ascent and Cumulative Descent Values Are Updated
Session start point
20 m
0 m
120 m
320 m
620 m
Session end point
The total ascent and total descent values produced by an Altimeter Mode reading operation session
during the example climb illustrated above are calculated as follows.
Total Ascent:
q
(300 m) +
e
(620 m) = 920 m
Total Descent:
w
(320 m) +
r
(500 m) = 820 m
Operation Guide 3415