


Operation Guide 5299
E-10
Timekeeping
You can adjust the Home city date and time in the Timekeeping Mode.
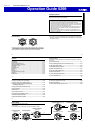
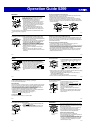
• Pressing A in the Timekeeping Mode will toggle the lower display between the
screens shown below.
A
Home City Date Home City Time
▲
▲
Date Seconds
Day of the week
Hour : Minutes
PM indicator
Day of the week
Seconds
E-11
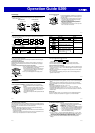
To set the time and date
1.In the Timekeeping Mode, hold down A for about two
seconds until SET appears on the lower display. This is
the setting mode.
• Note that keeping A depressed too long (for about
five seconds) will cause a different type of setting
mode to be entered (page E-53).
2.Use D and B to select the city code you want.
• Make sure you select your Home City code before
changing any other setting.
• For full information on city codes, see the “City Code
Table” at the back of this manual.
City code
E-12
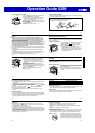
3. Press C to change the flashing screen content in the sequence shown below to
select the other settings.
Seconds
12/24-Hour
Format
Hour Minutes
DST
Month Year
City
Code
Day
Illumination
Duration
Button
Operation Tone
C C
CCCCC
CCCC
4. When the timekeeping setting you want to change is flashing, use D or B to
change it as described below.
Change the city code
Toggle the DST setting between
Daylight Saving Time (
) and
Standard Time (
).
Use D (east) and B
(west).
PressD.
Screen:
To do this:
Do this:
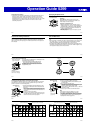
E-13
Screen: To do this:
Do this:
Toggle between 12-hour (
) and
24-hour ( ) timekeeping
Reset the seconds to
Change the hour and minutes
Change the year, month, or day
Toggle the button operation tone
between
(on) and (off)
Toggle the display illumination
duration between 1.5 seconds (
)
and three seconds (
)
PressD.
PressD.
Use D (+) and B (–).
PressD.
PressD.
E-14
5. Press A to exit the setting mode.
• The day of the week is displayed automatically in accordance with the date (year,
month, and day) settings.
Daylight Saving Time (DST)
Daylight Saving Time (summer time) advances the time setting by one hour from
Standard Time. Remember that not all countries or even local areas use Daylight
Saving Time.
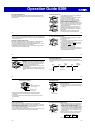
To change the Daylight Saving Time (summer time) setting
1.In the Timekeeping Mode, hold down A for about two
seconds until SET appears on the display.
• Note that keeping A depressed too long (for about
five seconds) will cause a different type of setting
mode to be entered (page E-53).
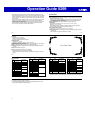
2.Press C. This will display the DST setting screen.
DST indicator
E-15
3. Use D to toggle the DST setting on and off.
DST off ( ) DST on ( )
D
• The default DST setting is OFF ( ).
4. When the setting you want is selected, press A to exit the setting mode.
• The DST indicator appears to indicate that Daylight Saving Time is turned on.
12-hour and 24-hour timekeeping
• With the 12-hour format, the PM indicator (P) appears on the lower display for times
in the range of noon to 11:59 p.m. and no indicator appears for times in the range of
midnight to 11:59 a.m.
• With the 24-hour format, times are displayed in the range of 0:00 to 23:59, without
the PM indicator (P).
• The 12-hour/24-hour timekeeping format you select in the Timekeeping Mode is
applied in all other modes.
E-16
Thermometer
This watch uses a temperature sensor to take temperature readings.
To take a temperature reading
1.In the Timekeeping Mode, press D to enter the
Thermometer Mode and start a temperature reading
operation.
• The first temperature reading will take about three
seconds. After that, readings are taken at two-second
intervals for the first two minutes, and then at two-
minute intervals after that.
• The displayed temperature will be updated with each
reading.
Temperature
E-17
2. To stop the temperature reading operation, press D to return to the Timekeeping
Mode.
• The watch will stop taking temperature readings and return to the Timekeeping
Mode automatically if you do not perform any operation for about one or two hours.
Temperature
• Temperature is displayed in units of 0.1°C (or 0.2°F).
• The displayed temperature value changes to - - - °C (or °F) if a measured
temperature falls outside the range of –10.0°C to 60.0°C (14.0°F to 140.0°F). The
temperature value will reappear as soon as the measured temperature is within the
allowable range.
Display Units
You can select either Celsius (°C) or Fahrenheit (°F) for the displayed temperature
value. See “To specify the temperature unit” (page E-21) for more information.
E-18
Temperature Sensor Calibration
The watch’s temperature sensor is calibrated at the factory and normally requires no
further adjustment. If you notice serious errors in the temperature readings produced
by the watch, you can calibrate the sensor to correct the errors.
Important!
• Incorrectly calibrating the temperature sensor can result in incorrect readings.
Carefully read the following before doing anything.
– Compare the readings produced by the watch with those of another reliable and
accurate thermometer.
– If adjustment is required, remove the watch from your wrist and wait for 20 or 30
minutes to give the temperature of the watch time to stabilize.
E-19
To calibrate the temperature sensor
1.Enter the Thermometer Mode, which will start a
temperature reading operation and display the results
(page E-16).
2.Hold down A for about two seconds.
• Holding down A will initially cause Hold to appear on
the screen. Keep A depressed until Hold disappears.
• This will cause the temperature reading operation to
re-start, and display the sensor calibration screen
shown in the illustration nearby.
3. Use D (+) and B (–) to change the displayed calibration by 0.1°C (0.2°F) steps.
• To return the currently flashing value to its initial factory default setting, press D
and B at the same time. OFF will appear in place of the flashing temperature
value for about two seconds, followed by the initial default value.
4. Press A to return to the Thermometer Mode screen and take temperature
readings.