


Operation Guide 3148
9
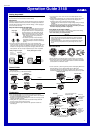
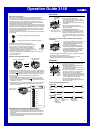
To turn Power Saving on and off
1. In the Timekeeping Mode, hold down A until
the city code starts to flash, which indicates
the setting screen.
2. Press D nine times until the Power Saving
on/off screen appears.
3. Press E to toggle Power Saving on (
ON) and
off (
OFF).
4. Press A to exit the setting screen.
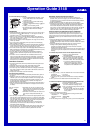
• The Power Saving on indicator (PS) is on the
display in all modes while Power Saving is
turned on.
l
l
l
l
l
l
l
l
l
l
l
l
l
l
l
l
l
l
l
l
Power Saving on
indicator
Timekeeping
• Resetting the seconds to
00
while the current count is in the range of 30 to
59 causes the minutes to be increased by 1. In the range of 00 to 29, the
seconds are reset to
00
without changing the minutes.
• With the 12-hour format, the P (PM) indicator appears on the display for
times in the range of noon to 11:59 p.m. and no indicator appears for times
in the range of midnight to 11:59 a.m.
• With the 24-hour format, times are displayed in the range of 0:00 to 23:59,
without any indicator.
• The 12-hour/24-hour timekeeping format you select in the Timekeeping
Mode is applied in all modes.
• The watch’s built-in full automatic calendar makes allowances for different
month lengths and leap years. Once you set the date, there should be no
reason to change it except when battery power drops to Level 5.
• The current time for all city codes in the Timekeeping Mode and World Time
Mode is calculated in accordance with the Coordinated Universal Time (UTC)
for each city, based on your Home City time setting.
• The UTC offset is a value that indicates the time difference between a
reference point in Greenwich, England and the time zone where a city is
located.
• The letters “UTC” is the abbreviation for “Coordinated Universal Time”,
which is the world-wide scientific standard of timekeeping. It is based upon
carefully maintained atomic (cesium) clocks that keep time accurately to
within microseconds. Leap seconds are added or subtracted as necessary
to keep UTC in sync with the Earth’s rotation.
Illumination Precautions
• The electro-luminescent panel that provides illumination loses power after
very long use.
• Illumination may be hard to see when viewed under direct sunlight.
• Illumination turns off automatically whenever an alarm sounds.
• The watch may emit an audible sound whenever the display is illuminated.
This is due to vibration of the EL panel used for illumination, and does not
indicate malfunction.
• Frequent use of illumination runs down the battery.
Auto light switch precautions
• The auto light switch is turned off automatically whenever battery power is
at Level 4.
• Wearing the watch on the inside of your wrist, movement of your arm, or
vibration of your arm can cause frequent activation of the auto light switch
and illumination of the display. To avoid running down the battery, turn off
the auto light switch whenever engaging in activities that might cause
frequent illumination of the display.
• Note that wearing the watch under your sleeve while the auto light switch is
turned on can cause frequent illumination of the display and can run down
the battery.
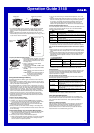
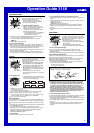
• Illumination may not turn on if the face of the
watch is more than 15 degrees above or below
parallel. Make sure that the back of your hand
is parallel to the ground.
• Illumination turns off in about one second, even
if you keep the watch pointed towards your
face.
More than 15 degrees
too high
• Static electricity or magnetic force can interfere with proper operation of the
auto light switch. If illumination does not turn on, try moving the watch back
to the starting position (parallel with the ground) and then tilt it back towards
your face again. If this does not work, drop your arm all the way down so it
hangs at your side, and then bring it back up again.
• Under certain conditions, illumination does not turn on until about one
second after you turn the face of the watch towards you. This does not
necessarily indicate malfunction.
• You may notice a very faint clicking sound coming from the watch when it is
shaken back and forth. This sound is caused by mechanical operation of
the auto light switch, and does not indicate a problem with the watch.
Barometer and Thermometer Precautions
• The pressure sensor built into this watch measures changes in air
pressure, which you can then apply to your own weather predictions. It is
not intended for use as a precision instrument in official weather prediction
or reporting applications.
• Sudden temperature changes can affect pressure sensor readings.
• Temperature measurements are affected by your body temperature (while
you are wearing the watch), direct sunlight, and moisture. To achieve a
more accurate temperature measurement, remove the watch from your
wrist, place it in a well ventilated location out of direct sunlight, and wipe all
moisture from the case. It takes approximately 20 to 30 minutes for the
case of the watch to reach the actual surrounding temperature.
Pressure Sensor and Temperature Sensor Calibration
The pressure sensor and temperature sensor built into the watch are
calibrated at the factory and normally require no further adjustment. If you
notice serious errors in the pressure readings and temperature readings
produced by the watch, you can calibrate the sensor to correct the errors.
Important!
• Incorrectly calibrating the barometric pressure sensor can result in incorrect
readings. Before performing the calibration procedure, compare the
readings produced by the watch with those of another reliable and accurate
barometer.
• Incorrectly calibrating the temperature sensor can result in incorrect
readings. Carefully read the following before doing anything.
Compare the readings produced by the watch with those of another
reliable and accurate thermometer.
If adjustment is required, remove the watch from your wrist and wait for 20
or 30 minutes to give the temperature of the watch time to stabilize before
adjusting.
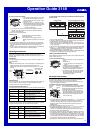
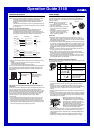
To calibrate the pressure sensor and the temperature sensor
1. Press D to enter the Barometer/
Thermometer Mode.
2. In the Barometer/Thermometer Mode, hold
down A for about two seconds until either
OFF or the current temperature calibration
value starts to flash. This is the setting screen.
• If you want to calibrate the barometric
pressure sensor, press D to move the
flashing to the middle display area. This is
the pressure sensor calibration screen.
l
l
l
l
l
l
l
l
l
l
l
l
l
l
l
l
l
l
l
l
l
l
l
l
l
l
l
l
l
l
l
l
l
l
l
l
3. Use E (+) and B (–) to set the calibration value in the units shown below.
Temperature 0.1
°
C (0.2
°
F)
Barometric Pressure 1 hPa (0.05 inHg)
• Pressing E and B at the same time returns to the factory calibration
(OFF).
4. Press A to return to the Barometer/Thermometer Mode screen.
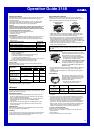
To select the temperature, barometric pressure, and altitude units
1. Enter the Timekeeping Mode.
2. Hold down A until the city code starts to
flash, which indicates the setting screen.
3. Use D to select the setting screen for the unit
you want to change.
• See step 3 under “To set the time and date”
for information about how to scroll through
setting screens.
l
l
l
l
l
l
l
l
l
l
l
l
4. Press E to change the unit setting.
• Each press of E changes the selected unit setting as shown below.
Temperature
°
C and
°
F
Barometric Pressure hPa and inHg
Altitude m and ft
5. After the settings are the way you want, press A to exit the setting screen.