


Operation Guide 3185
E-50
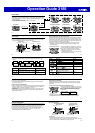
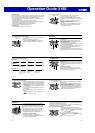
About the Auto Light Switch
Turning on the auto light switch causes illumination to turn on, whenever you position
your wrist as described below in any mode. Note that this watch features a “Full Auto
EL Light,” so the auto light switch operates only when available light is below a certain
level. It does not turn on the backlight under bright light.
Moving the watch to a position that is parallel to the ground and then tilting it towards
you more than 40 degrees causes illumination to turn on.
• Wear the watch on the outside of your wrist.
Parallel to
ground
More than 40°
E-51
Warning!
••
••
• Always make sure you are in a safe place whenever you are reading the
display of the watch using the auto light switch. Be especially careful when
running or engaged in any other activity that can result in accident or injury.
Also take care that sudden illumination by the auto light switch does not
startle or distract others around you.
••
••
• When you are wearing the watch, make sure that its auto light switch is turned
off before riding a bicycle or operating a motorcycle or any other motor
vehicle. Sudden and unintended operation of the auto light switch can create a
distraction, which can result in a traffic accident and serious personal injury.
To turn the auto light switch on and off
In the Timekeeping Mode, hold down B for about three seconds to toggle the auto
light switch on (auto light switch on indicator displayed) and off (auto light switch on
indicator not displayed).
• The auto light switch on indicator is on the display in all modes while the auto light
switch is turned on.
E-52
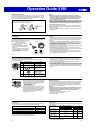
Power Supply
This watch is equipped with a solar cell and a rechargeable battery that is charged by
the electrical power produced by the solar cell. The illustration shown below shows
how you should position the watch for charging.
Example:Orient the watch so its face is
pointing at a light source.
• The illustration shows how to position a
watch with a resin band.
• Note that charging efficiency drops when
any part of the solar cell is blocked by
clothing, etc.
• You should try to keep the watch outside of
your sleeve as much as possible. Charging
is reduced significantly even if the face is
covered only partially.
Solar cell
E-53
Important!
• Storing the watch for long periods in an area where there is no light or wearing it in
such a way that it is blocked from exposure to light can cause rechargeable battery
power to run down. Make sure that the watch is exposed to bright light whenever
possible.
• This watch uses a rechargeable battery to store power produced by the solar cell, so
regular battery replacement is not required. However, after very long use, the
rechargeable battery may lose its ability to achieve a full charge. If you experience
problems getting the rechargeable battery to charge fully, contact your dealer or
CASIO distributor about having it replaced.
• Never try to remove or replace the watch’s rechargeable battery yourself. Use of the
wrong type of battery can damage the watch.
• All data stored in memory is deleted, and the current time and all other settings
return to their initial factory defaults whenever battery power drops to Level 5 (page
E-54) and when you have the battery replaced.
• Turn on the watch’s Power Saving function (page E-66) and keep it in an area
normally exposed to bright light when storing it for long periods. This helps to keep
the rechargeable battery from going dead.
E-54
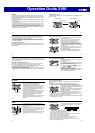
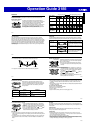
Level
1
2
3
4
5
Battery Power Indicator
(Charge Soon Alert)
Function Status
All functions enabled.
All functions enabled.
Illumination, beeper, and
Diving Mode access
disabled.
Except for timekeeping and
the CHG (charge) indicator,
all functions and display
indicators disabled.
All functions disabled.
Battery Power Indicator and Recover Indicator
The battery power indicator on the display shows you the current status of the
rechargeable battery’s power.
Battery power
indicator
E-55
• At Level 5, all functions are disabled and settings return to their initial factory
defaults. Once the battery reaches Level 2 after falling to Level 5, reconfigure the
current time, date, and other settings.
• The watch’s Home City code setting will change automatically to TYO (Tokyo)
whenever the battery drops to Level 5.
•
Display indicators reappear as soon as the battery is charged from Level 5 to Level 2.
• Leaving the watch exposed to direct sunlight or some other very strong light source
can cause the battery power indicator to show a reading temporarily that is higher
than the actual battery level. The correct battery level should be indicated after a few
minutes.
E-56
• If you use the light or alarms a number of times during a
short period, all segments of the battery power indicator
flash and the following operations become temporarily
disabled as battery power recovers.
-Display illumination
-Alarm and hourly time signal
-Access to Diving Mode
After some time, the battery power indicator should stop
flashing to indicate that battery power is back to normal.
At this time the watch should return to normal operation.
• If the battery power indicator frequently flashes, it
means that battery power is low. Leave the watch in
bright light to allow it to charge.
E-57
Charging Precautions
Certain charging conditions can cause the watch to become very hot. Avoid leaving
the watch in the areas described below whenever charging its rechargeable battery.
Also note that allowing the watch to become very hot can cause its liquid crystal
display to black out. The appearance of the LCD should become normal again when
the watch returns to a lower temperature.
Warning!
Leaving the watch in bright light to charge its rechargeable battery can cause it
to become quite hot. Take care when handling the watch to avoid burn injury.
The watch can become particularly hot when exposed to the following
conditions for long periods.
• On the dashboard of a car parked in direct sunlight
• Too close to an incandescent lamp
• Under direct sunlight
E-58
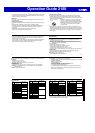
Exposure Level (Brightness)
Outdoor Sunlight (50,000 lux)
Sunlight Through a Window (10,000 lux)
Daylight Through a Window on a Cloudy Day (5,000 lux)
Indoor Fluorescent Lighting (500 lux)
Approximate
Exposure Time
5 minutes
24 minutes
48 minutes
8 hours
Charging Guide
The following table shows the amount of time the watch needs to be exposed to light
each day in order to generate enough power for normal daily operations.
• For details about the battery operating time and daily operating conditions, see the
“Power Supply” section of the Specifications (page E-75).
• Stable operation is promoted by frequent exposure to light.
E-59
Recovery Times
The table below shows the amount exposure that is required to take the battery from
one level to the next.
Approximate Exposure Time
Level 5 Level 4 Level 3 Level 2 Level 1
2 hours 17 hours 5 hours
7 hours 84 hours 23 hours
13 hours 171 hours 46 hours
145 hours - - - - - - - - - - - - - - - -
Exposure Level
(Brightness)
Outdoor Sunlight
(50,000 lux)
Sunlight Through a
Window (10,000 lux)
Daylight Through a
Window on a Cloudy
Day (5,000 lux)
Indoor Fluorescent
Lighting (500 lux)
• The above exposure time values are all for reference only. Actual required exposure
times depend on lighting conditions.
▲
▲
▲