


Operation Guide 3731
8
You can use the following procedure to set the current time and
date of the Timekeeping Mode Home Time Zone.
• Always use the Timekeeping Mode to set and adjust current time
and date settings.
If you are planning to manually change both the digital and
analog settings, be sure to adjust the digital setting first.
❚
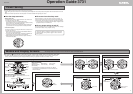
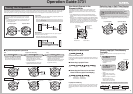
To configure Home Time Zone settings
1. In the Timekeeping Mode,
hold down the
AA
AA
A button
for about two seconds
until the Home Time Zone
setting starts to flash on
the display.
• This is the setting screen.
• The second hand moves to
12 o’clock at this time.
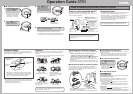
2. Use the
DD
DD
D (Westward)
and
BB
BB
B (Eastward) buttons
to scroll through the time
zones until the one whose
time you want to set is
displayed.
• See the “Time Zone List”
for more information about
time zones.
• Holding down either button
scrolls the setting at high
speed.
3. Press the
CC
CC
C button so the
summer time setting is
displayed.
Home Time Zone
+9.0 = Tokyo
(Westward)
(Eastward)
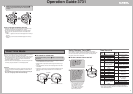
4. Press the
DD
DD
D button to
cycle through the summer
time settings until the one
you want is displayed.
• DS A
This setting enables the auto summer time setting, which
turns summer time on or off in accordance with the received
time calibration signal.
• DS OFF
This setting turns off summer time, and displays the current
time normally.
• DS On
This setting turns on summer time.
• Selecting this setting displays the DST indicator, and
advances the current time setting by one hour.
• Note that pressing the D button in the above step while any time
zone other than +8.0, +9.0, –5.0, –6.0, –7.0, –8.0, or –10.0 will
simply toggle the summer time setting between DS OFF and DS
On.
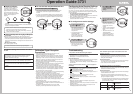
5. Use the
CC
CC
C button to cycle
through the time and date
settings shown below.
Each press of the
CC
CC
C
button causes the
applicable setting to flash.
Seconds
Time Zone 12/24-hour
Summer Time
Power Saving
Day Month Year Minute Hour
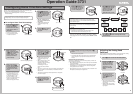
6. Use the
DD
DD
D and
BB
BB
B buttons to change the currently
selected setting.
Configuring Home Time Zone Settings
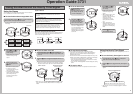
7. While the 12/24-hour
setting is selected, press
the
DD
DD
D button to toggle the
timekeeping format
between 12-hour (“12H”
indicator) and 24-hour
(“24H” indicator).
8. While the seconds are
selected, press the
DD
DD
D
button to reset them to 00
in accordance with the
time signal on the radio,
TV, etc.
• Pressing the D button while
the seconds count is in the
range of 30 to 59 resets it to
00 and also adds 1 to the
minutes. Pressing the D
button in the range of 00 to 29
resets the seconds count
without changing the minutes.
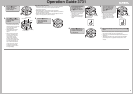
9. While the hour, minutes,
year, month, or day setting
is flashing, use the
DD
DD
D (+)
button and
BB
BB
B (–) button
to change the setting.
• Holding down either button
scrolls the setting at high
speed.
• When setting the hour, make
sure you specify AM (no
indicator) or PM (P) correctly
when using 12-hour
timekeeping, or that you
specify the correct 24-hour
time.
• You can set a year in the range of 00 (2000) to 99 (2099). The
day of the week is set automatically in accordance with the
date you set.
• The watch automatically makes adjustments for leap years
and month lengths.
10.
While the Power Saving
setting is selected, press
the
DD
DD
D button to toggle it
ON and OFF.
12/24 Timekeepin
g
Indicator
Resets to 00.
(Back)
(Forward)
Hour Minutes
on = Power Saving On
OFF = Power Saving Off
11.
When the setting is the way you want, press the
AA
AA
A
button.
• This exits the setting screen.
• The display also will exit the setting screen automatically if
you do not perform any operation for about two or three
minutes.
Digital-Analog Synchronization
The watch automatically adjusts its analog setting to match the
current digital time setting.
• When adjusting the analog time, the hands may move clockwise
or counterclockwise.
• Depending on how many hours different the digital and analog
time settings are, it may take some time for the analog hand
setting procedure to be finished.
• After adjustment of the hour and minute hand, the second hand
will adjust automatically to the digital time.
Adjusting the Analog Hand
Positions
You can use the Hand Setting Mode to manually adjust the analog
hand positions then they do not match the digital time.
1. Use the
CC
CC
C button to enter the Hand Setting Mode.
2. Hold down the
AA
AA
A button
for about two seconds
until the second hand
stops at the 12 o’clock
position and “– 00–”
flashes on the digital
display.
3. If the second hand does
not align with the 12
o’clock position by itself,
use the
DD
DD
D button to
adjust it.
• Each press of the D button
advances the second hand by
one second.
• Holding down the D button
advances the second hand at
high speed.
(Forward)
12 o’clock