Operation Guide 2730
6
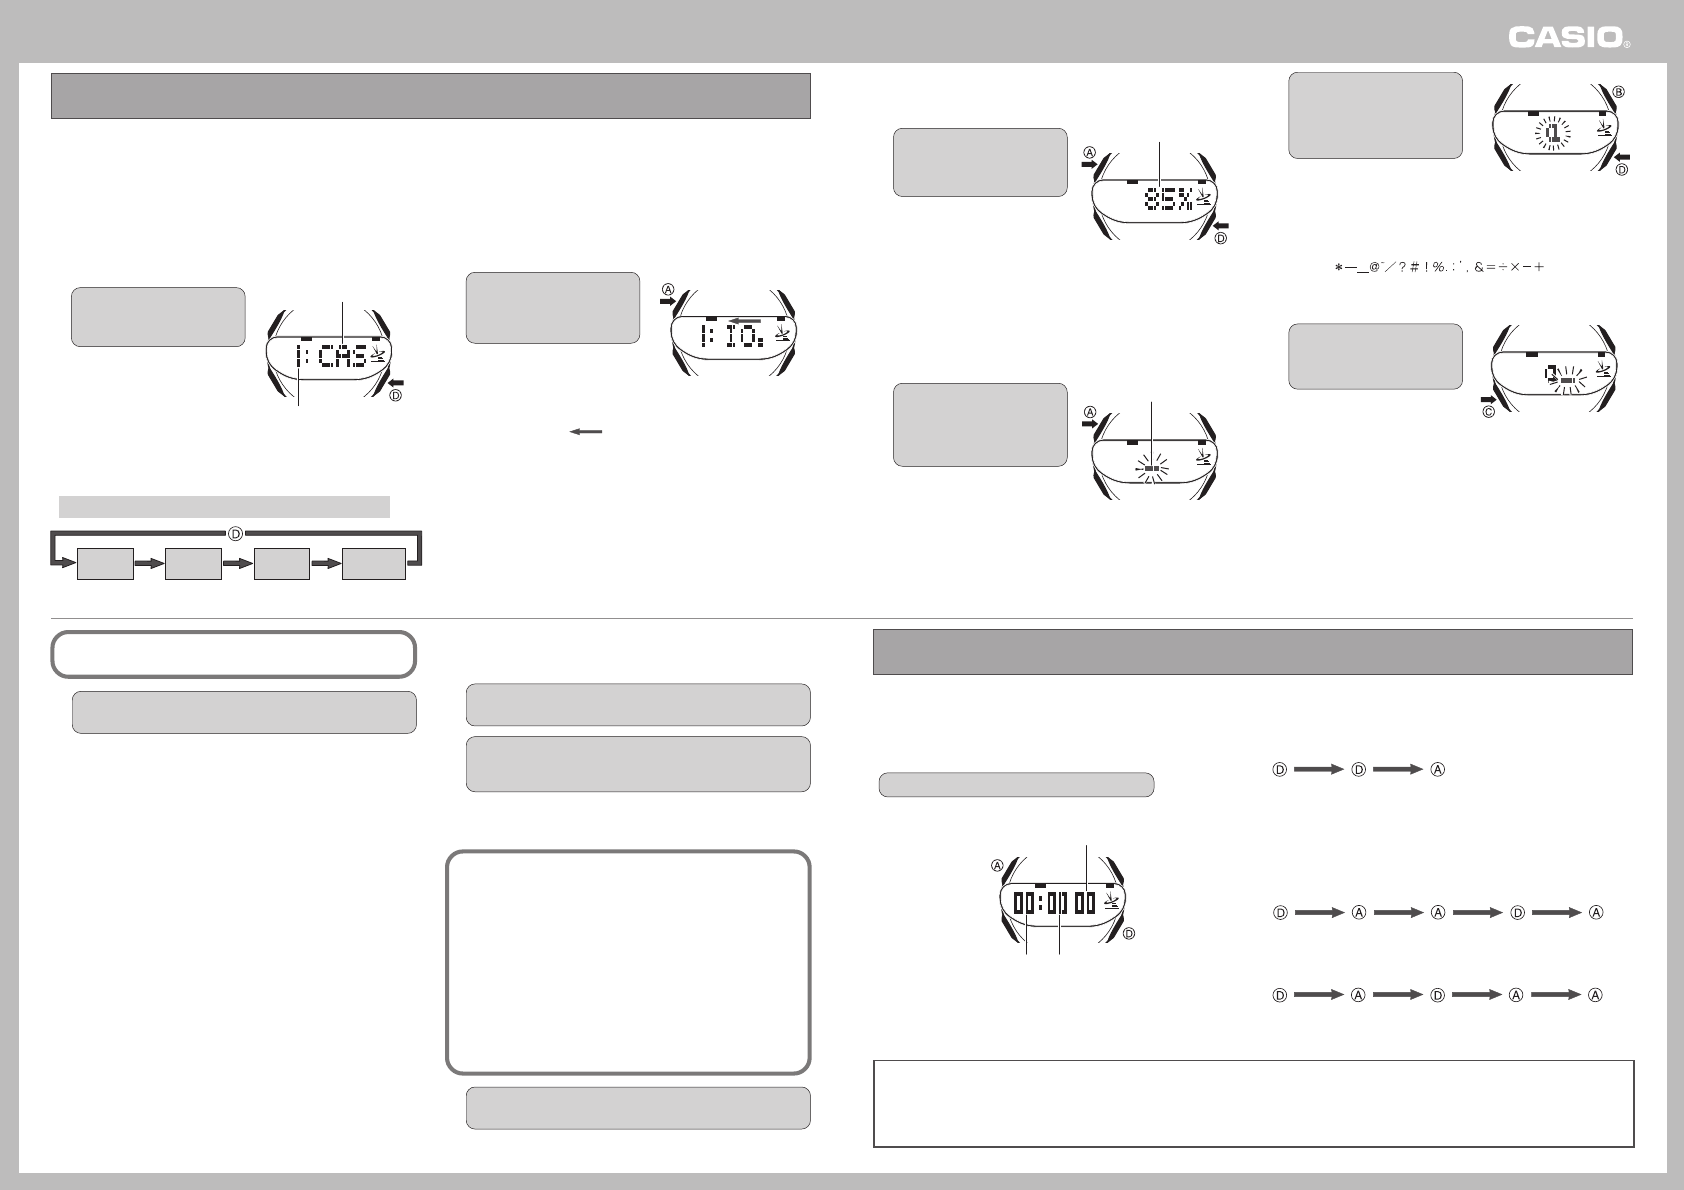
Viewing e-DATA MEMORY Records
1.
While in the e-DATA
MEMORY Mode, press the
DD
DD
D button.
• Each press of the D button
scrolls through the records
currently in e-DATA MEMORY.
• Holding down the D button
scrolls at high speed.
• As shown in the example below, scrolling through e-DATA
MEMORY also displays a remaining memory screen.
• If there is no data currently in e-DATA MEMORY, only the
remaining memory screen appears.
Example: When there are three e-DATA MEMORY records
Record 1
Record 2
Remaining
Memory
Record 3
e-DATA MEMORY Mode
The stopwatch measures elapsed time in units of 1/100 second up to 99 minutes, 59.99 seconds (100 minutes). When the maximum limit
is reached, the elapsed time automatically returns to zero and timing continues from there.
Performing Stopwatch Operations
In the Stopwatch Mode, press the
DD
DD
D button.
• Each press of the D button starts or stops the stopwatch.
Split/Reset
Start/Stop
1/100 Second
Minutes
Seconds
❚
Elapse Time Measurement
Start Stop Reset
Cumulative Time Measurement
Pressing the D button to restart the stopwatch without resetting it
to all zeros resumes elapsed time measurement from where it
was last stopped.
❚
Split Time Measurement
Record split Release split ResetStopStart
❚
1st and 2nd Place Finishers
Start 1st finisher
(Displays time
of 1st finisher.)
2nd finisher Displays time
of 2nd finisher.
Reset
• Pressing A while timing is being performed freezes the current elapsed time on the display, but timing of the next split continues
internally. This condition is indicated by the “SPL” (split) indicator on the display.
• Changing to another mode while a split time is displayed cancels the split time operation.
• Pressing the A button while timing is stopped resets the stopwatch to all zeros.
Stopwatch Mode
You can use the e-DATA MEMORY Mode to store e-mail addresses, Web site URLs, and other information for instant recall whenever you need it.
• Each record can contain up to 63 characters.
• The theoretical maximum number of records is 40, but the actual maximum depends on the number contained in each record. If each
record contains 63 characters, for example, you can store up to five records. If each record contains seven characters, you will be
able to store up to 40 records.
• Note that 40 is the maximum number of records, even if each record has fewer than six characters.
• When you enter the e-DATA MEMORY Mode, the record that was displayed when you last exited the mode appears first.
(Forward)
Data
Record Number
2. When the record whose
contents you want to view
is on the display, press
the
AA
AA
A button.
• This causes the record’s data
to start scrolling from right to
left, three characters at a
time.
• The end of the record is
indicated by the “ ”
symbol.
• The data of the currently
displayed record does not
scroll when you press the A
button if it contains two or
fewer characters.
Creating an e-DATA MEMORY Data
Record
1.
In the e-DATA MEMORY
Mode, press the
AA
AA
A button
and
DD
DD
D button at the same
time.
• This will display the remaining
memory screen.
• If the remaining memory
screen shows “0%”, it means
that memory is full and further
data storage is not possible. If
you need to store more data,
use the procedure under
“Editing and Deleting e-DATA
MEMORY Data” to delete
data you no longer need.
2. Hold down the
AA
AA
A button
for about two seconds
until the first character of
the data field starts to
flash.
• This is the setting screen.
3. Use the
DD
DD
D (+) and
BB
BB
B (–)
buttons to scroll through
characters at the cursor
position until the one you
want is displayed.
• Holding down either button
scrolls at high speed.
• Supported Characters
Lower Case Alpha: a to z
Symbols:
Upper Case Alpha: A to Z
Numerals: 0 to 9
4. Press the
CC
CC
C button to
move the cursor to the
next character to the right.
Remaining Memory
First data character
(Forward)
(Back)
Repeat steps 3 and 4 as many times as necessary to input all
of the characters for the record you are creating.
5. After inputting all of the characters you want, press the
AA
AA
A button to save the record.
• “SET” will flash on the display as the record is being saved.
After the save operation is complete, the watch will exit the
setting screen.
• The display also will exit the setting screen automatically if
you do not perform any operation for about two or three
minutes.
• Records are stored in the same sequence they are input.
Editing and Deleting e-DATA
MEMORY Data
1.
In the e-DATA MEMORY Mode, use the
DD
DD
D button to
display the record you want to edit or delete.
2. Hold down the
AA
AA
A button for about two seconds until
the first character of the data field of the displayed
record starts to flash.
• This is the setting screen.
3. Edit or delete the data as described below.
• To edit the record’s data
Use the C button to move the cursor to location of the
character you want to change, and then use the D and B
buttons to scroll through characters until the one you want to
change to is displayed.
• To delete the record’s data
Press down the D button and B button at the same time.
This causes “CLR” to flash on the display as the record is
deleted.
• After deleting a record’s data, you can input new data, if
you want.
• The display also will exit the setting screen automatically if
you do not perform any operation for about two or three
minutes.
4. After editing or deleting the record, press the
AA
AA
A button
to exit the setting screen.
• Deleting a record’s data deletes the record, and causes the
remaining records to shift upwards.


