


Operation Guide 5311
E-59
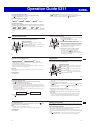
4. Press A to start calibration.
x After about seven seconds, the
x
Second Hand will
move to Y (YES) if calibration was successful or to
N (NO) if it was not successful.
x If the
x
Second Hand is pointing at N (NO)
(unsuccessful), press A to perform calibration again.
5. After calibration is complete, push the crown back in
and then lock it.
x This will start a magnetic north reading operation.
x Press C to return to the Timekeeping Mode.
@
Y (YES)
N (NO)
E-58
To perform northerly calibration
Important!
x If you want to perform both northerly and bidirectional calibration, perform
bidirectional calibration fi rst, and then perform northerly calibration. This is
necessary because bidirectional calibration cancels any existing northerly
calibration setting.
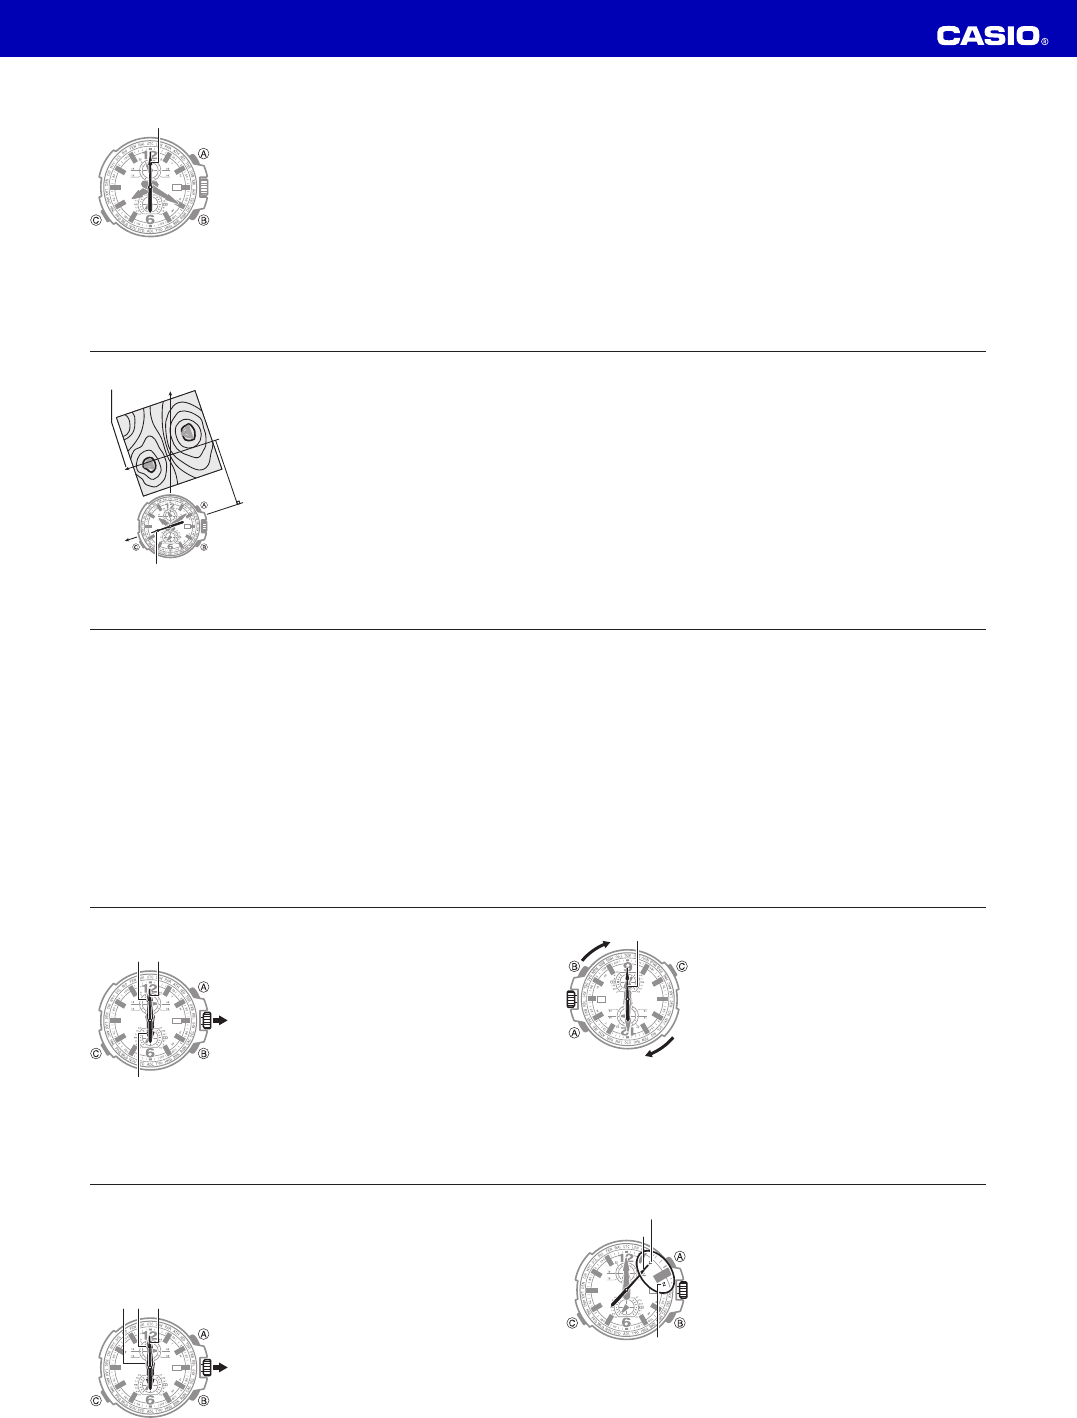
1. In the Digital Compass Mode, pull out the crown.
x The
x
Second Hand and
c
Minute Hand will
move to 12 o’clock, and the
z
Hour Hand will
move to 6 o’clock.
2. Press C. The
z
Hour Hand will move to 12 o’clock.
3. Place the watch on a level surface, and position it so
that its 12 o’clock position points north (as measured
with another compass).
+@B
E-57
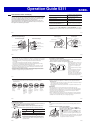
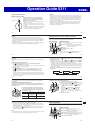
3. Rotate the watch 180 degrees.
4. Press A to start calibration of Point 2.
x After about seven seconds, the
x
Second Hand will
move to Y (YES) if Point 2 calibration was successful
or to N (NO) if it was not successful.
x If the
x
Second Hand is pointing at N (NO)
(unsuccessful), press A to return to Point 1
calibration.
5. After calibration is complete, push the crown back in
and then lock it.
x This will start a magnetic north reading operation.
x Press C to return to the Timekeeping Mode.
@
E-56
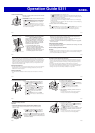
To perform bidirectional calibration
1. In the Digital Compass Mode, pull out the crown.
x The
x
Second Hand and
c
Minute Hand will
move to 12 o’clock, and the
z
Hour Hand will
move to 6 o’clock.
2. Press A to start calibration of Point 1.
x After about seven seconds, the
x
Second Hand
will move to Y (YES) if Point 1 calibration was
successful or to N (NO) if it was not successful.
x If the
x
Second Hand is pointing at N (NO)
(unsuccessful), press A to perform Point 1
calibration again.
x If the
x
Second Hand is pointing at Y (YES)
(successful), it will move to 6 o’clock after about
two seconds.
+
B
@
E-55
Precautions about bidirectional calibration
x You can use any two opposing directions for bidirectional calibration. You must,
however, make sure that they are 180 degrees opposite each other. Remember
that if you perform the procedure incorrectly, you will get wrong bearing sensor
readings.
x Do not move the watch while calibration of either direction is in progress.
x You should perform bidirectional calibration in an environment that is the same as
that where you plan to be taking direction readings. If you plan to take direction
readings in an open fi eld, for example, calibrate in an open fi eld.
E-54
x Keep the watch away from audio speakers, magnetic necklace, cell phone, and
other devices that generate strong magnetism. Exposure to strong magnetism can
magnetize the watch and cause incorrect direction readings. If incorrect readings
continue even after you perform bidirectional calibration, it could mean that your
watch has been magnetized. If this happens, contact your original retailer or an
authorized CASIO Service Center.
Bidirectional Calibration
x Use this method when using the watch to take readings in an area where magnetic
force is present, or if you notice that the readings produced by the watch are
different from another compass.
Northerly Calibration
x Use this method to calibrate the watch to detect true north (when it is known by
you).
E-53
Magnetic north: Indicates north in accordance with the Earth’s magnetic fi eld.
True north: Indicates the direction to the North Pole.
x For information about setting the watch up to indicate magnetic north or true
north, see “Magnetic North and True North” (page E-60).
3. Determine your location and destination by checking the map and the geographic
contours around you.
Calibrating Direction Readings
You can use the information in this section to calibrate direction readings, which helps
to improve digital compass accuracy.
Direction Reading Calibration Methods
Important!
x To ensure correct direction readings by this watch, be sure to perform bidirectional
calibration before using it. The watch may produce incorrect direction readings if
you do not perform bidirectional calibration.
E-52
Example: Determining your current position
and your objective on a map
Having an idea of your current location and the
direction to your destination is important when
mountain climbing or hiking. In this example, we
show you how to plot directions on a map and
determine your current location using direction
measurements taken by the watch.
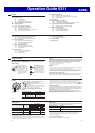
1. In the Timekeeping Mode, press A.
2. Rotate the map (without moving the watch)
until north on the map is aligned with north as
indicated by the watch’s second hand.
Depending on how the watch is set up, it may
be indicating magnetic north or true north.
1
1
North indicated on the map
North indicated by north pointer
E-51
x The
x
Second Hand indicates magnetic north.
x The
x
Second Hand will continue to move for about 20 seconds after you start
the digital compass operation as it adjusts its magnetic north reading. After that,
the hand will stop at the fi nal reading.
x To take another direction reading, press A again.
x To stop an ongoing direction reading operation and return to the Timekeeping
Mode, press C.
x If you do not perform any operation, the watch will return to normal timekeeping
after about one or two minutes.
3. Press C to return to the Timekeeping Mode.
Note
x If the
z
Hour Hand stops at 6 o’clock and the
c
Minute Hand stops at 12 o’clock,
it could mean that the watch has detected abnormal magnetism. For more
information, see “Abnormal magnetism detection is indicated.” (page E-87).
E-50
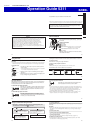
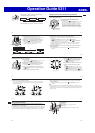
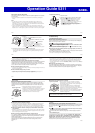
To take a direction reading
1. Point the 12 o’clock position of the watch in the direction
you want to read.
2. In the Timekeeping Mode, keep the watch horizontal as
you press A.
x The
x
Second Hand will move to 12 o’clock* and the
direction reading operation will start. After about two
seconds, the
x
Second Hand will move to indicate
north.
* If the
x
Second Hand does not point to 12 o’clock, it
could mean that the hand is out of position. Use the
procedure under “To adjust home positions” (page E-81)
to correct the hand position.
@