


Operation Guide 5135
5
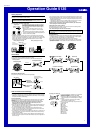
5. Press B to move the flashing in the sequence shown below to select the other
settings.
Seconds
12/24-Hour
Format
Hour
Minutes
DST
Month
Year
City Code
Day
Language
Button
Operation Tone
• The following steps explain how to configure timekeeping settings only.
Toggle between 12-hour ( ) and 24-
hour ( ) timekeeping
Change the city code
Cycle between Auto DST ( ), Daylight
Saving Time (
) and Standard Time
( ).
Reset the seconds to
Change the hour and minutes
Change the year, month, or day
Press C.
Screen: To do this: Do this:
6. When the timekeeping setting you want to change is flashing, use C to change it
as described below.
7. Press A to exit the setting screen.
• Auto DST (
) can be selected only while LON, PAR, ATH, TYO, HNL, ANC, LAX,
DEN, CHI, or NYC is selected as the Home City code. For more information, see
“Daylight Saving Time (DST)” below.
• The day of the week is displayed automatically in accordance with the date (year,
month, and day) settings.
Toggle the button operation tone between
(on) and (off)
Change the language
EN : English DE : German ES : Spanish
CH : Chinese JP : Japanese
/
12-hour and 24-hour timekeeping
• With 12-hour format, A (AM) is indicated for times in the range of midnight to 11:59
a.m., and P (PM) is indicated for times from noon to 11:59 p.m.
• With the 24-hour format, times are displayed in the range of 0:00 to 23:59, without
any indicator.
• The 12-hour/24-hour timekeeping format you select in the Timekeeping Mode is
applied in all other modes.
Daylight Saving Time (DST)
Daylight Saving Time (summer time) advances the time setting by one hour from
Standard Time. Remember that not all countries or even local areas use Daylight
Saving Time.
The time calibration signals transmitted from Mainflingen (Germany), Anthorn
(England), or Fort Collins (the United States) include both Standard Time and DST
data. When the Auto DST setting is turned on, the watch switches between Standard
Time and DST (summer time) automatically in accordance with the signals.
• Though the time calibration signals transmitted by the Fukushima and Fukuoka/
Saga, Japan transmitters include summer time data, summer time currently is not
implemented in Japan (as of 2010).
• The default DST setting is Auto DST (
) whenever you select LON, PAR, ATH,
TYO, ANC, LAX, DEN, CHI, or NYC as your Home City code.
• If you experience problems receiving the time calibration signal in your area, it
probably is best to switch between Standard Time and Daylight Saving Time
(summer time) manually.
To change the Daylight Saving Time (summer time) setting
1.In the Timekeeping Mode, hold down A for about three
seconds. You can release the button after “ADJ”
appears on the display.
• At this time, “12H” (12-hour timekeeping) or “24H” (24-
hour timekeeping) also will be flashing on the display.
2.Press B twice to enter the Daylight Saving Time
setting mode.
DST indicator
3. Use C to cycle through the DST settings in the sequence shown below.
Auto DST ( ) DST off ( ) DST on ( )
AT (AUTO)
This setting causes the watch to switch between standard time and summer time
automatically, in accordance with time calibration signal data. This setting is
available only when a city code that supports signal reception is selected as the
Home City.
OFF
This setting turns off summer time, and displays the current time normally.
ON
This setting turns on summer time. Turning on summer time advances the current
time by one hour.
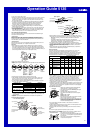
Transmitter
Japan
China
U.S.
Europe (U.K., Germany)
None
Covered City Codes
TYO
HKG
HNL, ANC, LAX, DEN, CHI, NYC
LON, PAR, ATH,
All other city codes
• If you change your Home City to one that is within the same transmitter area, the
current DST setting will be retained. If you change to a city that is outside your
current transmitter area, DST will be turned off automatically.
4. When the setting you want is selected, press A to exit the setting screen.
• The DST indicator appears to indicate that Daylight Saving Time is turned on.
Analog Timekeeping
The analog time of this watch is synchronized with the digital time. The analog time
setting is adjusted automatically whenever you change the digital time.
Note
• The hands for the analog timepiece move to adjust to a new setting whenever any of
the following occurs.
When you change the digital time setting manually
When the digital time setting is changed by time calibration signal reception
When you change the Home City code and/or DST setting
• If the analog time does not match the digital time for any reason, use the procedure
described under “To adjust home positions” to match the analog setting to the digital
setting.
• Whenever you need to adjust both the digital and the analog time settings manually,
make sure you adjust the digital setting first.
• Depending on how much the hands have to move in order to adjust to the digital
time, it may take some time before they stop moving.
Adjusting Home Positions
Strong magnetism or impact can cause the hands of the watch to be off, even if the
watch is able to perform the signal receive operation. If this happens, perform the
applicable home position adjustment procedures in this section.
• Hand home position adjustment is not required if the analog time and digital time are
the same in the Timekeeping Mode.
• Holding down the C button during the adjustment procedures in this section will
cause the applicable hand to start high-speed hand movement. Once started, high-
speed hand movement will continue even if you release the C button. To stop high-
speed hand movement, press any button.
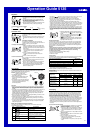
To adjust home positions
1.In the Timekeeping Mode, hold down A for about six
seconds. You can release the button after “H-SET”
appears on the display.
• Though “ADJ” will appear on the display after about
three seconds, do not release the button yet. Keep it
depressed until “H-SET” appears.
• The second hand should move to 12 o’clock (its home
position), and “SEC 00” will flash on the display.
• If the second hand does not point to 12 o’clock, use
the C button to adjust it. Each press of C advances
the hand by one second.
Correct second hand
position
2.After the second hand is in the proper home position,
press B.
• The hour and minute hands should move to 12 o’clock
(their home position), and “+0:00” will flash on the
display.
3.What you should do next depends on whether the hour
and minute hands are to the left or to the right of
12 o’clock.
■ If the hands point to 12 o’clock
Go to step 4 of this procedure.
■ If the hands point to the left of 12 o’clock
Use the C button to move the hands clockwise until
they point to 12 o’clock.
• Each press of C moves the hands 10 seconds.
■ If the hands point to the right of 12 o’clock
Press B, which will cause the flashing display to
change to “–0:00”. Next, use the C button to move the
hands counterclockwise until they point to 12 o’clock.
• Each press of C moves the hands 10 seconds.
Correct hour and
minute hand positions
4. After everything is the way you want, press A to return to the Timekeeping Mode.
• After performing home position adjustment, enter the Timekeeping Mode and check
to make sure that the analog hands and the digital display indicate the same time. If
they do not, perform home position adjustment again.
Reference
This section contains more detailed and technical information about watch operation.
It also contains important precautions and notes about the various features and
functions of this watch.
Button Operation Tone
The button operation tone sounds any time you press one of the watch’s buttons. You
can turn the button operation tone on or off as desired.
• Even if you turn off the button operation tone, alarms, the Hourly Time Signal, and
other beepers all operate normally.
To turn the button operation tone on and off
1.In the Timekeeping Mode, hold down A for about three
seconds. You can release the button after “ADJ”
appears on the display.
• At this time, “12H” (12-hour timekeeping) or “24H” (24-
hour timekeeping) also will be flashing on the display.
2.Press B nine times until the current button operation
tone setting (
or ) appears.
3.Press C to toggle the setting between
(tone
on) and
(tone off).
4. Press A to exit the setting screen.
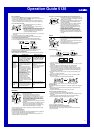
Power Saving Function
When turned on, the Power Saving function enters a
sleep state automatically whenever the watch is left in an
area for a certain period where it is dark. The table below
shows how watch functions are affected by the Power
Saving function.
Elapsed Time
in Dark
60 to 70 minutes
6 or 7 days
Display
Blank
Blank
Operation
Second hand moves to 12 o’clock
and stops, all functions enabled,
display blank.
All hands stop at 12 o’clock. Auto
receive, beeper tone, illumination,
and display are disabled.