


Operation Guide 5060
4
Use 5. D to move the x Second Hand to the month
setting you want.
After the month setting is the way you want, press 6.
C.
The watch will beep and change to the day setting •
mode.
Use 7. D (+) and B (–) to change the
m Day setting.
If you want to change the time setting at this time, •
press C and then perform the procedure starting
from step 3 under “To change the current time
setting manually”.
After the settings are the way you want, press 8. A to
return to the Timekeeping Mode.
This will cause the •
x Second Hand to move
automatically to 12 o’clock and resume movement
from there.
The day of the week indicated by the •
v Left Dial
Hand changes automatically in accordance with
the date (year, month, and day).
Note
The watch’s built-in full automatic calendar makes allowances for different month •
lengths and leap years. Once you set the date, there should be no reason to
change it except after you have the watch’s rechargeable battery replaced or after
power drops to Level 3.
5
@
>
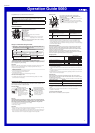
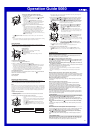
Using the Stopwatch
The stopwatch measures elapsed time and split times.
Hand Functions
x Second Hand: Indicates the stopwatch seconds count.
v Left Dial Hand: Indicates the stopwatch 1/20-second
count.
n Right Dial Hands: Indicate the stopwatch hours and
minutes.
> 6
@
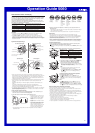
To perform elapsed time measurement
Use 1. C to move the
v Left Dial Hand to ST.
Now you can perform either of following stopwatch operations.2.
To perform an elapsed time operation
B
B
B B
D
Start Stop (Restart) (Stop) Reset
To pause at a split time
B
D
Normal stopwatch hand movement will
resume automatically after five seconds.
B
D
Start Split Stop Reset
Note
The Stopwatch Mode can indicate elapsed time up to 23 hours, 59 minutes, 59.95 •
seconds.
• D button operation (split, reset) is disabled while hands are moving at high speed
following a reset operation and when transitioning from a split time back to normal
elapsed timekeeping.
Once started, stopwatch timing continues until you press • B to stop it, even if you
exit the Stopwatch Mode to another mode and even if timing reaches the stopwatch
limit defined above.
You can press • B to start an elapsed time operation immediately after entering the
Stopwatch Mode, even if the watch’s hands are still moving to their initial Stopwatch
Mode positions. Note, however, that if the stopwatch was not reset after the last
elapsed time operation, timing will restart from where it was last stopped, and not
from 0.
The •
v Left Dial Hand indicates the 1/20-second count for the first 30 seconds of
a stopwatch elapsed time operation. After that, the hand stops at 0. 1/20-second
timing continues internally after the first 30 seconds, and the
v Left Dial Hand will
jump to the current value whenever B (Stop) or D (Split) is pressed.
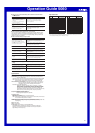
Using the Countdown Timer
The countdown timer can be configured to start automatically at a preset time, and
sound an alarm when the end of the countdown is reached.
Hand Functions
x Second Hand:
Moves counter-clockwise to countdown the seconds.
Automatically switches to clockwise movement after
the end of the countdown is reached to count up the
seconds of the elapsed time operation.
v Left Dial Hand: Points to TMR.
n Right Dial Hands:
Move counter-clockwise to countdown the hours and
minutes. Automatically switch to clockwise movement
after the end of the countdown is reached to count up
the hours and minutes of the elapsed time operation.
@
>
6
To specify the countdown start time
Use 1. C to move the
v Left Dial Hand to TMR.
After confirming that the 2.
x Second Hand is stopped (which indicates there is no
ongoing countdown timer operation), press D.
If the •
x Second Hand is moving, press B to stop it and then press D.
Use 3. D (+) and A (–) to specify the countdown start time.
Each press of either button will move the •
n Right Dial Hands one minute.
Holding down • D or A will start high-speed hand movement in the applicable
direction. To stop high-speed hand movement, press any button.
The maximum countdown start time setting is 24 hours. To set a countdown start •
time of 24 hours, move the
n Right Dial Hands to 24.
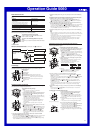
To perform a countdown timer operation
B
B
B B
D
Start Stop (Restart) (Stop) Reset
Before starting a countdown timer operation, check to make sure that the •
countdown timer is not already operating (indicated by a moving
x Second Hand).
If it is, press B to stop it and then D to reset to the countdown start time.
An alarm sounds for 10 seconds when the end of the countdown is reached. This •
alarm will sound in all modes.
While a countdown operation is in progress, the •
x Second Hand and n Right Dial
Hands move counterclockwise. When the end of a countdown is reached, the
x
Second Hand and
n Right Dial Hands change direction and start moving clockwise
to measure elapsed time after the end of the countdown. The elapsed time
operation continues until you press B to stop it.
The maximum time measured by the elapsed time operation that starts after a •
countdown is complete is 23 hours, 59 minutes, 59 seconds.
To stop the alarm
Press any button.
Note
Pressing any button while the alarm is sounding simply stops the alarm sound. •
It does not stop the elapsed time operation that started when the end of the
countdown was reached. To stop the elapsed time operation, press B.
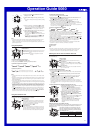
Setting the month
@
Dec
Jan
Feb
Mar
Apr
Jun
May
Nov
Jul
Oct
Sep
Aug
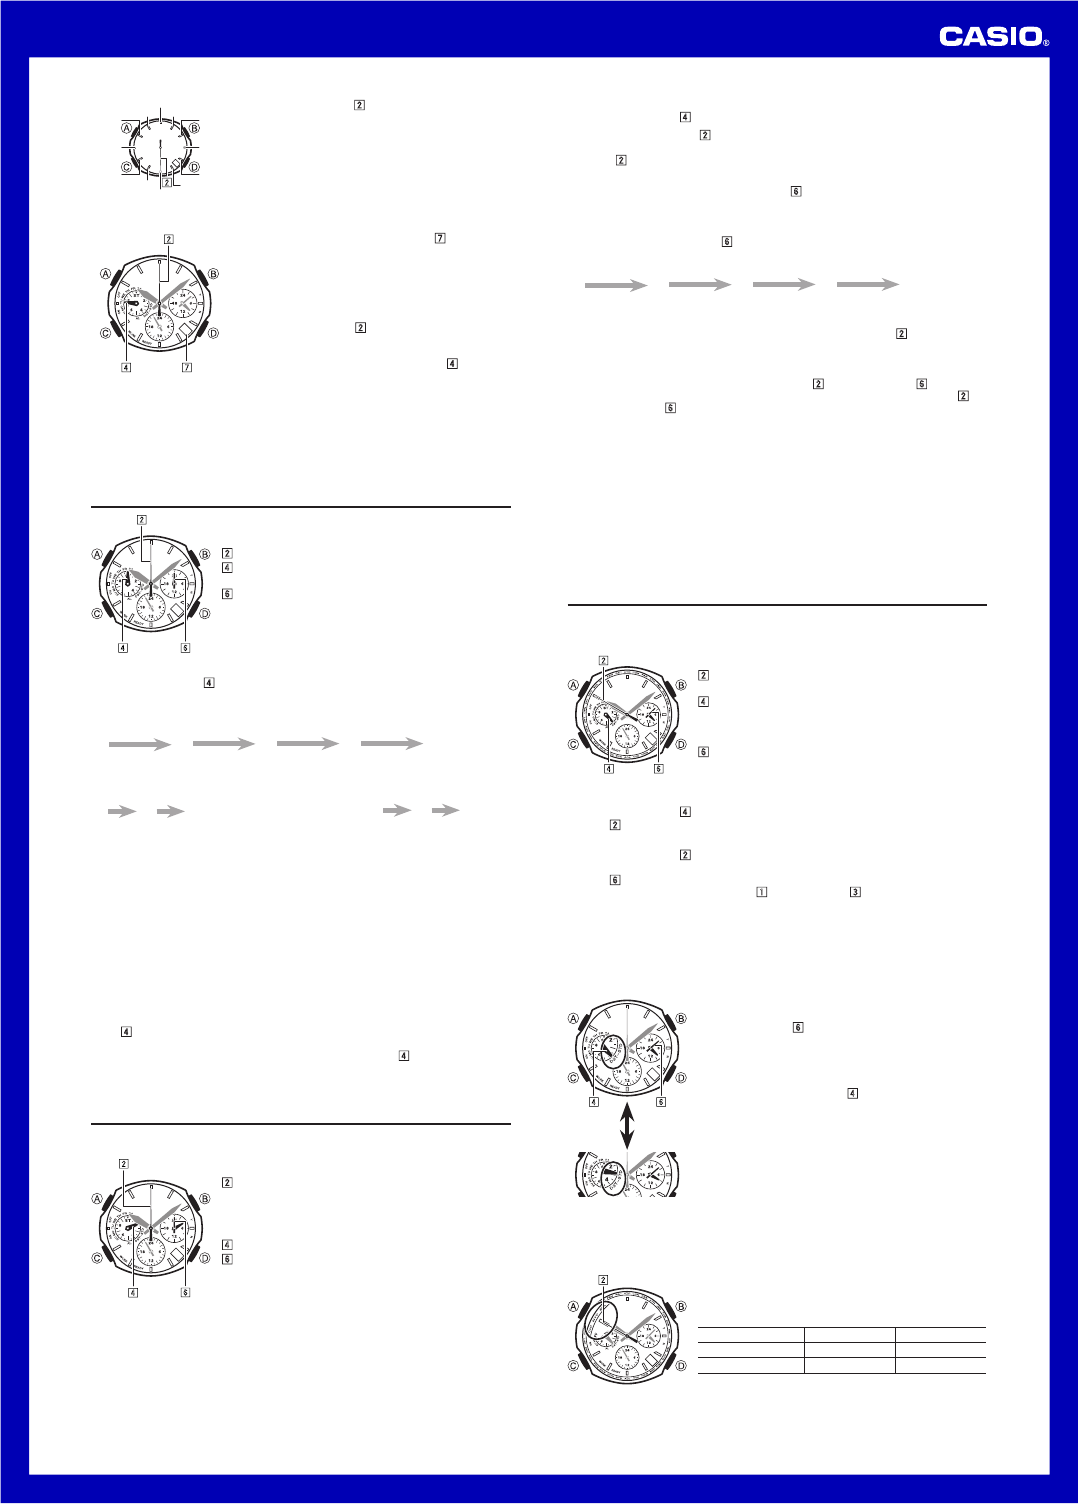
Checking the Current Time in a Different Time Zone
You can use the World Time Mode to view the current time in one of 29 time zones
around the globe. The city that is currently selected in the World Time Mode is called
the “World Time City”.
Hand Functions
x Second Hand:
Indicates the currently selected World Time City.
v Left Dial Hand:
Indicates the current STD (standard time) or DST
(daylight saving time) setting of the currently selected
time zone.
n Right Dial Hands:
Indicate the current time in the selected World Time
City in 24-hour format.
To view the time in another time zone
Use 1. C to move the
v Left Dial Hand to STD or DST.
The •
x Second Hand will move to the city code of the currently selected World
Time City.
Use 2. D to move the
x Second Hand to the city code you want to select as the
World Time City.
The •
n Right Dial Hands will move to the current time in the time zone of the
current city code. At this time, the
z Hour Hand and c Minute Hand will
continue to indicate the current time in the Home City.
For full information on city codes, see the “City Code Table”. •
If you think that the time indicated for the selected time zone is not correct, it •
probably means that there is something wrong with your Home City settings.
Use the procedure under “To configure Home City settings” to correct the Home
City settings.
To specify standard time or daylight saving time (DST) for a city
In the World Time Mode, use 1. D to select the city code
whose setting you want to change.
Wait until the •
n Right Dial Hands complete their
move to the time in the currently selected World
Time City. You will not be able to perform step 2 of
this procedure until the hands stop moving.
Hold down 2. A for about two seconds until the watch
beeps. This will cause the v Left Dial Hand to
toggle between DST (daylight saving time) and STD
(standard time).
Note that you cannot switch between • STD (standard
time)/DST (daylight saving time) while UTC is
selected as the World Time City.
Note that the • STD (standard time)/DST (daylight
saving time) setting affects only the currently
selected time zone. Other time zones are not
affected.
Swapping your Home City and World Time City
You can use the procedure below to swap your Home City and World Time City. This
capability can come in handy when you frequently travel between two locations in
different time zones.
The following example shows what happens when the
Home City and World Time City are swapped while the
Home City originally is TYO (Tokyo) and the World Time
City is NYC (New York).
Home City World Time City
Before swapping TYO NYC
After swapping NYC TYO
@
> 6
@
6>
Hold down
A for two
seconds