


Operation Guide 5022
4
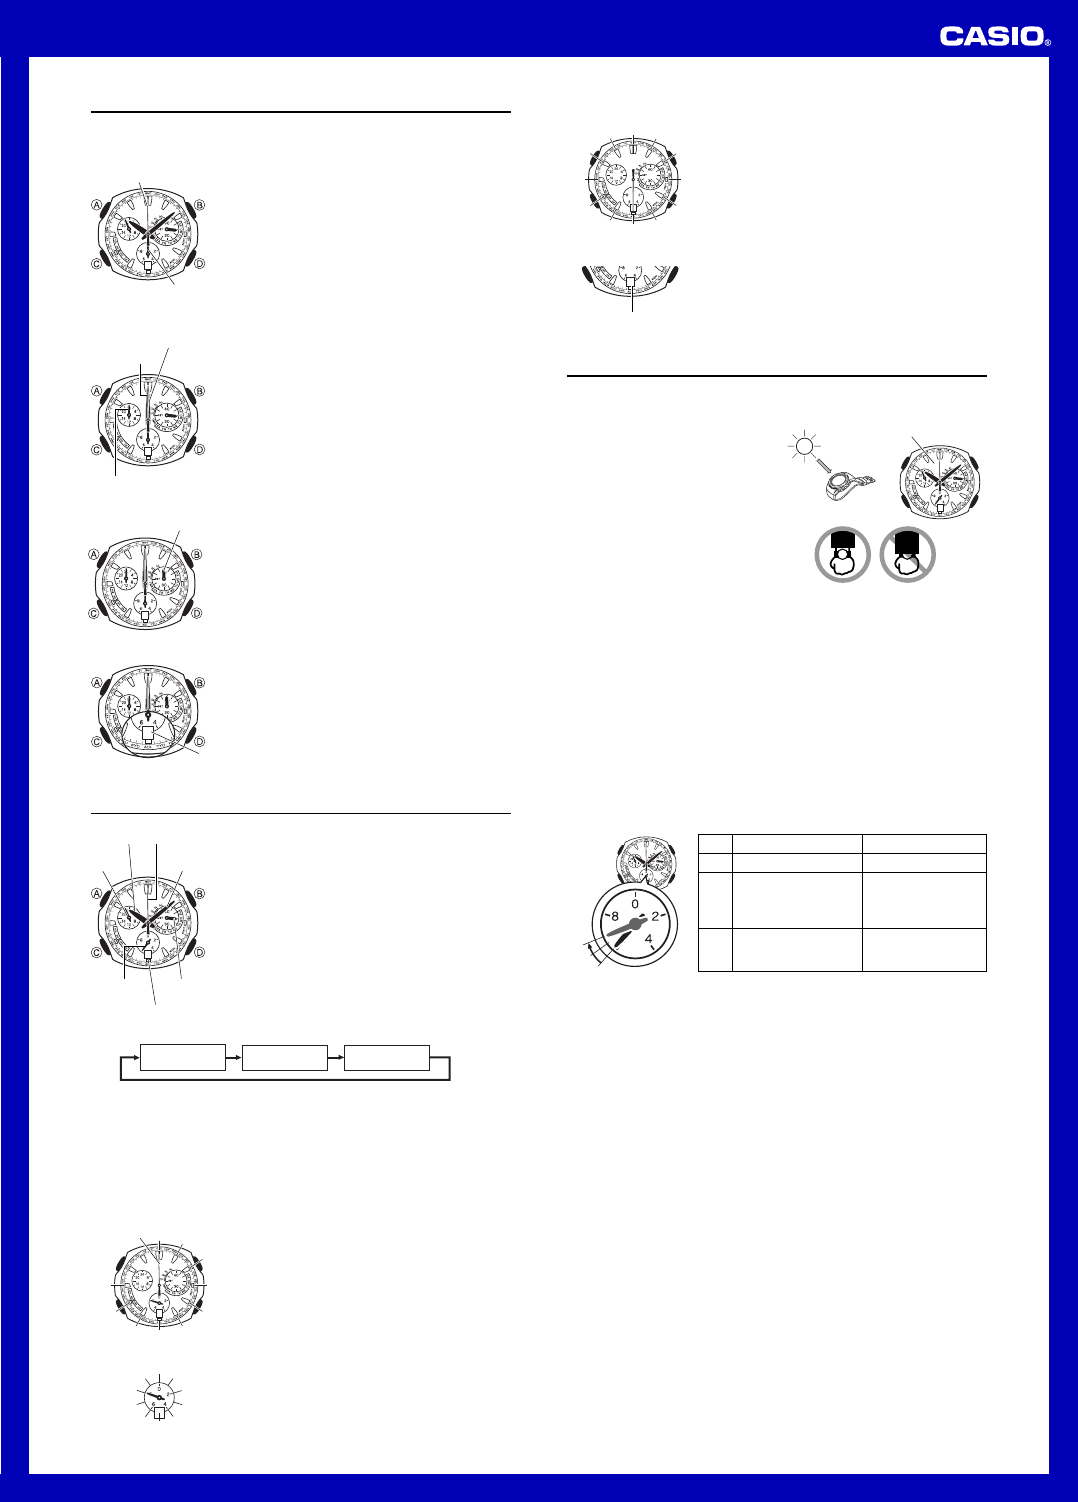
Adjusting the Home Positions
If the time and date settings are wrong even after the time calibration signal is
received normally, use the following procedure to adjust their home positions.
To adjust the home positions
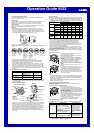
1.In the Timekeeping Mode, as you hold down A, hold
down C for about three seconds until the watch beeps.
• This indicates that the watch is in the time and date
home position adjustment mode.
• First is timekeeping second hand and stopwatch
second hand home position adjustment.
• If the timekeeping second hand moves to “0”, it is in
the correct home position. If it doesn’t, use D to
move the timekeeping second hand to “0”.
• The stopwatch second hand is also in the proper
home position if it moves to 12 o’clock. If it doesn’t,
press B to move it to 12 o’clock.
30
Stopwatch second hand
Timekeeping
second hand
Correct timekeeping second
hand and stopwatch second
hand home positions
2.After confirming that the timekeeping second hand and
stopwatch second hand are both at the proper home
positions, press C.
This will switch to hour hand and minute hand home
position adjustment.
• The hour hand and minute hand are at their proper
home positions if they both move to 12 o’clock, and if
the 24-hour hand is pointing at hour 24. If the hands
are not positioned correctly, use D (+) and B (–) to
move all three hands to their proper home positions.
• The 24-hour hand moves in accordance with the hour,
minute, and second settings. As you set the time, take
care to ensure that the 24-hour hand also is at the
correct position.
3.After confirming that the hour and minute hands are in
the correct home position, press C. This will advance
to day of the week hand home position adjustment.
30
Minute hand
Hour hand
24-hour hand
Correct hour and minute
hand home position
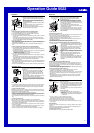
• The day of the week hand is in the correct home
position if it is pointing at 0 (or 60). If it isn’t, use D
(+) and B (–) to move the hand to 0 (or 60).
4.After confirming that the day of the week hand is in the
correct home position, press C. This will advance to
date home position adjustment.
• The date is in the correct home position if it shows “1”.
If it doesn’t, use D (+) and B (–) to change the date
to “1”.
• Pressing C here will return to the timekeeping
second hand and stopwatch second hand home
position adjustment in step 1 of this procedure.
5.Press A to return to the Timekeeping Mode.
• After you complete the home position adjustment
procedure, place the watch in a location that allows
good time calibration signal reception, and then perform
a manual receive operation. See “To perform manual
receive” for more information.
30
1
1
Date
Day of the week hand
Correct day of the week
hand home position
Correct date home position
Timekeeping
Use the Timekeeping Mode to set and view the current
time and date. This section also explains how to set the
current date and time manually.
• All of the operations in this section are performed in the
Timekeeping Mode.
To set the time and date manually
1.In the Timekeeping Mode, hold down A for about five
seconds until the watch beeps twice.
• The stopwatch second hand will move to the city code
of the currently selected Home City. This is the city
code setting mode.
• The second hand will stop at “0”.*
* Some models show “60” instead of “0”.
2. Use D to change the Home City setting.
• For full information on city codes, see the “City Code
Table”.
30
Hour hand
Timekeeping
second hand
Minute
hand
24-hour
hand
Day of the
week hand
Stopwatch
second hand
Date
3. Use B to cycle through the DST settings in the sequence shown below.
Auto DST
(AT/AUTO)
DST off (OFF) DST on (ON)
• Auto DST (AT/AUTO) can be selected only while LON, PAR, ATH, HNL, ANC,
LAX, DEN, CHI, NYC, HKG, or TYO is selected as the Home City code. For more
information, see “Daylight Saving Time (DST)”.
• Even after you change the DST setting, you can still use D to select a different
Home City code if you want.
4. After the Home City and DST settings are the way you want, press C.
• This will cause the watch to beep, and the stopwatch second hand and day of the
week hand to move to their 12 o’clock positions.This is the time setting mode.
5. Use D (+) and B (–) to change the time (hour and minute) setting.
• As you set the time, take care to ensure that the 24-hour hand also is at the
correct position.
6.After the time setting is the way you want, press C.
• This will cause the watch to beep and change to the
year setting mode.
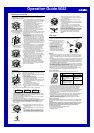
7.Use D and B to change the year setting declination
value.
• Each press of B will move the stopwatch second
hand and change the year setting in 10-year units.
• Each press of D will move the timekeeping second
hand and change the year setting in one -year units.
00
10
20
3
0
40
50
60
70
80
90
Setting the year (10-year units)
Stopwatch
second
hand
Setting the year
(1-year units)
0
1
2
3
4
5
6
7
8
9
30
Date
Setting the date
8.After the year setting is the way you want, press C.
• This will cause the watch to beep and change to the
month setting mode.
9.Use D to move the stopwatch second hand to the
month setting you want.
10.After the month setting is the way you want, press C.
• This will cause the watch to beep and change to the
date setting mode.
11.Use D (+) and B (–) to change the date setting.
• Pressing C will return to the time setting mode.
12.After all the settings are the way you want, press A to
return to the Timekeeping Mode.
• Pressing A any time during the above procedure will
return to the Timekeeping Mode, where the timekeeping
second hand will resume timekeeping from second 0.
• The day of the week is displayed automatically in
accordance with the date (year, month, and day)
settings.
Setting the month
Dec
Jan
Feb
Ma
r
Apr
May
Jun
Jul
Aug
Sep
Oct
Nov
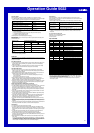
Power Supply
This watch is equipped with a solar cell and a special rechargeable battery (secondary
battery) that is charged by the electrical power produced by the solar cell. The
illustration shown below shows how you should position the watch for charging.
Example:Orient the watch so its face is
pointing at a light source.
• The illustration shows how to position
a watch with a resin band.
• Note that charging efficiency drops
when any part of the solar cell is
blocked by clothing, etc.
• You should try to keep the watch
outside of your sleeve as much as
possible. Even if the face of the watch
is blocked from light only partially,
charging will be reduced significantly.
30
Solar cell
Important!
• Storing the watch for long periods in an area where there is no light or wearing it in
such a way that it is blocked from exposure to light can cause rechargeable battery
power to run down. Make sure that the watch is exposed to bright light whenever
possible.
• This watch uses a special rechargeable battery to store power produced by the solar
cell, so regular battery replacement is not required. However, after very long use, the
rechargeable battery may lose its ability to achieve a full charge. If you experience
problems getting the special rechargeable battery to charge fully, contact your dealer
or CASIO distributor about having it replaced.
• The special rechargeable (secondary) battery used by your watch is not intended to
be removed or replaced by you. Use of a rechargeable battery other than the special
one specified for this watch can damage the watch.
• The current time and all other settings return to their initial factory defaults whenever
battery power drops to Level 3 and when you have the battery replaced.
• Keep the watch in an area normally exposed to bright light when storing it for long
periods. This helps to keep the rechargeable battery from going dead.
Battery Power Levels
The movement of the analog hands indicates the current battery power level.
Jumps two seconds
30
Hand Movement
Normal.
• Second hand jumps
every 2 seconds.
• Date changes to home
position.
• Second hand stopped.
• Hour and minute hands
stopped at 12 o’clock.
Level
1
2
3
Function Status
All functions enabled.
Beeper and time
calibration signal
reception disabled.
All functions disabled.
• The second hand jumping every two seconds (Level 2) indicates that battery power
is quite low. Expose the watch to light as soon as possible to charge the battery.
• When battery power is at Level 2, time calibration signal reception is disabled.
• At Level 3, all functions are disabled and settings return to their initial factory
defaults. The watch will continue to keep time internally for about one month after the
battery drops to Level 3. If you recharge the battery sufficiently during this period,
the analog hands will move automatically to the correct setting and normal
timekeeping will resume.
• Alarm operation can cause hand movement to stop due to a sudden temporary drop
in battery power. This does not indicate malfunction, and normal operation will
resume when the watch is exposed to light. Though hand movement stops,
timekeeping continues internally, and the hands will be adjusted to the correct
setting when normal operation returns.
Charging Precautions
Certain charging conditions can cause the watch to become very hot. Avoid leaving
the watch in the areas described below whenever charging its rechargeable battery.
Warning!
Leaving the watch in bright light to charge its rechargeable battery can cause it
to become quite hot. Take care when handling the watch to avoid burn injury.
The watch can become particularly hot when exposed to the following
conditions for long periods.
• On the dashboard of a car parked in direct sunlight
• Too close to an incandescent lamp
• Under direct sunlight