


Operation Guide 4734 4735
4
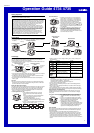
Illumination
This watch has an EL (electro-luminescent) panel that
causes the entire display to glow for easy reading in the
dark. The watch’s auto light switch turns on illumination
automatically when you angle the watch towards your
face.
• The auto light switch must be turned on (indicated by
the auto light switch on indicator) for it to operate.
• See “Illumination Precautions” for other important
information about using illumination.
To turn on illumination manually
In any mode (except when a setting screen is on the
display), press B to illuminate the display for about one
second.
• The above operation turns on illumination regardless of
the current auto light switch setting.
Auto light switch
on indicator
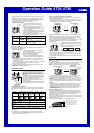
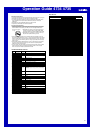
About the Auto Light Switch
Turning on the auto light switch causes illumination to turn on, whenever you position
your wrist as described below in any mode, except for the Hand Setting Mode setting
screen.
Moving the watch to a position that is parallel to the ground and then tilting it towards
you more than 40 degrees causes illumination to turn on.
• Wear the watch on the outside of your wrist.
Parallel to
ground
More than
40°
Warning!
••
••
• Always make sure you are in a safe place whenever you are reading the
display of the watch using the auto light switch. Be especially careful when
running or engaged in any other activity that can result in accident or injury.
Also take care that sudden illumination by the auto light switch does not
startle or distract others around you.
••
••
• When you are wearing the watch, make sure that its auto light switch is turned
off before riding on a bicycle or operating a motorcycle or any other motor
vehicle. Sudden and unintended operation of the auto light switch can create a
distraction, which can result in a traffic accident and serious personal injury.
To turn the auto light switch on and off
In the Timekeeping Mode, hold down D for about three seconds to toggle the auto
light switch on (
displayed) and off ( not displayed).
• The auto light switch on indicator (
) is on the display in all modes while the auto
light switch is turned on.
• In order to protect against running down the battery, the auto light switch will turn off
automatically approximately six hours after you turn it on. Repeat the above
procedure to turn the auto light switch back on if you want.
Reference
This section contains more detailed and technical information about watch operation.
It also contains important precautions and notes about the various features and
functions of this watch.
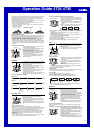
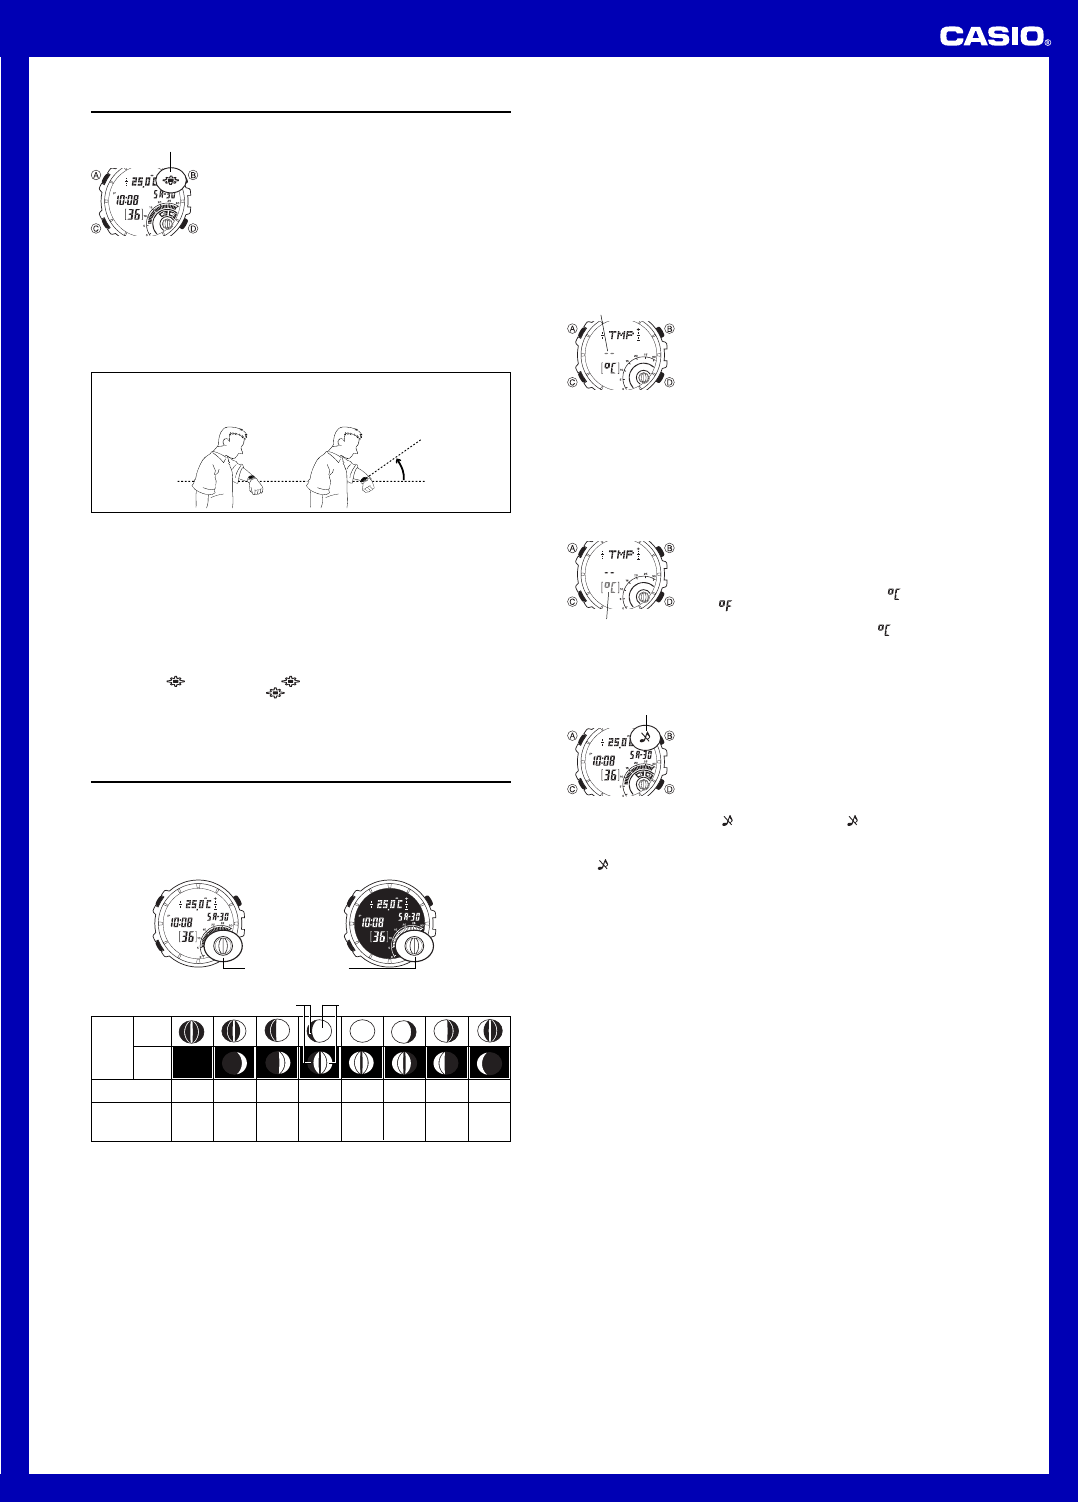
Moon Phase Indicator
The Moon phase indicator of this watch indicates the current phase of the Moon as
shown below.
Moon phase indicator
Module 4734 Module 4735
0.0 - 1.8
1.9 - 5.5 5.6 - 9.2 9.3 - 12.9 13.0 - 16.6
16.7 - 20.2
20.3 - 23.9 24.0 - 27.6
27.7 - 29.5
• The Moon phase indicator shows the Moon as viewed at noon from a position in the
Northern Hemisphere looking south. Note that at times the image shown by the
Moon phase indicator may differ from that of the actual Moon in your area.
• The left-right orientation of the Moon phase is reversed when viewing from the
Southern Hemisphere or from a point near the equator.
Moon
Phase
Indicator
Moon Age
Moon Phase
New
Moon
First
Quarter
(Waxing)
Full
Moon
Last
Quarter
(Waning)
Moon phase (part you can see)
(part you cannot see)
Module
4734
Module
4735
Moon Phases and Moon Age
The Moon goes through a regular 29.53-day cycle. During each cycle, the Moon
appears to wax and wane as the relative positioning of the Earth, Moon, and Sun
changes. The greater the angular distance between the Moon and the Sun,* the more
we see illuminated.
* The angle to the Moon in relation to the direction at which the Sun is visible from the
Earth.
This watch performs a rough calculation of the current Moon age starting from day 0
of the moon age cycle. Since this watch performs calculations using integer values
only (no fractions), the margin for error of the displayed Moon age is ± 1 day.
Thermometer
Temperature Sensor Calibration
The temperature sensor built into the watch is calibrated at the factory and normally
requires no further adjustment. If you notice serious errors in the temperature readings
produced by the watch, you can calibrate the sensor to correct the errors.
Important!
Incorrectly calibrating the temperature sensor can result in incorrect readings.
Carefully read the following before doing anything.
•
Compare the readings produced by the watch with those of another reliable and
accurate thermometer.
•
If adjustment is required, remove the watch from your wrist and wait for 20 or 30
minutes to give the temperature of the watch time to stabilize.
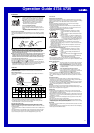
To calibrate the temperature sensor
1. In the Timekeeping Mode, hold down A until the
seconds start to flash, which indicates the setting
screen.
2. Press C nine times to display the temperature sensor
calibration screen.
3. Use D (+) and B (–) to change the calibration value.
• You can change the value in 0.1°C (0.2°F) steps, in a
range of ±10°C (±18°F). The calibration value shows
‘‘--.-’’ when the setting is outside the allowable range.
• To return the calibration value to its default (no calibration, indicated by ‘‘- -’’),
press D and B at the same time.
• Temperature sensor calibration will not be possible if the current reading is
outside the allowable display range (–10.0°C/14.0°F to 60.0°C/140.0°F) and the
calibration value shows ‘‘- -’’.
• Setting a sensor calibration value does not affect temperature values that are
already stored in memory.
4. After configuring the setting you want, press A twice to exit the setting screen.
l
l
l
l
l
l
l
l
l
l
l
l
l
l
Calibration value
To specify the temperature display unit
1. In the Timekeeping Mode, hold down A until the
seconds start to flash, which indicates the setting
screen.
2. Press C 10 times to display the temperature unit
setting screen.
3. Use D to switch between Celsius (
) and Fahrenheit
(
).
• The initial factory default and the initial default after
battery replacement is Celsius (
).
4. After configuring the setting you want, press A twice to exit the setting screen.
• The temperature display unit setting you select is also applied to temperature values
that are already stored in memory.
l
l
l
l
l
l
l
l
l
l
l
l
l
l
Temperature unit
Button Operation Tone
The button operation tone sounds any time you press one
of the watch’s buttons. You can turn the button operation
tone on or off as desired.
• Even if you turn off the button operation tone, the alarm,
Hourly Time Signal, and Countdown Timer Mode alarm
all operate normally.
To turn the button operation tone on and off
In any mode (except when a setting screen is on the
display), hold down C to toggle the button operation tone
on (
not displayed) and off ( displayed).
• Since the C button is also the mode change button, holding it down to turn the
button operation tone on or off also causes the watch’s current mode to change.
• The
indicator is displayed in all modes when the button operation tone is turned
off.
Mute indicator
Auto Return Feature
• If you leave a screen with flashing digits on the display without performing any
operation for two or three minutes, the watch saves any settings you have made up
to that point and exits the setting screen automatically.
• The watch will change to the Timekeeping Mode automatically if you do not perform
any operation in the Hunting/Fishing Mode, Temperature Data Recall Mode, Alarm
Mode, or Hand Setting Mode for two or three minutes.
Scrolling
The B and D buttons are used in various modes and setting screens to scroll
through data on the display. In most cases, holding down these buttons during a scroll
operation scrolls through the data at high speed.
Timekeeping
• Resetting the seconds to 00 while the current count is in the range of 30 to 59
causes the minutes to be increased by 1. In the range of 00 to 29, the seconds are
reset to 00 without changing the minutes.
• With the 12-hour format, the P (PM) indicator appears on the display for times in the
range of noon to 11:59 p.m. and the A (AM) indicator appears for times in the range
of midnight to 11:59 a.m.
• With the 24-hour format, times are displayed in the range of 0:00 to 23:59, without
any indicator.
• The year can be set in the range of 2000 to 2099.
• The watch’s built-in full automatic calendar makes allowances for different month
lengths and leap years. Once you set the date, there should be no reason to change
it except after you have the watch’s batteries replaced.
World Time
• The seconds count of the World Time is synchronized with the seconds count of the
Timekeeping Mode.
• All World Time Mode times are calculated from the current time in the Timekeeping
Mode using UTC time differential values.