


Operation Guide 4723
3
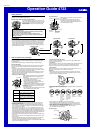
Alarm
When the alarm is turned on, the alarm sounds when the
alarm time is reached.
• All of the operations in this section are performed in the
Alarm Mode, which you enter by pressing C.
To set an alarm time
1.In the Alarm Mode, hold down A for two seconds to
display the setting mode.
2.Use B to change the alarm time.
• Press B to move the hands clockwise in one-minute
steps.
3.After setting the alarm time, press A to exit the setting
mode.
• Setting the alarm time causes the alarm to turn on
automatically.
Alarm time minute hand
On/Off status
Alarm time
hour hand
Alarm time 24-
hour hand
Alarm Operation
The alarm tone sounds at the preset time for 10 seconds, regardless of the mode the
watch is in.
• Alarm operations are performed in accordance with the Timekeeping Mode time.
• Pressing any button stops the alarm tone operation.
To toggle an alarm on and off
In the Alarm Mode, press B to toggle the alarm ON and OFF.
• The watch will beep when you turn on the alarm.
Adjusting the Home Positions
• If the time and date settings are wrong even after the time calibration signal is
received normally, use the following procedure to adjust their home positions.
• You can use the procedure in this section to adjust the position of the second hand,
the stopwatch minute hand and stopwatch 1/20 second hand whenever they do not
align with the 12 o’clock position when you enter the Hand Setting Mode.
To adjust the home positions
1.In the Timekeeping Mode, press C four times to enter
the Hand Setting Mode.
2.Hold down A until 0 0 starts to flash, which indicates
the analog setting screen.
• The second hand is at the proper home position if it
moves to 12 o’clock. If it doesn’t, press B to move it
to 12 o’clock.
l
l
l
l
l
l
l
l
l
l
l
l
l
l
l
l
l
l
l
l
l
Second hand
3.After confirming that the second hand is at the proper
home positions, press C. This will switch to hour hand
and minute hand home position adjustment (Hm
flashed).
• The hour hand and minute hand are at their proper
home positions if they both move to 12 o’clock, and if
the 24-hour hand is pointing at hour 24. If the hands
are not positioned correctly, use B to move them to
their proper home positions.
4.After confirming that the hour hand and minute hand
are both at their proper home positions, press C.
This will switch to stopwatch 1/20 second hand home
position adjustment (20 flashed).
• The stopwatch 1/20 second hand is at the proper
home position if it moves to 0 position. If it doesn’t,
use B to move it to 0 position.
l
l
l
l
l
l
l
l
l
l
l
l
l
l
l
l
l
l
l
l
l
l
l
l
l
l
l
l
l
l
l
l
l
l
l
l
l
l
l
l
l
l
Minute hand Hour hand
Stopwatch 1/20 second hand
5.After confirming that the stopwatch 1/20 second hand is
at the proper home positions, press C. This will switch
to stopwatch minute hand home position adjustment
(60 flashed).
• The stopwatch minute hand is at the proper home
position if it moves to 60 position.If it doesn’t, use B
to move it to 60 position.
6.Press A to exit the setting screen.
• After you complete the home position adjustment
procedure, place the watch in a location that allows
good time calibration signal reception, and then perform
a manual receive operation. See “To perform manual
receive” for more information.
l
l
l
l
l
l
l
l
l
l
l
l
l
l
l
l
l
l
l
l
l
Stopwatch minute hand
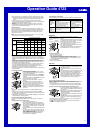
Timekeeping
Use the Timekeeping Mode to set and view the current
time and date. This section also explains how to set the
current date and time manually.
• All of the operations in this section are performed in the
Timekeeping Mode, which you enter by pressing C.
Hour hand
Date
Minute hand
Second hand
24-Hour hand
Setting the Time and Date Manually
Make sure you select your Home Time Zone before you change the current time and
date settings. Dual Time Mode times are all displayed in accordance with the
Timekeeping Mode settings. Because of this, Dual Time Mode times will not be correct
if you do not select the proper Home Time Zone before setting the time and date in the
Timekeeping Mode.
• When setting the time and date, you can also configure settings for your Home Time
Zone (the time zone where you normally use the watch) and summer time (Daylight
Saving time or DST).
To set the time and date manually
1.In the Timekeeping Mode, hold down A until the GMT
differential value starts to flash, which indicates the
setting screen.
• The second hand will move at high speed to the 12
o’clock position, where it will stop.
l
l
l
l
l
l
l
l
l
l
l
l
l
l
l
l
l
l
l
l
l
DST indicator
GMT differential value
: +2.0 : -4.0
Minus sign
• The GMT differential value indicates the time difference in hours between
Greenwich Mean Time and the currently selected time zone.
• The DST indicator indicates that Daylight Saving Time (summer time) is turned on
for the currently selected time zone.
2. Use B to select the time zone you want to use as your Home Time Zone.
• For full details about GMT differential values, see the “Time Zone Table”.
3. Press C to move the flashing in the sequence shown below to select other
settings.
GMT differential
value
DST
Day
Minutes
YearMonth
4. When the setting you want to change is flashing, use B to change it as described
below.
To do this:
Change the time zone
Toggle between Daylight Saving Time ( ),
Standard Time ( ), or Auto DST ( )
Change the minutes (time)
Change the year
Change the month
Change the day
Do this:
Use B.
Press B.
Use B.
Use B.
Press B.
Press B.
5. Press A to exit the setting screen.
• When you exit the setting screen, the analog hands are adjusted automatically to
match the digital time.
Screen
• Auto DST ( ) can be selected only while +0.0, +1.0, or +2.0 (+1.0, +2.0, or +3.0
while DST is turned on) is selected as the Home Time Zone. For more information,
see “Daylight Saving Time (DST)” below.
Daylight Saving Time (DST)
Daylight Saving Time (summer time) advances the time setting by one hour from
Standard Time. Remember that not all countries or even local areas use Daylight
Saving Time.
The time calibration signals include both Standard Time and DST data. When the auto
DST setting is turned on, the watch switches between Standard Time and DST
(summer time) automatically in accordance with the signal it receives.
• The auto DST setting can be turned on only while +0.0, +1.0, or +2.0 (+1.0, +2.0, or
+3.0 while DST is turned on) is selected as the Home Time Zone.
• If you experience problems receiving the time calibration signal in your area, it is
probably best to switch between Standard Time and Daylight Saving Time (summer
time) manually.
To change the Daylight Saving Time (summer time) setting
1. In the Timekeeping Mode, hold down A until the GMT differential value starts to
flash, which indicates the setting screen.
2. Press C to display the DST setting screen.
3. Press B to cycle through the DST settings in the sequence shown below.
Auto DST ( ) DST off ( ) DST on ( )
4. Press A to exit the setting screen.
• The DST indicator appears on the display to indicate that Daylight Saving Time is
turned on.
• Turning on DST causes the GMT differential value to be increased by one.
Illumination
An LED (light-emitting diode) illuminate the face of the
watch for easy reading in the dark. The watch’s auto light
switch illuminates the face automatically when you angle
the watch towards your face.
• The auto light switch must be turned on for it to operate.
• See “Illumination Precautions” for other important
information.
To illuminate the face of the watch
In Timekeeping mode (except when a setting screen is on
the display), press B to illuminate the face of the watch.
• The above operation turns on illumination regardless of
the current auto light switch setting.
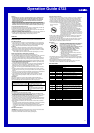
About the Auto Light Switch
Turning on the auto light switch causes the face to illuminate, whenever you position
your wrist as described below in any mode. Note that this watch features an “Auto LED
Light,” so the auto light switch operates only when available light is below a certain
level. It does not illuminate the face under bright light.
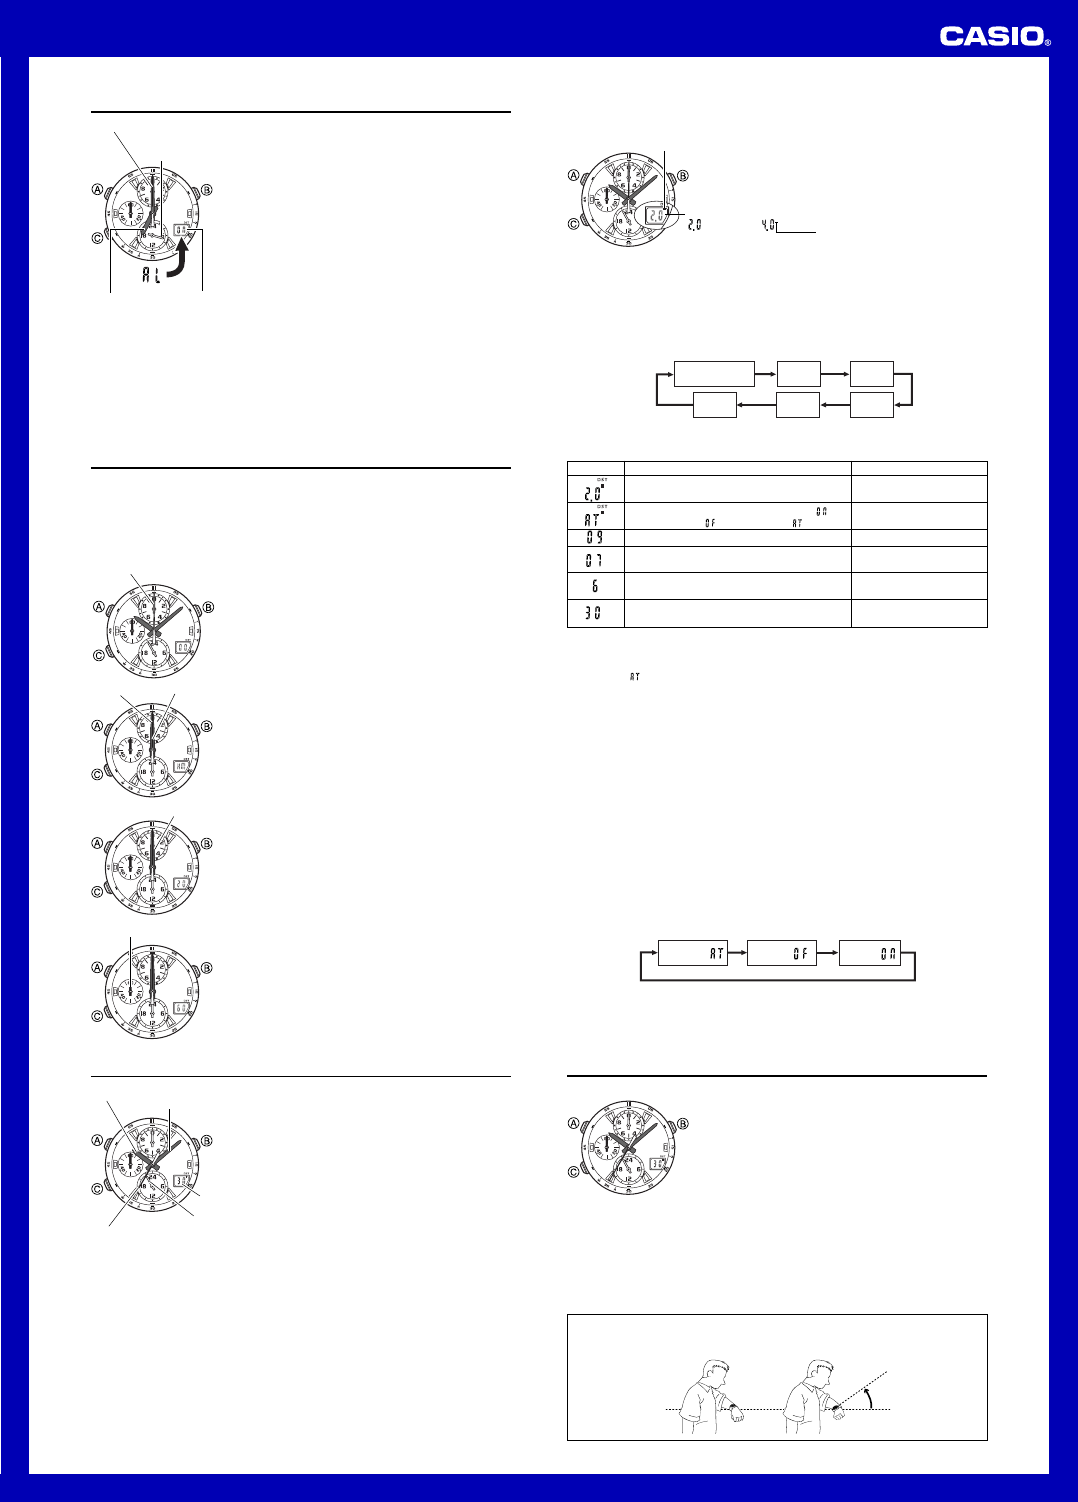
Moving the watch to a position that is parallel to the ground and then tilting it
towards you at more than 40 degrees causes illumination to turn on.
• Wear the watch on the outside of your wrist.
Parallel to
ground
More than
40°