


Operation Guide 3417/3418
E-49
●
3
Press
D
to toggle the illumination duration setting between [LT1]
(1.5seconds) and [LT3] (3 seconds).
●
4
To return to the Timekeeping Mode, press
A
.
E-48
To specify the illumination duration
●
1
In the Timekeeping Mode, hold down
A
for about
two seconds until the time zone setting screen
appears.
●
2
Press
C
10 times to display the illumination
duration setting screen.
See “Confi guring Current Time and Date Settings
Manually” (page E-19).
The screen will show either [LT1] or [LT3].
E-47
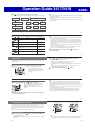
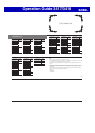
◆ Auto Light Precautions
x The Auto Light may not operate properly when the watch is angled towards your
face from an angle greater than about 15 degrees as shown in the illustration
below.
x Leaving Auto Light enabled can run down the watch’s battery
due to frequent display illumination.
x Electro-static charge or magnetism can interfere with proper Auto
Light operation. If this happens, try lowering your arm and then
angle it towards your face again.
x When moving the watch you may note a slight rattling sound.
This is due to operation of Auto Light, which determines the
current orientation of the watch. It does not indicate malfunction.
x Auto Light will remain enabled for about 6 hours after you turn it
on. After that Auto Light will disable automatically.
E-46
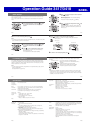
◆ To enable/disable Auto Light
●
In the Timekeeping Mode, hold down
L
for at least
three seconds.
This will toggle Auto Light between enabled (LT
indicator displayed) and disabled (no indicator
displayed).
Auto Light indicator
E-45
Using Auto Light
When Auto Light is enabled, angling the watch towards your face at an angle of 40˚
or greater will illuminate the display automatically.
40˚ or greater
Note
x Auto Light is disabled automatically while an alarm is sounding.
E-44
Illumination
You can use the procedure below to illuminate the display for easy reading in the
dark. The watch also has an Auto Light function that illuminates the display whenever
the watch is angled towards your face for reading.
To illuminate the display
●
Press
L
to illuminate the display.
Note
x Illumination will turn off automatically if it is on when an alarm alert, incoming
call alert, or any alert operation starts.
◆ Light Use Precautions
Frequent use of the light can shorten battery life.
E-43
Note
x A tone/vibration alert is performed for about 10 seconds when the end of the
countdown is reached, and the display returns to the screen that was shown
before the countdown was started.
x Even if you exit the Timer Mode while a timer countdown is ongoing, the
countdown will continue and the tone/vibration alert operation will be
performed when the end of the countdown is reached.
To stop a tone/vibration alert operation
●
Double-tapping the center of the watch display or pressing any one of the
buttons will stop an ongoing tone/vibration alert operation.
E-42
●
3
Use
B
and
D
to change the currently fl ashing digits (hours, minutes, or
seconds).
x Holding down either button scrolls the setting at high speed.
x To specify a start time of 100 hours, set the timer to 0H00'00".
●
4
After all the settings are the way you want, press
A
to exit the setting
screen.
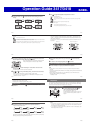
To perform a countdown
●
The following shows button operations for a countdown.
D
D D D B
Start Stop (Restart) (Stop) Reset
E-41
To set the timer start time
●
1
In the Timer Mode, hold down
A
for about two seconds.
[SET Hold] will appear on the display. After that, [SET
Hold] will disappear and the hours digits will fl ash.
Note
x If a timer countdown operation is in progress, press
D to stop it and then press B to reset the timer to
its start time before performing the above step.
x If a timer countdown operation is paused, press B
to reset the timer to its start time before performing
the above step.
●
2
Each press of
C
moves the fl ashing between the hours, minutes, and
seconds digits.
The fl ashing digits are the ones that are selected.
E-40
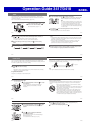
Timer
The timer start time can be set in one-second increments up to 100 hours. The
watch will sound a tone or vibrate for about 10 seconds when the end of the timer
countdown is reached.
See “To change the alarm/timer alert method” (page E-52).
To enter the Timer Mode
●
In the Timekeeping Mode, press
C
fi ve
times to enter the Timer Mode.
See “Using Modes” (page E-14).
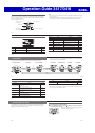
Minutes
Current time
Seconds
Hours
1/10 Second