


Operation Guide 3189/3252
E-10
Backlight Precautions
The backlight uses an EL (electro-luminescent) panel that causes the entire display to
glow for easy reading in the dark.
In any mode, press L to illuminate the display for about two seconds.
• The electro-luminescent panel that provides illumination loses power after very long
use.
• The illumination provided by the backlight may be hard to see when viewed under
direct sunlight.
• The watch may emit an audible sound whenever the display is illuminated. This is
due to vibration of the EL panel used for illumination, and does not indicate
malfunction.
• The backlight turns off automatically whenever an alarm sounds.
• Frequent use of the backlight shortens the battery life.
E-11
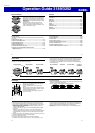
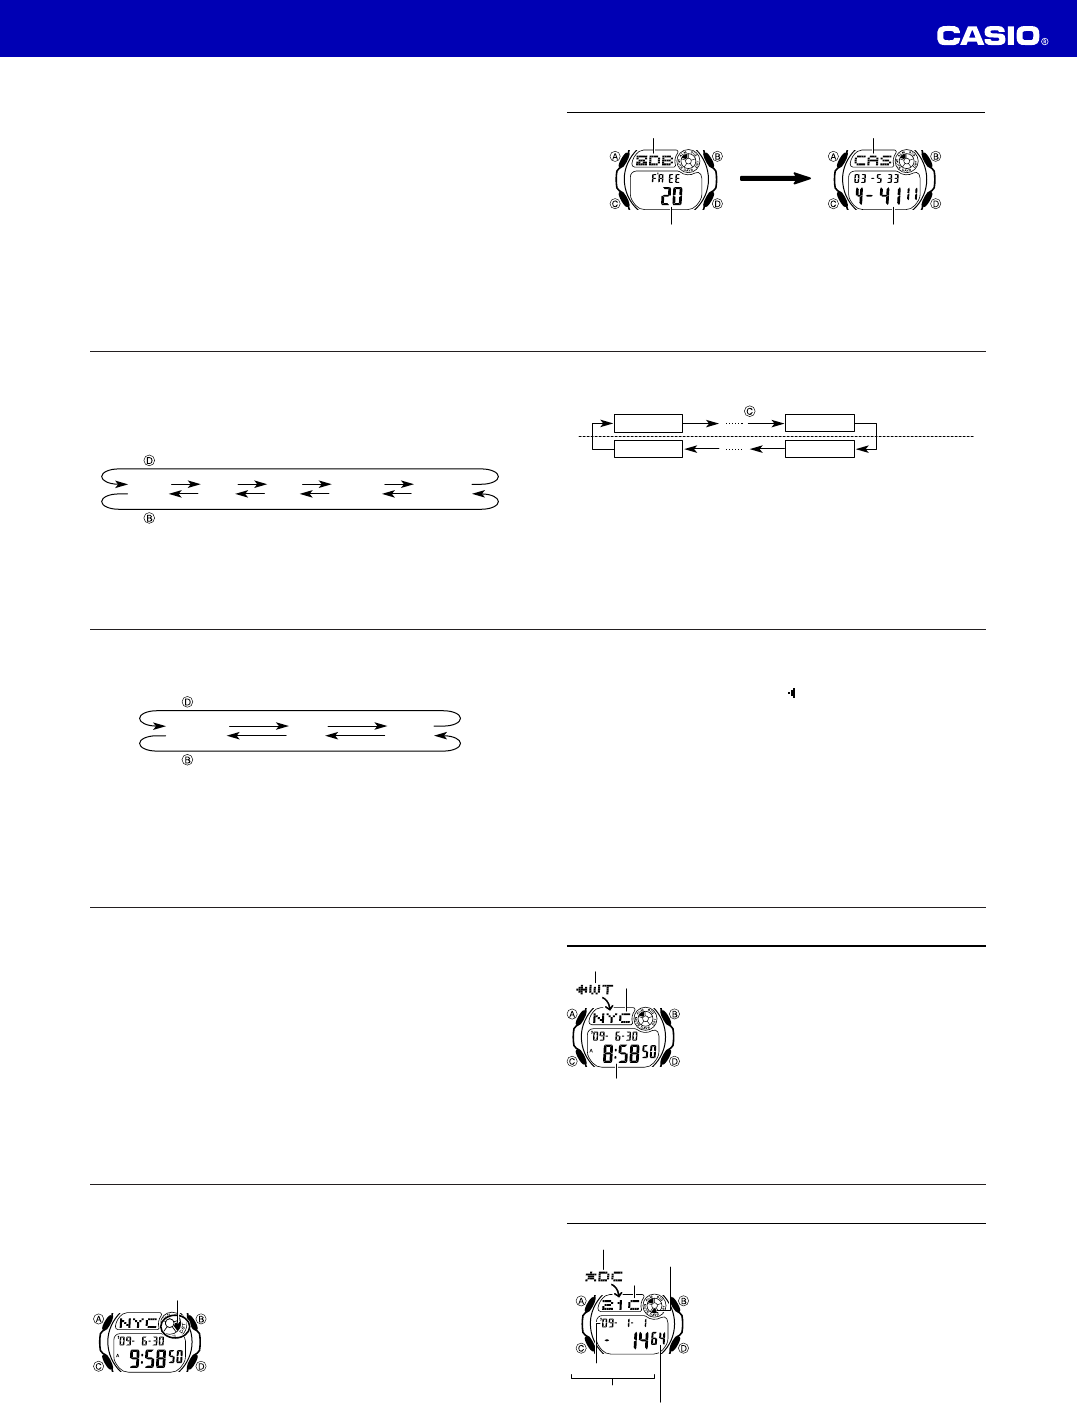
Data Bank
Mode indicator Name area
Remainin
g
free records Number area
Alternate at
the 1-second
interval.
The Data Bank Mode lets you store up to 25 records, each with a name (up to eight
characters) and a phone number (up to 12 digits). Entering the Data Bank Mode displays
a screen that shows the mode name (DB) and remaining memory capacity (number of
records) for a few moments. After that, the record you were viewing the last time you
exited the Data Bank Mode will appear. Anytime you input a new record, all records will
be sorted automatically into alphabetic sequence on the name.*
* A to Z, 0 to 9, symbols (, or -)
E-12
To input a new Data Bank record
1. In the Data Bank Mode, use D (+) and B (–) to scroll through the Data Bank
records and display the one you want to input data.
2. Hold down A until a cursor appears on the name area.
3. Use D and B to scroll through characters at the current cursor position.
Characters scroll in the sequence shown below.
(Space)
A to Z 0 to 9 . (Period)
-
(Hyphen)
Press .
Press .
• Holding down D or B scrolls at high speed.
E-13
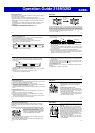
4. When the character you want is at the current cursor position, press C to move the
cursor to the right.
1st digit
8th digit
12th digit
1st digit
Name area
Number area
Press .
5. Repeat the steps 3 and 4 to input the rest of the characters.
• You can input up to eight characters for the name, though only three characters
are visible at a time.
• If the name you input has fewer than eight characters, use C to move the cursor
to the eighth space (which means you would press C three times after inputting
a five-character name).
6. After you input the name, use C to move the cursor to the number area.
• Pressing C while the cursor is located at the eighth character of the name area
advances to the number area. Pressing C while the cursor is located at the 12th
digit of the number area returns to the name area.
E-14
7. Use D and B to scroll through characters (hyphen, numbers, space) at the
current cursor position on the number area. Characters scroll in the sequence
shown below.
(Space)
0 to 9
-
(Hyphen)
Press .
Press .
• Holding down D or B scrolls characters at high speed.
8. When the character you want is at the cursor position, press C to move the cursor
to the right.
9. Repeat steps 7 and 8 to input the rest of the numbers you want.
• You can input up to 12 digits for the number.
E-15
10. After inputting the name and number of the record, press A to store it and exit
the setting screen.
• The display can show only three name characters at a time. Longer names scrolls
continuously from right to left. The symbol “
” indicates that the character to the
left is the last, and the character to the right is the first.
To recall Data Bank records
In the Data Bank Mode, use D (+) and B (–) to scroll through Data Bank records on
the display.
• Holding down B or D scrolls at high speed.
E-16
To edit a Data Bank record
1.
In the
Data Bank
Mode, scroll through the records and display the one you want to edit.
2. Hold down A until the cursor appears in the display.
3. Use C to move the cursor to the character you want to change.
4. Use D and B to change the character.
• See step 3 of “To input a new Data Bank record” for information on inputting name
characters, and step 7 for inputting number characters.
5. After making the changes that you want, press A to store them and exit the setting
screen.
To delete a Data Bank record
1. In the Data Bank Mode, scroll through the records and display the one you want to
delete.
2. Hold down A until the cursor appears in the display.
3. Press B and D at the same time. The message “CLR” appears in the display,
indicating that the record was deleted.
• After the record is deleted, the cursor appears in the name area, ready for input.
4. Input a new record or press A to exit the setting screen.
E-17
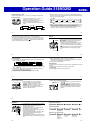
World Time
World Time shows the current time in 30 cities (29 time
zones) around the world.
• All of the operations in this section are performed in the
World Time Mode, which you enter by pressing C
(page E-4).
To view the time in another city code
In the World Time Mode, press D to scroll through city
codes (time zones) to the east or B to scroll to the west.
• For full information about city codes, see the “City Code
Table” at the back of this manual.
• If the current time shown for a city is wrong, check your
Timekeeping Mode time and Home City code settings
and make the necessary changes.
Current time in the zone
of the selected city code
City code
Mode indicator
E-18
Daylight Saving Time (DST) Setting
Daylight Saving Time (summer time) advances the time setting by one hour from
Standard Time. Remember that not all countries or even local areas use Daylight
Saving Time.
To toggle a city code time between Standard Time and Daylight Saving Time
1.In the World Time Mode, use B and D to display the
city code (time zone) whose Standard Time/Daylight
Saving Time setting you want to change.
2.Hold down A for about one second to toggle between
Daylight Saving Time (DST indicator displayed) and
Standard Time (DST indicator not displayed).
DST indicator
• The DST indicator will appear on the display whenever you display a city code for
which Daylight Saving Time is turned on.
• Note that the DST/Standard Time setting affects only the currently displayed city
code. Other city codes are not affected.
E-19
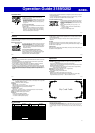
Day Counter
The Day Counter Mode lets you count the number of days
from the Timekeeping Mode’s current date to a specific
target date.
This watch has five day counters. You can assign text
titles up to eight characters long to each of the five Day
Counters. Whenever the date specified by any one of the
day counters matches the date of the Timekeeping Mode
(regardless of the day counter’s year setting), the DAYS
indicator flashes on the Timekeeping Mode screen. In the
Day Counter Mode, the DAYS indicator flashes on the
screen of the particular day counter whose date matches
the date of the Timekeeping Mode.
• The day counter on the display when you exit the Day
Counter Mode appears first the next time you enter the
Day Counter Mode.
Year – Month – Day
Target date
Text
DAYS indicator
Numbers of days
Mode indicator